What's new in iCompta 5 ?
There are a lot of changes in iCompta 5 if you've already been using a previous version of iCompta so here is a short list of major new features.
More kind of accounts supported
iCompta can now manage checking, credit card, savings, cash, assets, loan and investment accounts. You can learn more about accounts here.
There is also a new reconciliation panel that allows you to reconcile easily with your bank statements.
A new scheduler
The scheduler has completely changed and is now the place to create and manage repeating and/or future transactions. Unlike previous versions of iCompta repeating transactions are not directly included in their accounts, only their occurrences are. In addition to that you can no longer tell when to create automatically the next occurrence of a repeating transaction (a week before, at the start of the month, etc.). Instead, you just set the date until which you want to see all planned transactions.
You can tell iCompta to update this date automatically to the current date or the end of the (week | month | year) plus a given duration.
Investments
You can now manage securities and monitor your portfolio. More info in the investments section.
Enhanced reports
Reports have now a dedicated section in the left list and can be fully customized so that you can monitor anything you want.
Budgets
The period is no more defined for the whole budget but can be set for every category so you can have a monthly category and a bimonthly category within the same budget for example. As a consequence the way to display the different periods of a budget has changed, see more information in the budgets section.
Unlike previous of versions of iCompta a split can be only be matched by a single budget so that implies two things.
Firstly, if you were used to create a new budget every month for example, make sure to set a correct end date for all your previous budgets otherwise some split could be matched by a previous budget and not appear in the new one as you would expect.
Secondly, you can now create an household budget next to an extra budget for example and have the same category defined in both budgets. In this case a split will be matched by only one of the two budgets (and of course you can specify which one if the wrong one was chosen automatically).
iCloud synchronization
You can now synchronize your documents between several devices using iCloud. More info in the synchronization section.
Import / Export
You can now import or export transactions in XML and JSON in addition to QIF, OFX and CSV.
Rules
The new rules engine has been redesigned and is even more powerful.
Professional features
You can now manage clients, make invoices and print them directly in iCompta. You can learn more about that here.
Password protection
Password protection is still there but unlike previous versions of iCompta, this is just a software protection and the data file on your disk is not encrypted.
Managing documents
A document is where all your data (accounts, transactions, etc.) is stored. In iCompta you can manage different sets of accounts in separate documents, one for your personal accounts and one for your professional accounts for example. If you need to reinstall your computer or move iCompta on a different computer make sure to save your documents, you'll just have to reopen them when done to get all your data back.
Creating a new document
You can create a new document by clicking on the menu item.
Getting an existing document from the cloud
If you have installed iCompta on an other device and have already synchronized a document on the cloud, you can get this document back by moving the mouse on the menu item and clicking on the document name when it appears.
Getting an existing document from another device
If you have installed iCompta on another device you can also get your document back with a local network synchronization if the two devices are connected to the same local network. Create a new document as explained above and make a local network synchronization using the replace mode.
Saving a document
When you make changes, they are automatically saved on a regular basis but you can also trigger the save with the menu item or the keyboard shortcut ⌘S. In addition to saving the document, it also sends your changes to the cloud if you have enabled iCloud or Dropbox synchronization.
Transferring your accounts from version 4
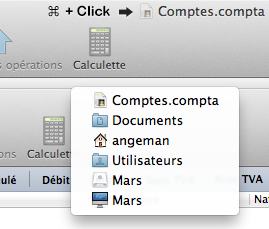
The first time you entered your accounts in iCompta, you were asked to choose a location to save them. By default it's in the Documents folder and the name of the file ends with .compta. If you don't remember where it is, you can hold ⌘ and click on the title bar of version 4 to show its location.
You just have to open this file with the new version. It will be converted to the new .comptadb format and you will be asked to choose a new location to save it.
Managing accounts
Creating or editing an account
You can create an account by clicking on the + button in the bottom left corner or by clicking on the menu item. When you create a new account, a new window appears to let you edit its properties. If you want to edit an existing account just double click on it.
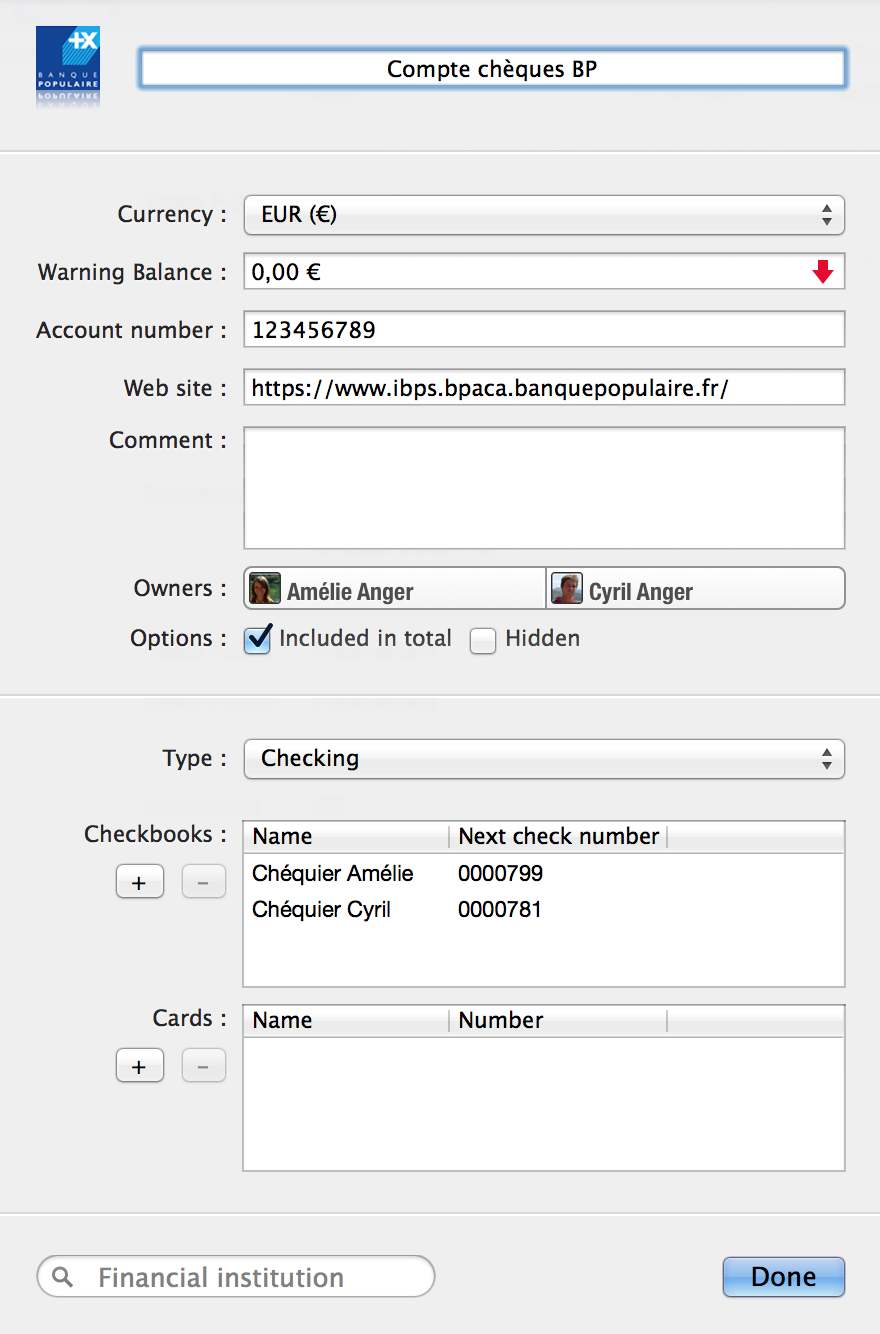
In the account editing window you can change the following properties :
- Icon : you can drag & drop an image file over the existing icon or also copy/paste an image onto it to change it.
- Name
- Currency : go here to learn how to add a new currency.
- Warning balance : if the balance of your account goes below this value it will be displayed in red in the transactions list.
- Number : the account number might be used when downloading transactions from your financial institutions in order to automatically find to which account they belong.
- Web site : this is the home page that is displayed when you click on the earth icon below the transactions list.
- Comment : feel free to enter any information you want to remember about your account here.
- Owners : you can define to which people the account belongs to. The owners defined here will be the default owners for each transaction split of the account. Setting owners for accounts and for transaction splits will be useful when you'll make reports. Go here for more information about reports or go here to learn how to create people.
- Included in total : choose whether or not this account is included in the total balance displayed in the bottom left corner.
- Hidden : if you have closed this account and don't want it to be shown in the accounts list you can check this box. If you want to look at its transactions later on you can activate menu item to make it reappear.
- Type : you can specify if it's a checking, credit card, savings, cash, assets, loan or investment account.
You can search for the name of your financial institution in the bottom search field in order to fill the web site and the icon of the account.
Removing an account
You can remove selected accounts by clicking on the - button in the bottom left corner. All transactions in the deleted accounts will be removed, too. If some of the deleted transactions were transfers to other accounts, the linked transactions will remain in their accounts as standard transactions. If you just want to hide this account from the accounts list but still be able to look at it later set it to hidden in the account editing window instead.
Organizing accounts
You can create accounts groups and then drag & drop other accounts in them. You can also reorder accounts by drag & drop.
An account group will display the sum of the balances of its accounts in its own currency.
The accounts list
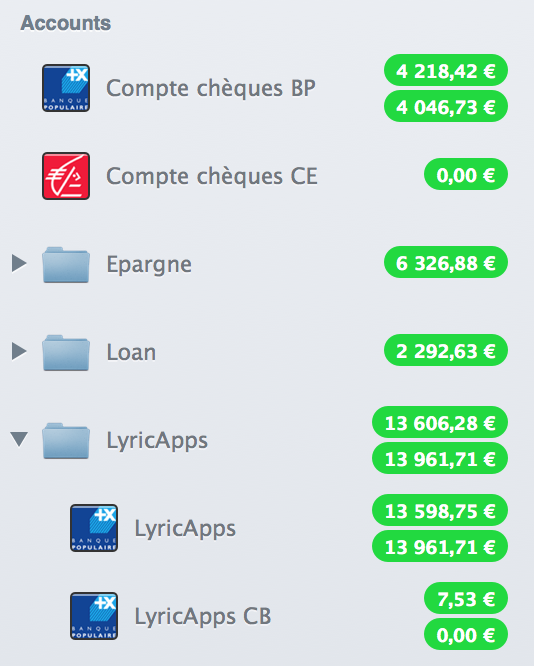
The balance of the account is displayed next to its name in a red or green badge whether it is lower or higher than the warning balance.
If the cleared balance is different than the balance, it will be displayed just underneath. The cleared balance is the sum of all cleared and locked transactions so it is intended to be compared to the balance shown on your financial's institution web site to check that there are no mistakes.
In the preferences window, you can choose to display only the balance or the cleared balance. In this case, you can show the other balance by keeping the ⌥ key down.
If you enabled professional features you can also choose to display excluded of taxes balance in the preferences window.
Information on accounts balance
The balance of an account is the sum of all transactions except the ones that are planned (slightly dark background) or canceled. The "Display today's balance" is no longer there like in version 4 because it's now up to you to choose which transactions should be included in the balance as explained below.
When you want to enter transactions you just made, you add them in your accounts and they are included in the balance instantly.
On the opposite when you want to enter future transactions or repetitive transactions, you have to do it in the scheduler now. The occurrences of the transactions in the scheduler are displayed with a slightly darker background in the transactions list (if you activated the show planned transactions checkbox) and thus are not included in the balance of their accounts.
When you want the planned transactions to be included in the balance (the day they should occur for example) you just have to click on the little calendar to turn them into regular transactions. This is done automatically by iCompta if you enable the "Change status of planned transactions" box in the preferences.
If you imported a file from version 4 in which you had chosen to create automatically next occurrences 3 months before for example, you may now have a lot of future transactions which are included in the balance because they don't have the "planned" status. In order to avoid that, you can select all these transactions and double click on one to edit them and modify their status to "planned". Your accounts should have a more logical balance again.
Managing people
In iCompta a person is a special account intended to be used for two purposes : to know who owes what to whom when making shared expenses and to be able to track who is responsible for an expense or income and therefore make reports on who spends the most in the household for example.
Adding or removing people works the same way as adding or removing accounts.
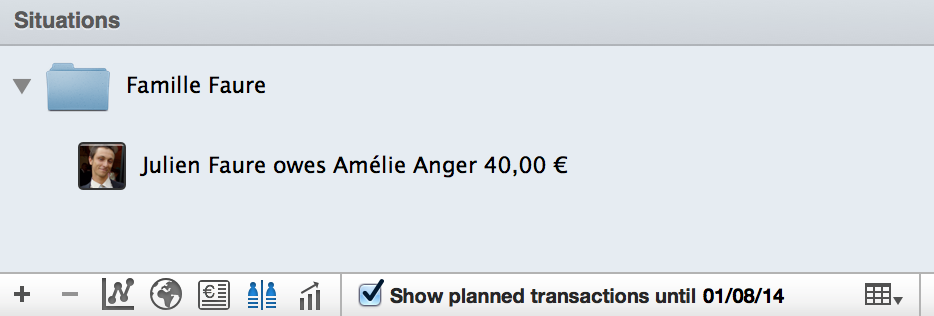
The amount lent or owed by the person is displayed in a badge in the accounts list.
Managing currencies
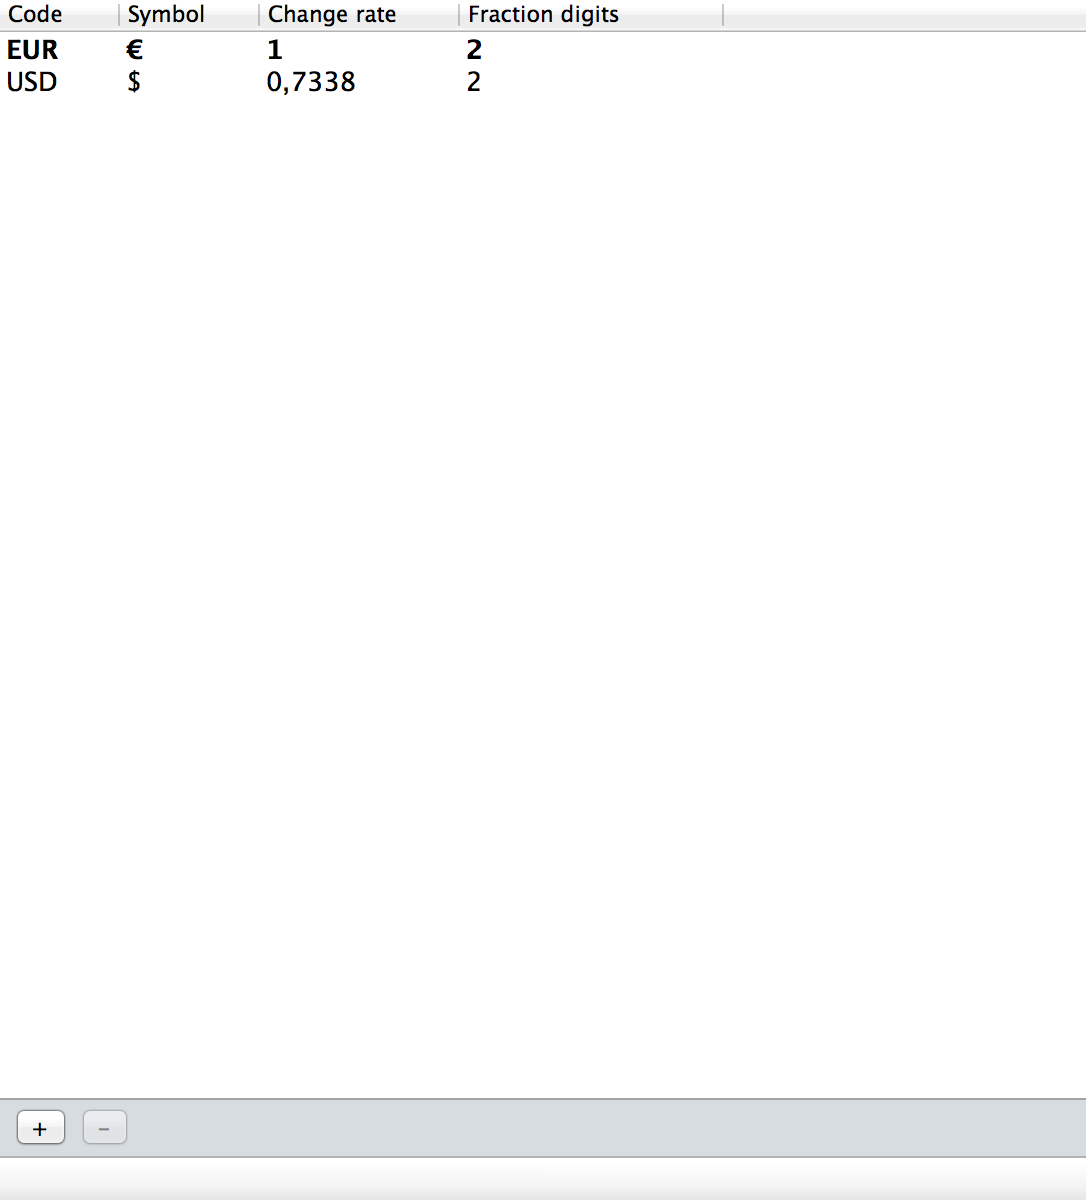
You can add or remove currencies by selecting the currencies line in the left list.
iCompta can download the latest change rate from Google if you enable it in the preferences window.
Managing categories
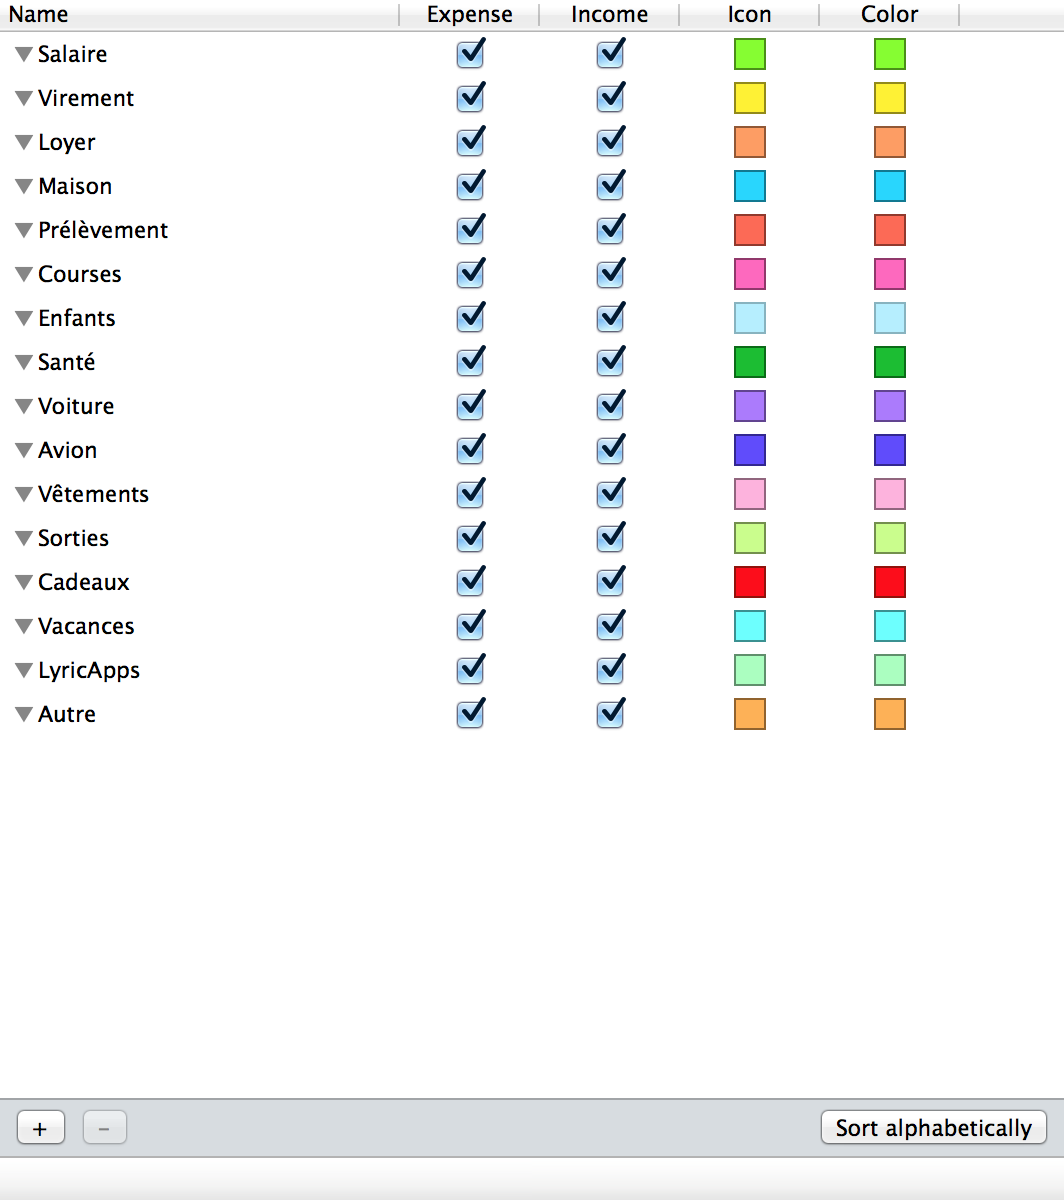
You can add or remove categories by selecting the categories line in the left list.
To change the icon of a category, drag & drop an image file on the appropriate line of the icon column.
To change the color of a category, click on the color square in the color column.
You can tell whether the category should be used for expense or income or both. This is used when editing the category of a split : it will only show income or expense categories depending on the amount of the split.
You can reorder and organize categories by drag & drop.
Managing transactions
Anatomy of a transaction
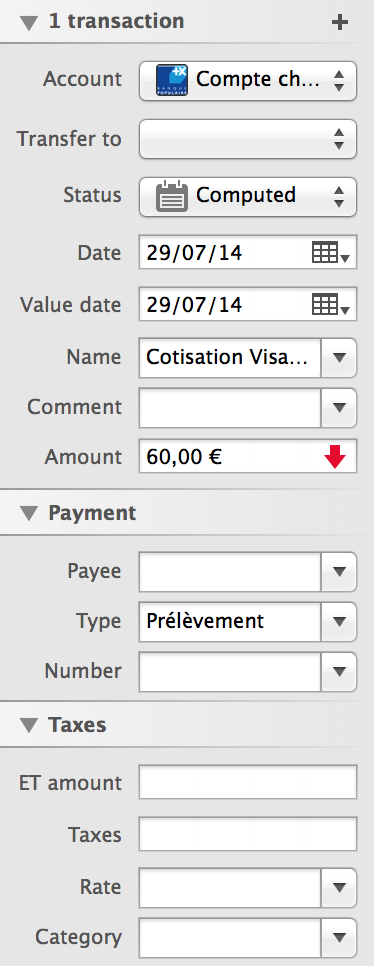
Properties of a transaction are listed below :
- Account
- Status : indicates if the transaction is planned, created, cleared, locked or canceled.
- Date : you can show a date picker by clicking on the little calendar in the right of the field.
- You can also enter the date directly either using the same format as it is displayed or one of the following short formats :
- DD : 18 = the 18th of current month of current year
- DDMM : 1804 = the 18th of April of current year
- DDMMYY or DDMMYYYY : 180412 or 18042012 = the 18th of April 2012
- You can also modify the date with these shortcuts :
- ↑ : + 1 day
- ↓ : - 1 day
- ⇧↑ : + 1 month
- ⇧↓ : - 1 month
- ⌃↑ : + 1 year
- ⌃↓ : - 1 year
- Value date : the value date is the same as the date by default.
- Name : the names of all other transactions are in the completions list of this field.
When creating a new transaction, setting the name will make previous transactions with the same name appear and you can copy the values of one of theses previous transactions by clicking on the blue arrow or typing F1, F2, F3, F4 or F5.
- Comment : the comments of all other transactions are in the completions list of this field.
- Amount
You can directly enter the amount or make some basic math calculations using +, -, *, /, ( and ). You can also type currency symbols and they will be replaced by their current change rate.
Example : (€4 + $3) * 5 will be replaced by €31.50 assuming the currency of the account was €.If you enabled the "Automatically insert decimal separator" option in the preferences window, you can type the amount without the decimal separator. For example 1495 will be converted into 14.95 and 500 will be converted into 5.00. - Payee : the payees of all other transactions are in the completions list of this field.
- Type : the types of all other transactions are in the completions list of this field.
- Number : the number of a check for example.
If the account of the transaction is a checking account, the checkbooks you added in the account editing window will appear in the completions list of this field. Then if you select a checkbook in the completions list, it will be replaced by the next check number when saving the transaction and the next check number will be incremented.
- ET amount : only appears if professional features are enabled.
- Taxes : only appears if professional features are enabled.
- Rate : only appears if professional features are enabled. The tax rates defined in the taxes line of the left list will appear in the completions list of this field.
Anatomy of a split
A transaction can also be divided into splits. You can add a new split by clicking on the + button on the right of the splits section and you can remove selected splits by clicking on the - button. You can select multiple splits by holding the ⇧ or ⌘ key when clicking and if you do the fields below will modify all the selected splits at once.
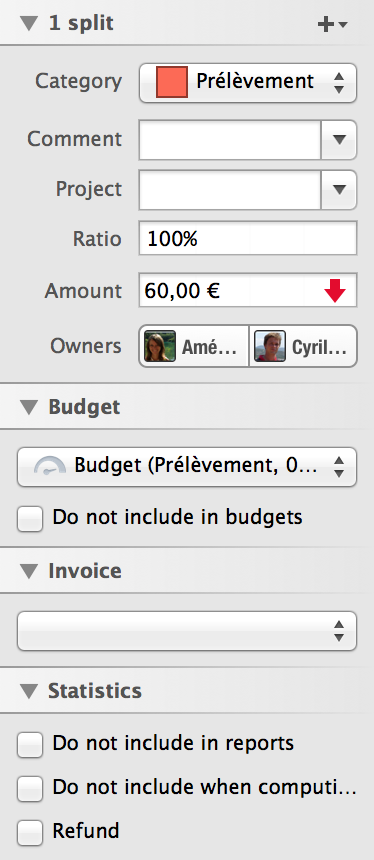
A split has the following properties :
- Category
- Linked account : set an account if you want to make a transfer.
- Comment : the comments of all other splits are in the completions list of this field.
- Project : the projects of all other splits are in the completions list of this field. You can tag everything related to a project in here, for example "Building the house". By doing so and also setting categories, you will be able to make a report and know exactly how much you spent in the various categories when building your house.
- Ratio : you can set a percentage of the amount of the transaction.
- Amount
When you modify this field you can choose whether or not to report the change on the amount of the transaction. If the little icon on the left of the field is white, the change will be propagated to the transaction. You can click on the icon to make it active or not.
- Owners : you can tell who spends money for example. If you use this field, you will be able to know who has spent money and how much for a given category for example.
- Budget : iCompta automatically choose a budget period but you can change it if you want the split to be affected to a different budget or to the previous or next month for example. You can also indicate not to include the split in any budget.
- ET amount : only appears if professional features are enabled.
- Taxes : only appears if professional features are enabled.
- Rate : only appears if professional features are enabled. The tax rates defined in the taxes line of the left list will appear in the completions list of this field.
- Taxes category : only appears if professional features are enabled. When you make a taxes report, it is grouped by taxes category.
- Invoice : only appears if professional features are enabled. Allows you to monitor if the invoices have been paid.
- Do not include in reports
- Do not include when computing the average balance of the account : used by the balance evolution view.
- Refund : if your health insurance company made you a refund you can check this box so that the amount will be deduced from the health expense instead of being added to health income.
Creating a transaction
You can create a new transaction by clicking on the + button under the transactions list or by using the keyboard shortcut ⌘N. You can then edit the properties of the new transaction in the right panel. You can also apply rules to the created transaction by clicking on the menu item or by using the keyboard shortcut ⌘R.
Removing a transaction
You can remove selected transactions by clicking on the - button under the transactions list. If you remove a transfer, the linked transaction will be deleted as well.
Editing several transactions at once
You can select several transactions and double click on them to edit them. The properties you modify will affect all the selected transactions at once.
You can also assign a category to one or more transactions quickly by making a right click and choosing "Set category".
Transfers
To create a transfer, you just need to create a transaction and set the linked account of at least one split. The linked transaction will automatically be created in the other account. When you edit the amount of a split in a transfer you will be asked if you want to modify the linked split as well.
If you have existing transactions that should be a transfer you can select them in the transactions list and click on the menu item. You will then have to choose a split from the first transaction to link with a split from the second transaction.
Removing old transactions
If you want to remove some old transactions to clean your accounts you can use the menu item. A new single transaction with the sum of all the categories of the removed transactions will be created.
The transactions list
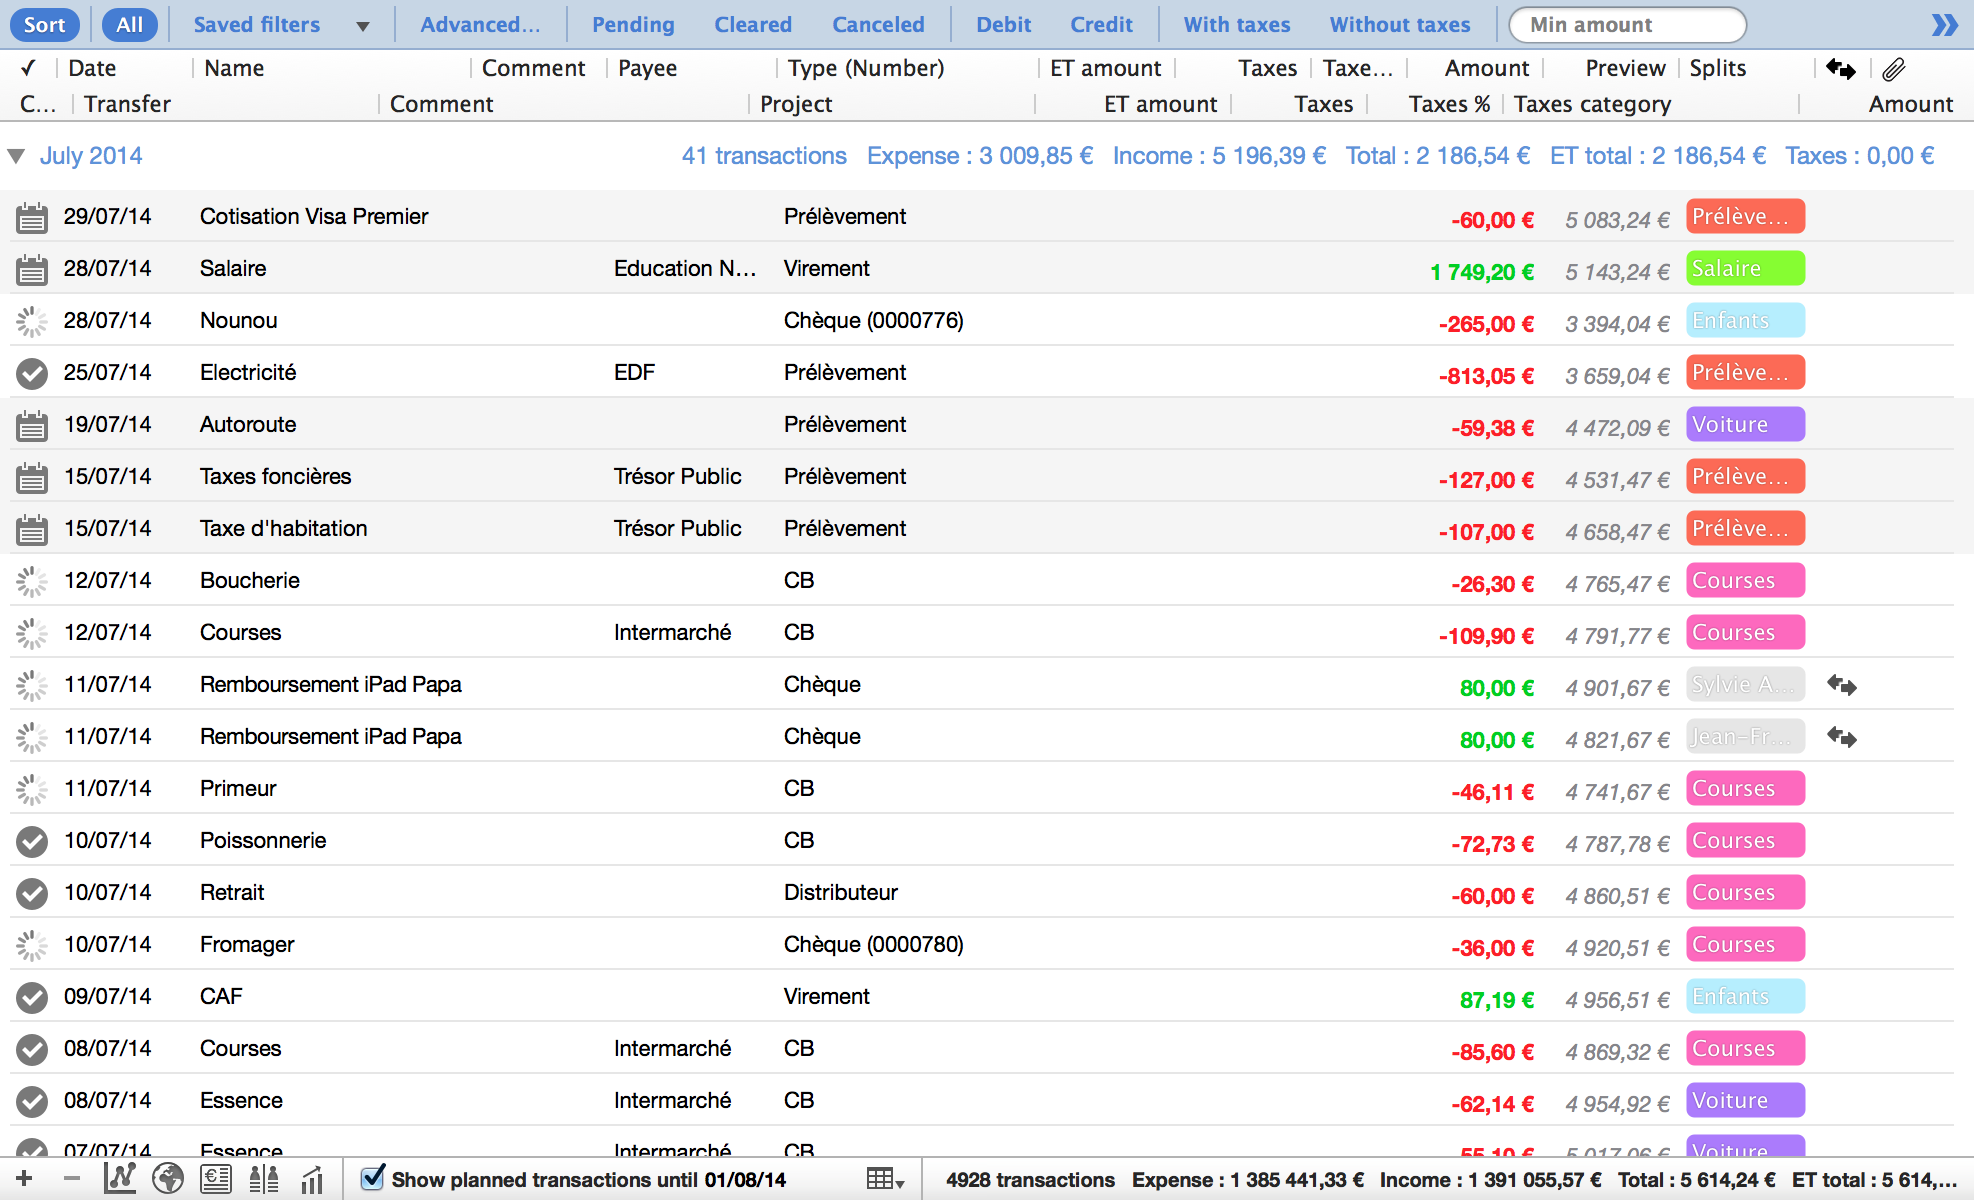
You can change how the transactions are sorted by clicking on the sort button in the gray bar above the transactions list.
You can choose which transactions should be shown by selecting different filters in that gray bar. You can also make a custom filter by clicking on the advanced button. Clicking on the "All" button resets all the active filters. The filters only apply to transactions by default but you can also decide to make the categories and people filters to also apply on splits in the preferences window.
The first row of columns (or the first 2 rows if you have chosen the 2 lines display) represents the transactions properties and the last row the splits properties.
You can resize the different columns by moving the separators between them. You can reorder the columns and choose to hide some if you don't use them by right clicking on the columns bar.
When several transactions occur on the same day you can reorder them by drag & drop.
You can highlight transactions by choosing a color in the menu item.
You can print the transactions by clicking on the menu item or using the keyboard shortcut ⌘P. Only the transactions that are currently displayed will be printed so you can use the filters bar to exactly choose what will be printed. You can choose to print transactions and/or splits in the settings view of the print panel that appears (Click on show details and select iCompta menu item in the popup button).
Preview computation mode
You can change the way the preview column is computed in the preferences.
There are 3 different modes :
- Add filtered transactions first and then add displayed transactions.
- Add filtered transactions and displayed transactions in order.
- Add displayed transactions only.
- Example : let's consider the following transactions sorted by date.
- Name : Transaction 4
Date : 01/04/2014
Amount : $-40
Status : Pending - Name : Transaction 3
Date : 01/03/2014
Amount : $-30
Status : Validated - Name : Transaction 2
Date : 01/02/2014
Amount : $-20
Status : Pending - Name : Transaction 1
Date : 01/01/2014
Amount : $-10
Status : Validated
The computation mode only makes a difference when there is an active filter which hides some transactions otherwise the preview will be the same in the 3 modes.
- Example : let's consider the previous transactions with the "Pending" filter on which hides transactions 1 and 3.
- Add filtered transactions first and then add displayed transactions :
Preview is computed in the order 1 > 3 > 2 > 4.
Transaction 4 : $-100
Transaction 2 : $-60
(Transaction 3 : $-40)
(Transaction 1 : $-10) - Add filtered transactions and displayed transactions in order :
Preview is computed in the order 1 > 2 > 3 > 4.
Transaction 4 : $-100
(Transaction 3 : $-60)
Transaction 2 : $-30
(Transaction 1 : $-10) - Add displayed transactions only :
Preview is computed in the order 2 > 4.
Transaction 4 : $-60
Transaction 2 : $-20
Using the scheduler
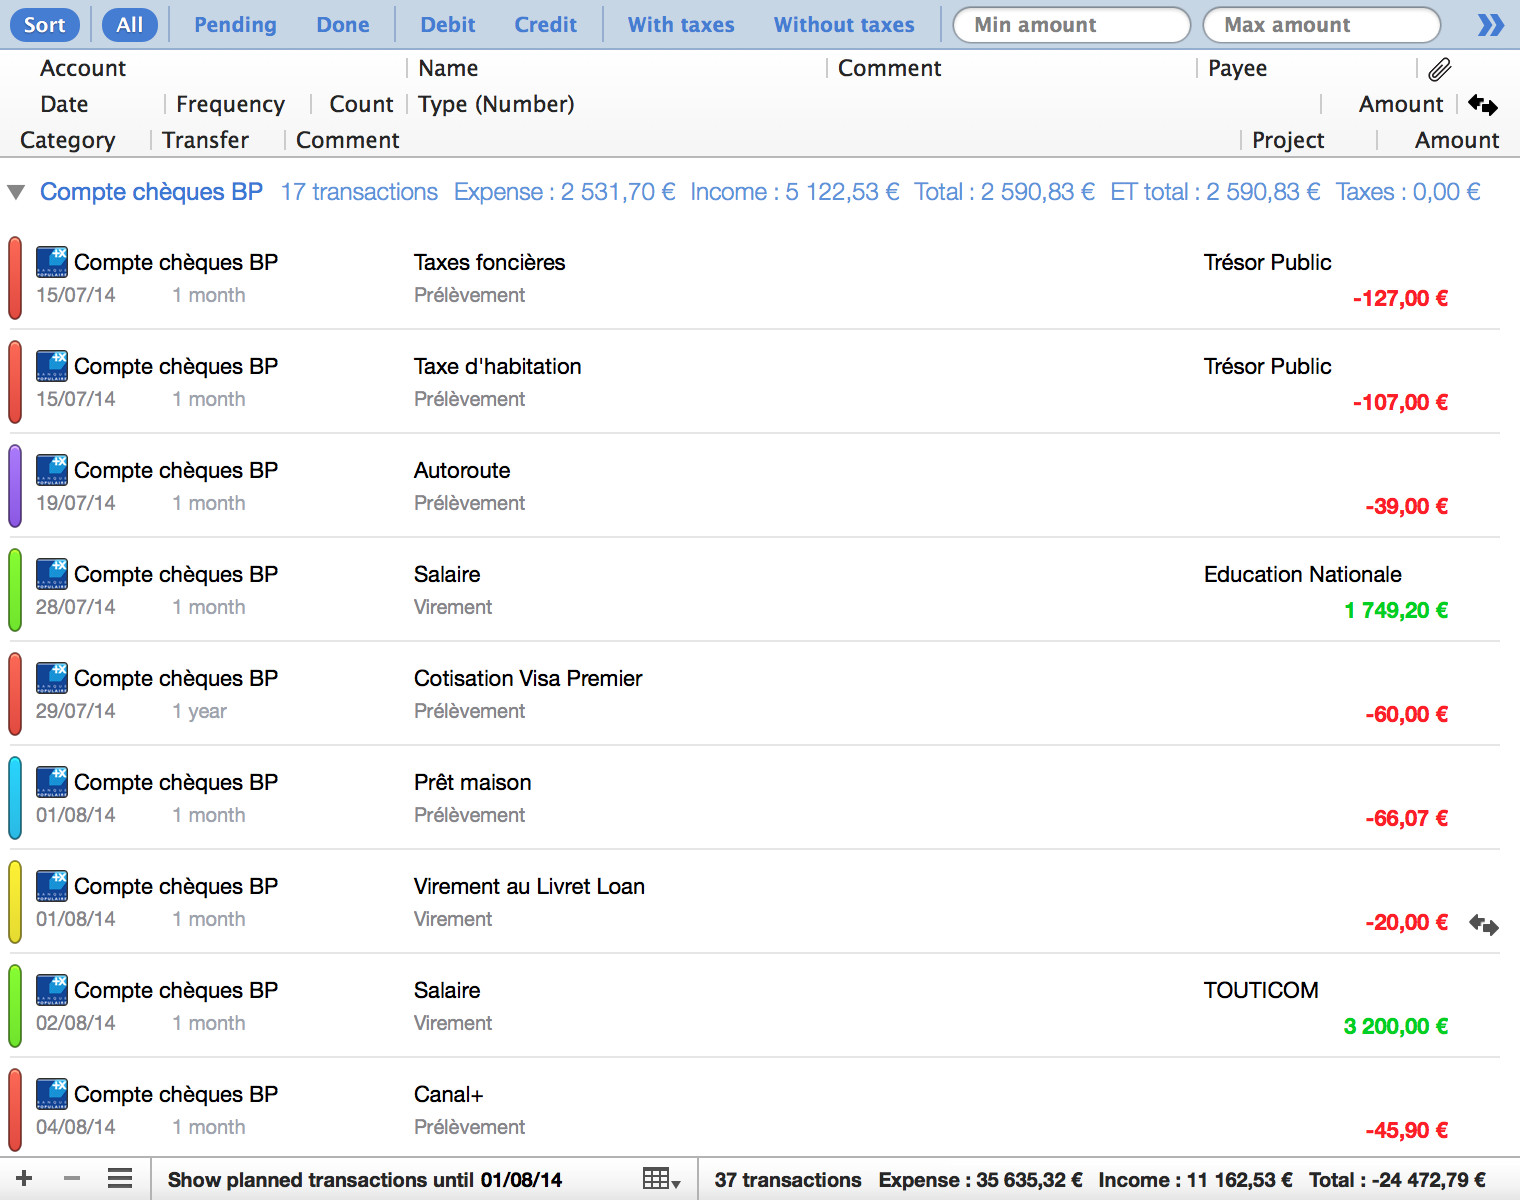
The scheduler is the place to add repeating transactions or transactions that are planned to occur at a later date.
You can display the occurrences of scheduled transactions in the transactions list of their accounts by checking the "Show planned transactions" box under the transactions list. Unlike previous versions of iCompta, you don't have to tell when to create automatically the next occurrence of a repeating transaction (a week before, at the start of the month, etc.). Instead, you just have to set the date until which you want to see all planned transactions.
In the preferences, you can tell iCompta to update this date automatically to the current date or the end of the (week | month | year) plus a given duration.
It is important to know the difference between modifying a scheduled transaction (in the scheduler) and one or several occurrences (in the transactions list) : if you modify a property of a scheduled transaction the change will be propagated to the same property of all planned occurrences whereas a change to an occurrence is limited to that occurrence. This also applies to removal : if you delete a scheduled transaction it will delete all of its planned occurrences as well but you can just delete one occurrence.
An occurrence of a scheduled transaction can be easily recognized as it's displayed with a slightly dark background in the transactions list. You can click on the little calendar icon of a planned occurrence to turn it into a regular transaction. From now on it won't be affected by any change to the scheduled transaction and it will be included in the account balance.
In the preferences, you can tell iCompta to change the status of planned transactions automatically on their due date in order to turn them into regular transactions.
Please note that this setting doesn't apply to credit cards transfers and budgets previsions so that they can be computed again if you enter your transactions a fews days later.
Using credit card accounts
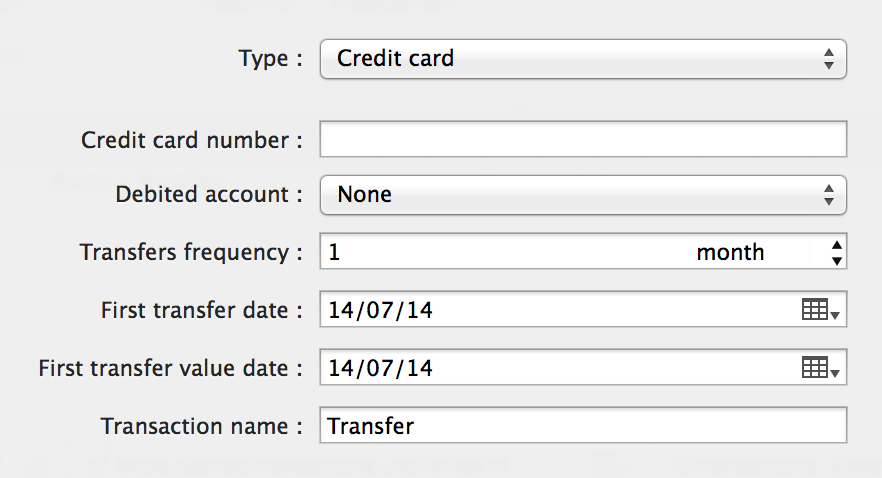
You can create a credit card account to have iCompta create transfers to a main account on a periodic basis. In the account editing window set the debited account and transfers frequency and iCompta will automatically compute the balance of all transactions since the previous transfer and create a new transfer between the two accounts.
- Example : you have a credit card that stops the ongoing balance on the 20th of each month and then withdraw it on your main account on the 26th.
- Set the transfers frequency to 1 month.
- Set the first transfer date to 01/20/2013.
- Set the first transfer value date to 01/26/2013.
- If you create a transaction with the date 01/19/2013 it will be included in the transfer on 01/20/2013.
- If you create a transaction with the date 01/20/2013 it will be included in the transfer on 02/20/2013.
- Please note that this is the value date of the transaction that is used to determine in which transfer the transaction is included. So if you create a transaction with the date 01/19/2013 but you notice that your financial institution didn't include it in the January withdraw you can change its value date to 01/20/2013 so that iCompta will include it in the transfer on 02/20/2013 as well.
Using savings accounts
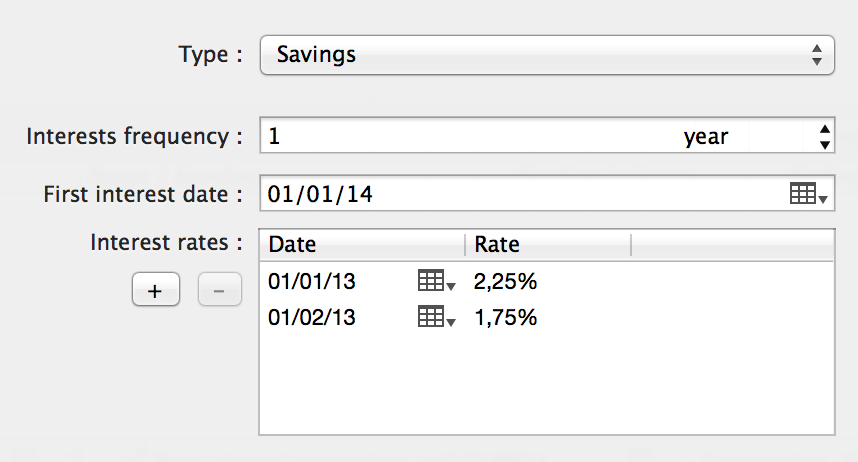
You can create a savings account to have iCompta compute the approximate interests you will earn. In the account editing window you have to set the interests frequency and add the different rates and the date when they become effective. When your financial institution pays your interests, you can click on the little calendar icon of the transaction computed by iCompta to turn it into a regular transaction so that you will be able to change its amount to the real one.
Managing loans
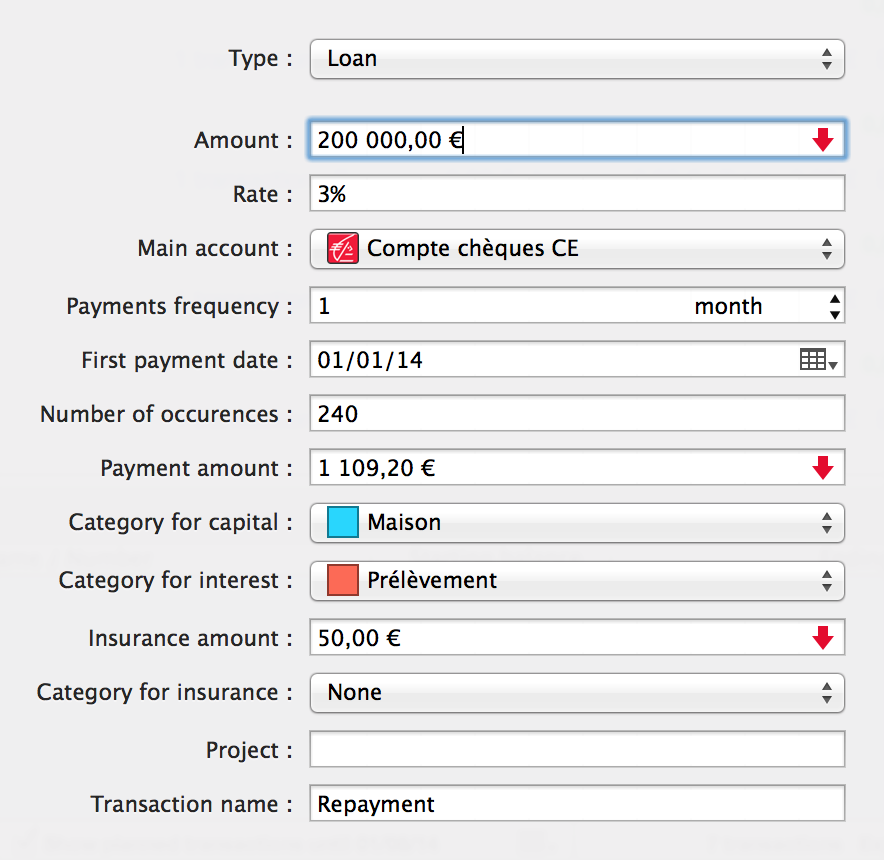
You can create a loan account if you want to know how much capital you still have to pay back and how much interest and insurance you have paid for example. In the account editing window you can enter the amount of the loan, its rate (don't include the insurance in it) and the amount of the insurance that will be added to each payment. iCompta will then automatically create transfers between the loan account and the main account.
- Example : you contracted a 20-year loan for building your house and you pay for it every month.
- Set the amount to 200 000.
- Set the main account to your standard checking account.
- Set the rate to 3 %.
- Set the payments frequency to 1 month.
- Set the first payment date to 01/01/2013.
- Set the number of occurrences to 240.
- iCompta automatically computes the amount to pay every month : 1,109.20 (it doesn't include insurance).
- Set the categories for capital, interest and insurance (you should create some for that matter if you haven't already done it so that you can easily monitor how much interest and insurance you have paid for example).
- Set the insurance amount a month to 50.
- iCompta automatically creates a simple 200 000 transaction in the loan account but if in fact the financial institution has made one or several transfers to your main account, you can delete this transaction and instead create transfers between your main account and the loan account.
The important thing to remember is that the balance of a loan account is the capital left to be paid.
If a real monthly payment differs from the one computed by iCompta you can click on the little calendar icon of the transaction to turn it into a standard transaction and then edit it so that it matches reality. This might be the case if you have to pay interim interest during the building of your house. If the financial institution adds the interim interest to the amount of the loan when the house is built, you just create a new transaction with that extra amount in the loan account.
- Example : you renegotiate the rate of your loan with your financial institution.
- Make sure to transform all previous payments to regular transactions by clicking on the little calendar icon of each of the concerned payments. This way the previous payments will remain unaffected and only the future ones will be updated to reflect the new settings of the loan.
- Go in the account editing screen and change the rate to 2,5 %.
- iCompta will automatically recalculate future monthly payments.
- Example : you change the amount of your monthly payment.
- Make sure to transform all previous payments to regular transactions by clicking on the little calendar icon of each of the concerned payments. This way the previous payments will remain unaffected and only the future ones will be updated to reflect the new settings of the loan.
- Go in the account editing screen and change the payment amount to the new value.
- iCompta will automatically modify the number of occurrences and recalculate future monthly payments.
Downloading transactions from your financial institutions
Downloading from your financial institution's web site
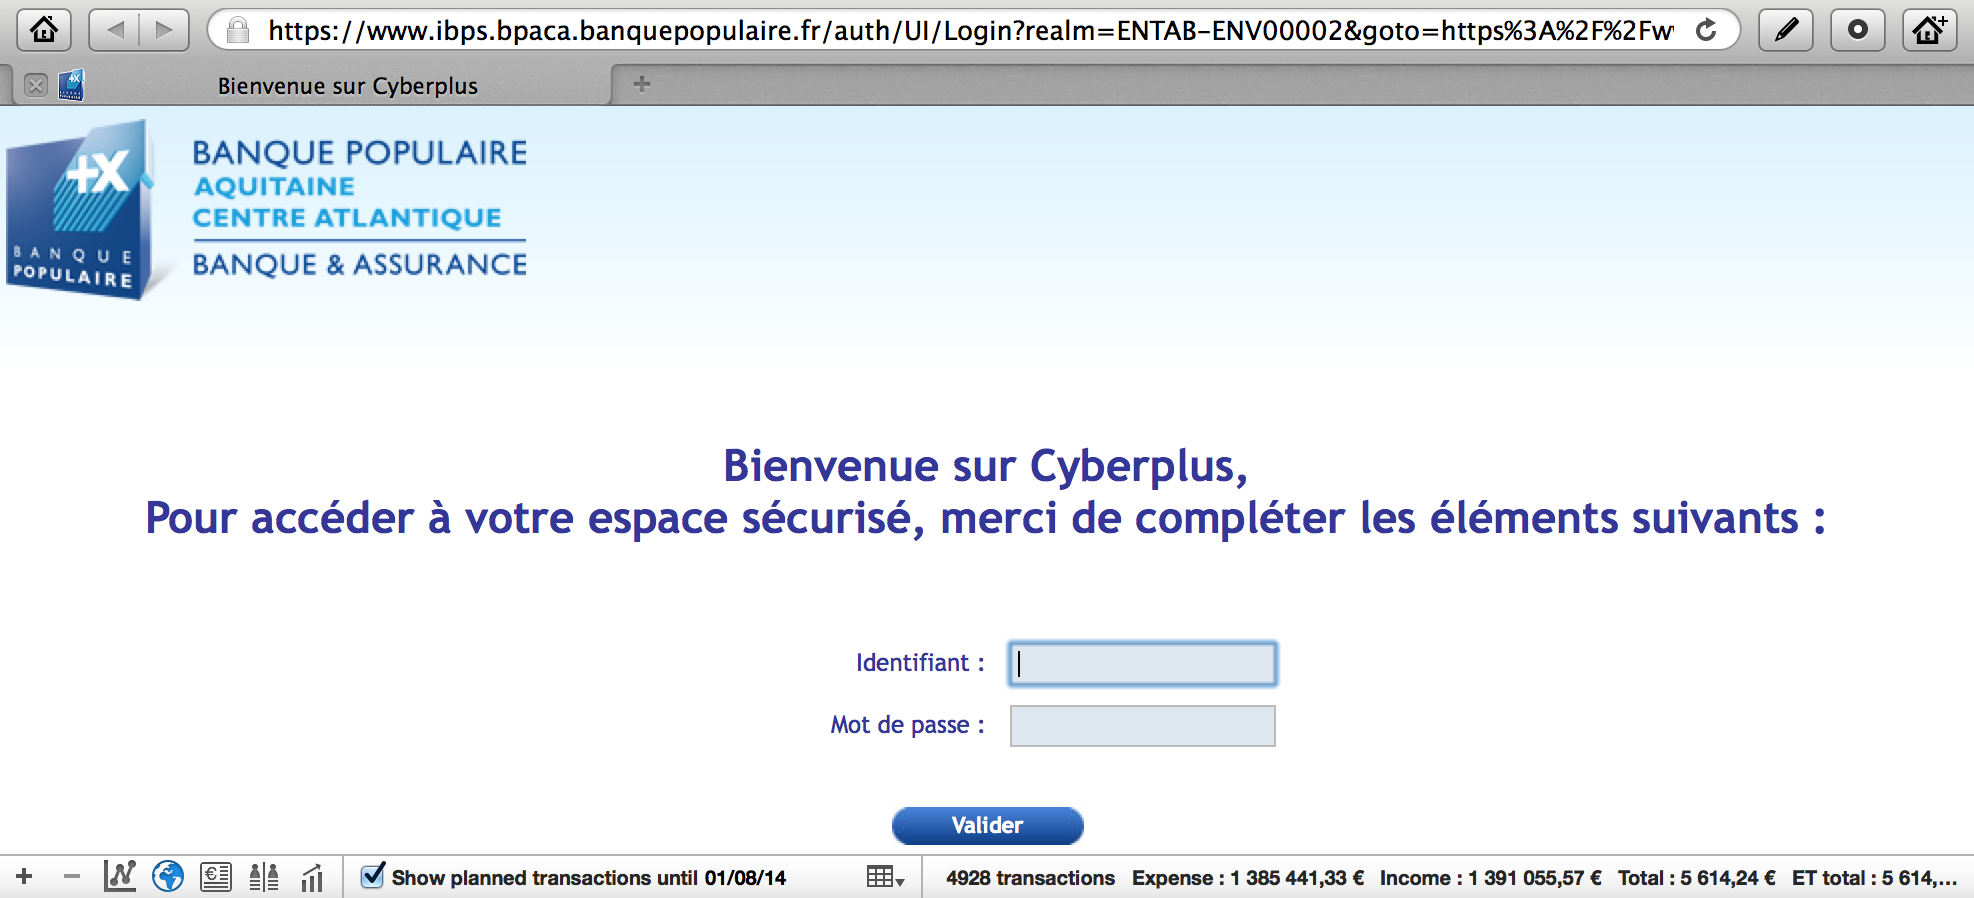
Assuming you entered the financial institution's web site in the account editing window, you can click on the earth icon under the transactions list to show the integrated web browser. You can save your login and password in the system keychain using the second button on the right of the address bar if you don't want to type them every time. If you do so, the next time you can just click on the pencil button to fill in the login form automatically. Then you have to navigate to the download page of your financial institution's web site and download a file. iCompta will automatically open an import dialog when the file is downloaded.
If you have installed a network monitoring utility like Little Snitch, you may see alerts about iCompta trying to connect to unknown web sites. This is certainly because your financial institution's web site automatically connects to those web sites.
Using OFX Direct Connect
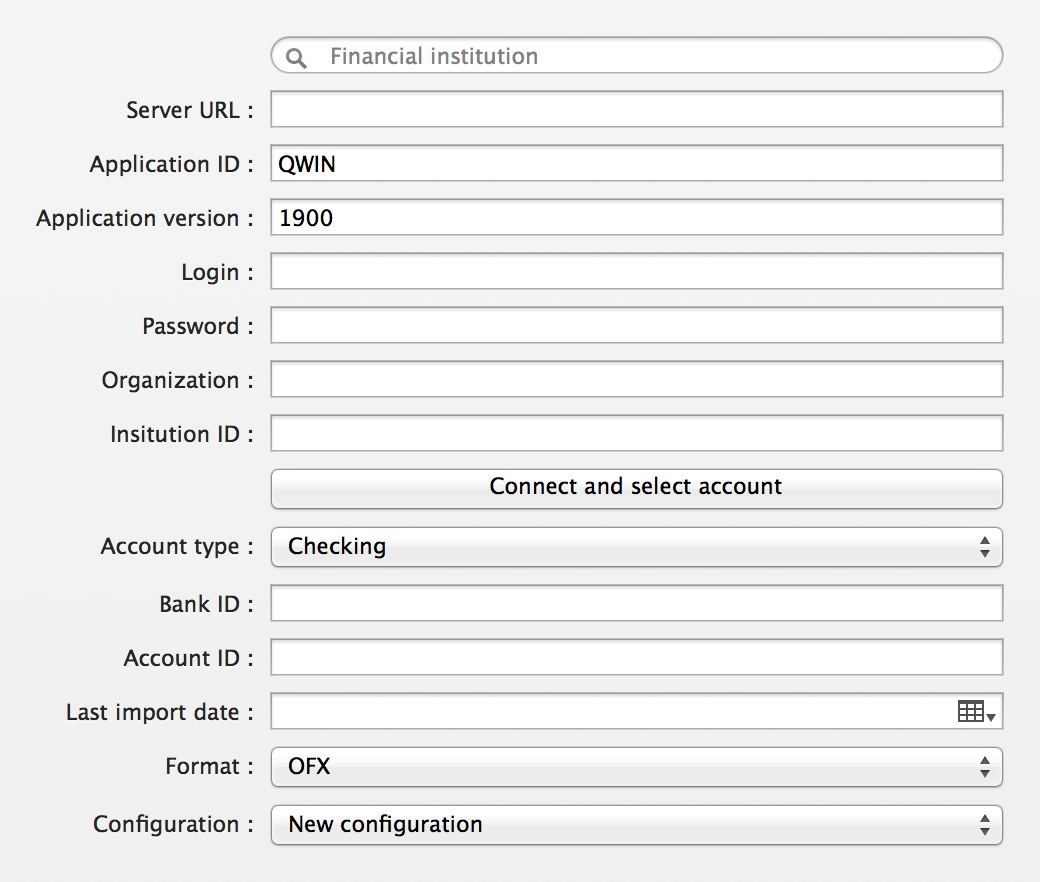
If your financial institution supports OFX Direct Connect you can directly download transactions in iCompta. Click on the automatic import button in the window toolbar and click on the add button. Select OFX Direct Connect, search for your financial institution in the search field and then enter your login and password. Click on the connect button to select the account you want to download. Repeat these steps if you want to download another account.
Launching automatic import
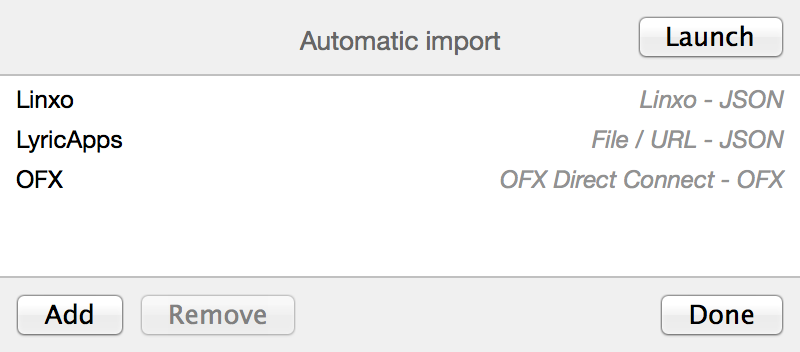
If you have set up automatic import configurations you can launch them using the menu item or using the keyboard shortcut ⌘D. You can also automatically launch automatic import when opening a document by enabling the option in the preferences window.
Importing your data
You can import transactions by clicking on the menu item or using the keyboard shortcut ⌘I. A dialog will appear to let you choose the file to open and its format between QIF, OFX, CSV, XML and JSON.
Settings
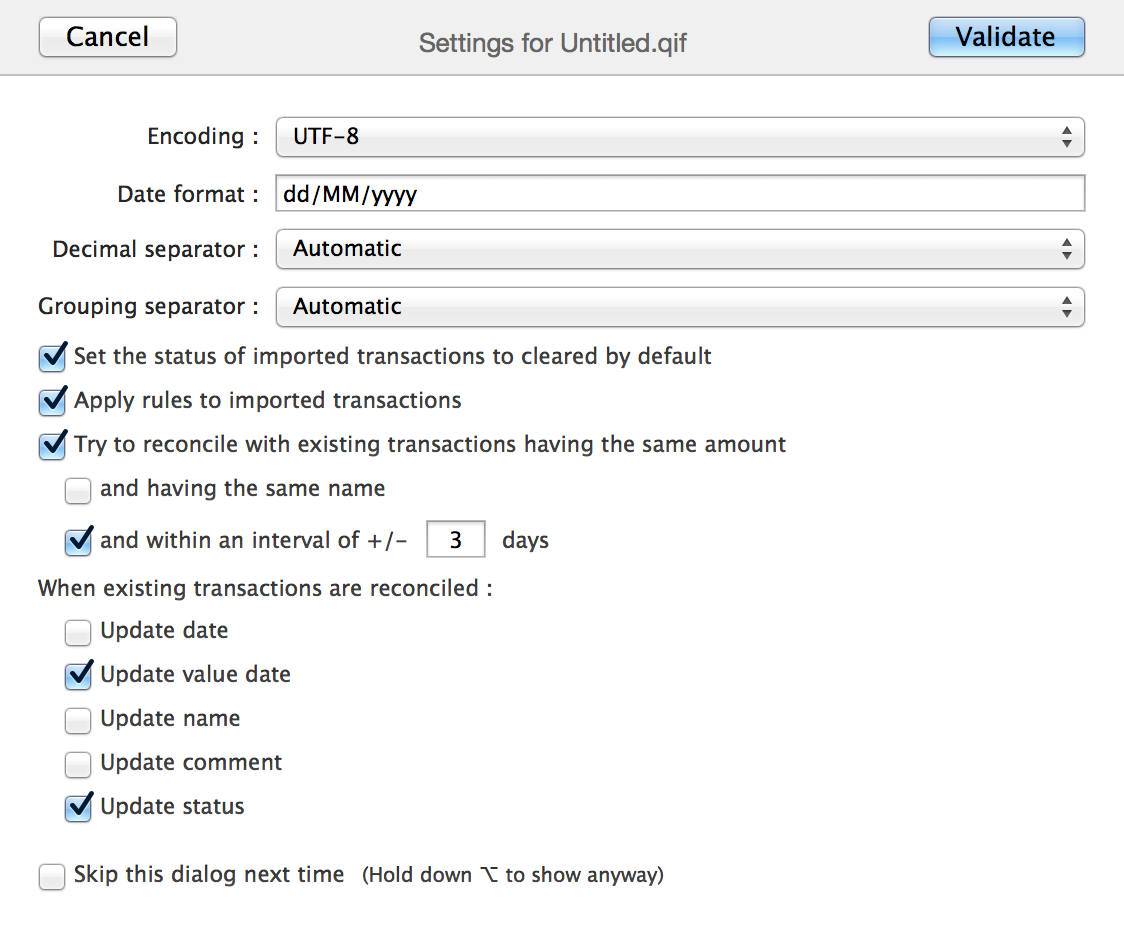
The settings screen will appear next to let you edit the following properties :
- Encoding
- Date format : use yy or yyyy for the year, MM for the month and dd for the day. The date format is case sensitive so make sure to enter MM and not mm. For example if a date in your file is 02/24/2012 you have to set the date format to MM/dd/yyyy.
The date format for importing a Microsoft Money QIF file is dd/MM''yyyy (with two ' and not one "). - Decimal separator : choose automatic to let iCompta guess it.
- Grouping separator : choose automatic to let iCompta guess it.
- Set the status of imported transactions to cleared by default : if you enable this imported transactions will have the cleared status instead of created. You should put this on when you import a file from your financial institution.
- Apply rules to imported transactions
- Try to reconcile with existing transactions : if you enable this iCompta will try to find if an imported transaction doesn't already exist to mark it as reconciled or ignored.
- When existing transactions are reconciled : you can tell which fields to update.
CSV settings

- CSV separator
- Start importing from line : indicate the first line where the actual data begin.
- The file contains the description of the columns : check this if the first line of the data is an header line with the description of the columns.
XML settings
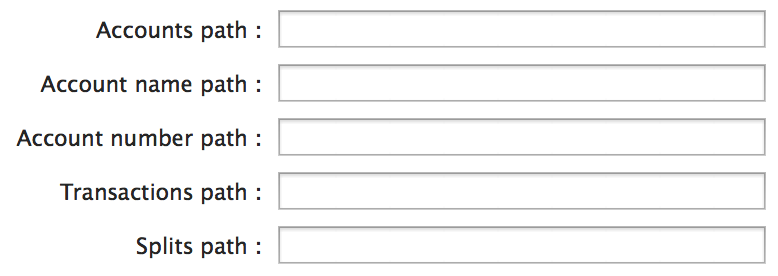
Example 1
<accounts>
<account>
<name>Account 1</name>
<number>123456</number>
<transactions>
<transaction>
...
<splits>
<split>
...
</split>
<split>
...
</split>
</splits>
</transaction>
</transactions>
</account>
</accounts>
Example 2
<account name='Account 1' number='123456'>
<transaction>
...
<split>
...
</split>
<split>
...
</split>
</transaction>
</account>
- Accounts path : enter the path to access the accounts nodes from the root node.
Example 1 : you have to enter /accounts/account.
Example 2 : you have to enter /account. - Account name path : enter the path to access the name from an account node. Leave it empty if the file doesn't contain account names.
Example 1 : you have to enter name.
Example 2 : you have to enter @name. - Account number path : enter the path to access the number from an account node. Leave it empty if the file doesn't contain account numbers.
Example 1 : you have to enter number.
Example 2 : you have to enter @number. - Transactions path : enter the path to access the transactions nodes from an account node.
Example 1 : you have to enter transactions/transaction.
Example 2 : you have to enter transaction. - Splits path : enter the path to access the splits nodes from a transaction node. Leave it empty if the file doesn't contain splits.
Example 1 : you have to enter splits/split.
Example 2 : you have to enter split.
JSON settings
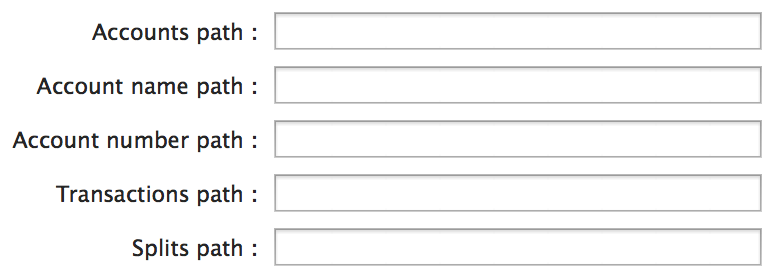
Example
{
"accounts": [
{
"name": "Account 1",
"number": "123456",
"transactions": [
{
...
"splits": [
{
...
}
]
}
]
}
]
}
- Accounts path : enter the path to access the accounts array from the root object.
Example : you have to enter accounts. - Account name path : enter the path to access the name from an account object. Leave it empty if the file doesn't contain account names.
Example : you have to enter name. - Account number path : enter the path to access the number from an account object. Leave it empty if the file doesn't contain account numbers.
Example : you have to enter number. - Transactions path : enter the path to access the transactions array from an account object.
Example : you have to enter transactions. - Splits path : enter the path to access the splits array from a transaction object. Leave it empty if the file doesn't contain splits.
Example : you have to enter splits.
Mapping
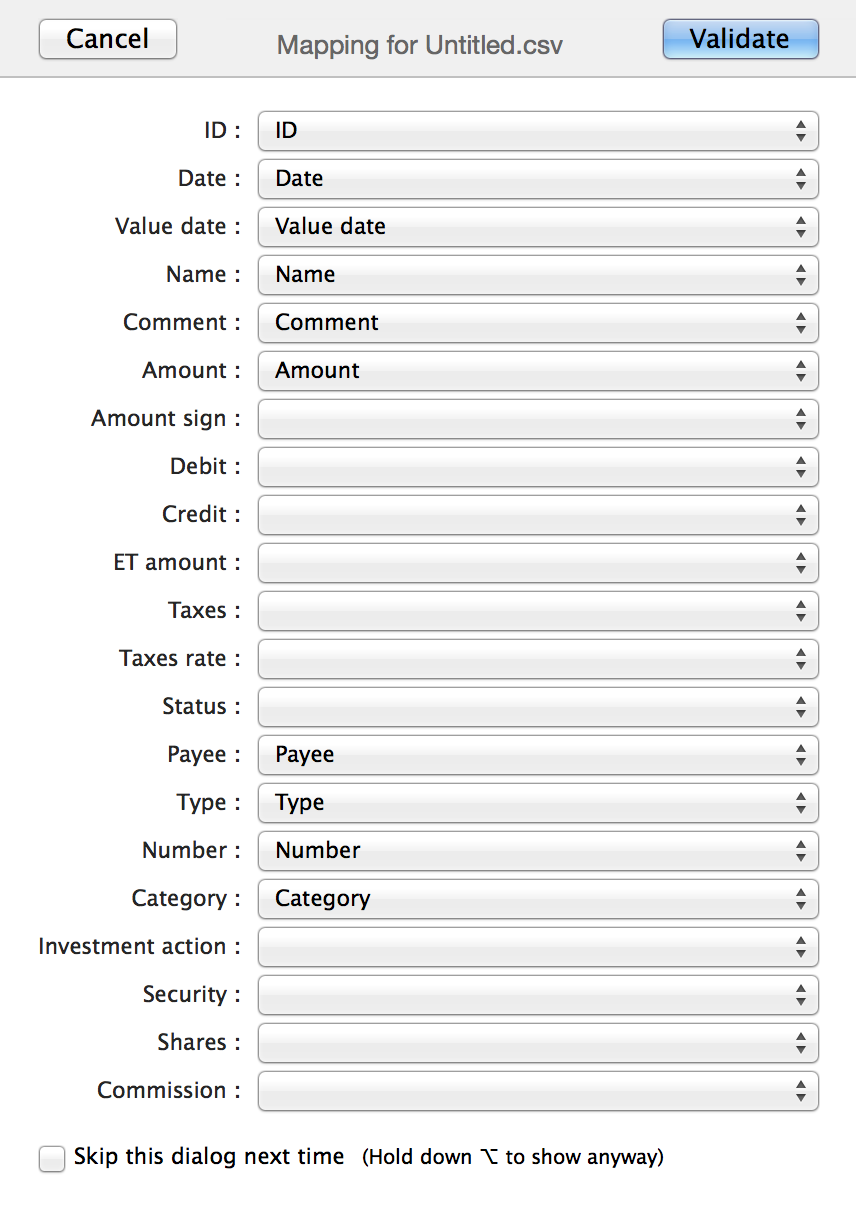
The mapping screen will appear next to let you match the iCompta fields with the fields contained in the file. For QIF and OFX files the mapping is automatically set and won't appear unless you hold down ⌥ when validating the settings screen.
Unmapped values
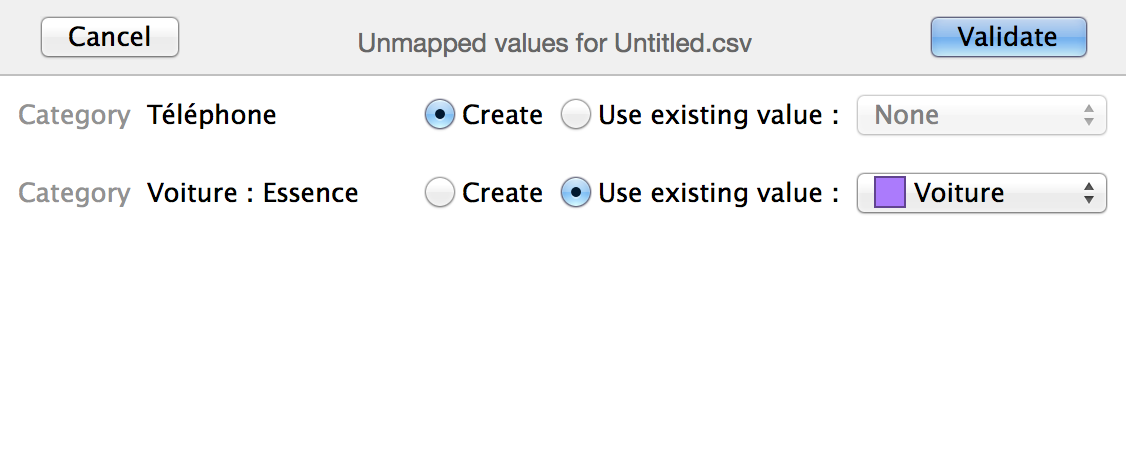
If the imported file contains categories that do not exist in your accounts file for example, iCompta will ask you if you want to create them or use an existing one instead.
Results
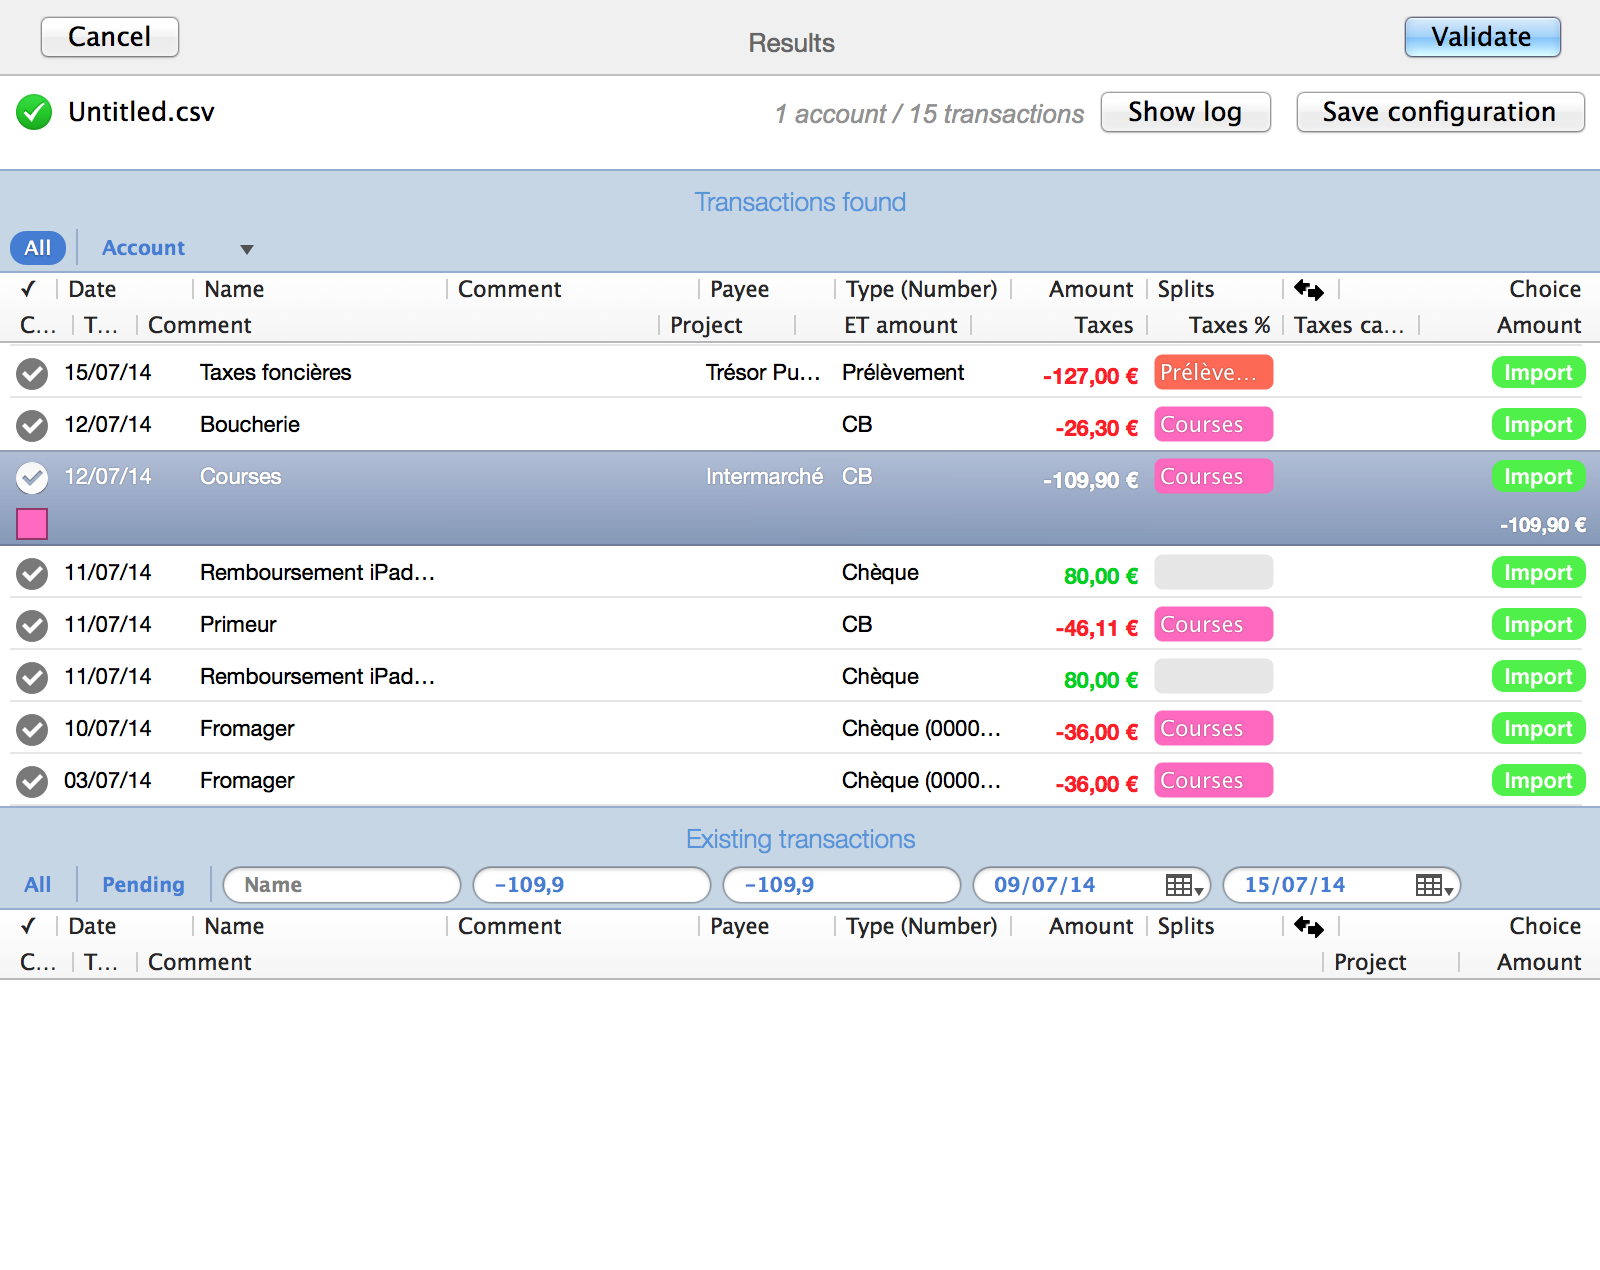
When import is finished, iCompta will show you the imported transactions in the middle list of the results window. The choice column lists the action to execute for each transaction. You can ignore it, import it or reconcile it with one or more existing transactions. If you didn't enable reconciliation in the settings window all choices will be set to import otherwise they will be set to reconcile if an existing transaction was found and its status was planned or created or to ignored if an existing transaction was found and its status was cleared or locked.
The automatic reconciliation works great for most transactions but let's say you created a scheduled transaction for your salary but this month you get a bonus. When you download latest transactions from your financial institution, iCompta won't find the existing salary transaction as the amount differs because of the bonus. In this case you can select the imported salary transaction in middle list and you will see that iCompta updates the filters bar of the bottom list according to the criteria you specified in the settings window. You just have to change the values in the filter bar to make the existing salary transaction appears and then select it. Now you can click on the import button of the imported salary transaction and select reconcile.
You can also reconcile a single imported transaction with several existing transactions. This could be the case if you received several checks and created a transaction for each in iCompta but your financial institution only has one line for them. In that case it is the same way as explained above except that you have to select several transactions in the bottom list. On the contrary you can reconcile several imported transactions with one or more existing transactions. You just need to select the imported transactions, then select one or more existing transactions and finally right click on the selected imported transactions and choose the reconcile menu item.
You can save your import configuration by clicking on the save configuration button in order to reuse it for other files. You can view and manage saved import configurations by clicking on the menu item.
Exporting your data
You can export transactions by clicking on the menu item or using the keyboard shortcut ⌘E. Only the transactions that are currently displayed in the transactions list will be exported so you can use the filters bar to choose exactly what will be exported. A dialog will appear to let you choose where to save the exported file and its format between QIF, OFX, CSV, XML and JSON.
Settings
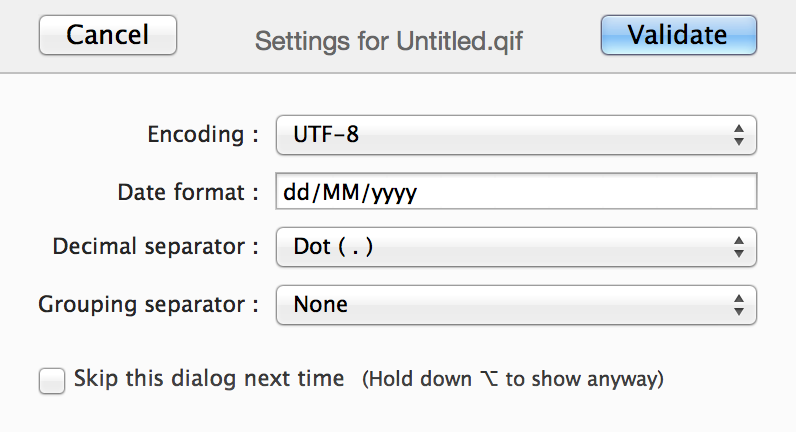
The settings screen will appear next to let you edit the following properties :
- Encoding
- Date format : use yy or yyyy for the year, MM for the month and dd for the day. The date format is case sensitive so make sure to enter MM and not mm. For example if you want the dates to be formatted like 02/24/2012 you have to set the date format to MM/dd/yyyy.
- Decimal separator
- Grouping separator
CSV settings
- CSV separator
XML settings

- Accounts path : enter the path to put the accounts nodes from the root node.
- Account name path : enter the path to put the name from an account node.
- Account number path : enter the path to put the number from an account node.
- Transactions path : enter the path to put the transactions nodes from an account node.
- Splits path : enter the path to access the put nodes from a transaction node.
JSON settings

- Accounts path : enter the path to put the accounts array from the root object.
- Account name path : enter the path to put the name from an account object.
- Account number path : enter the path to put the number from an account object.
- Transactions path : enter the path to put the transactions array from an account object.
- Splits path : enter the path to put the splits array from a transaction object.
Mapping
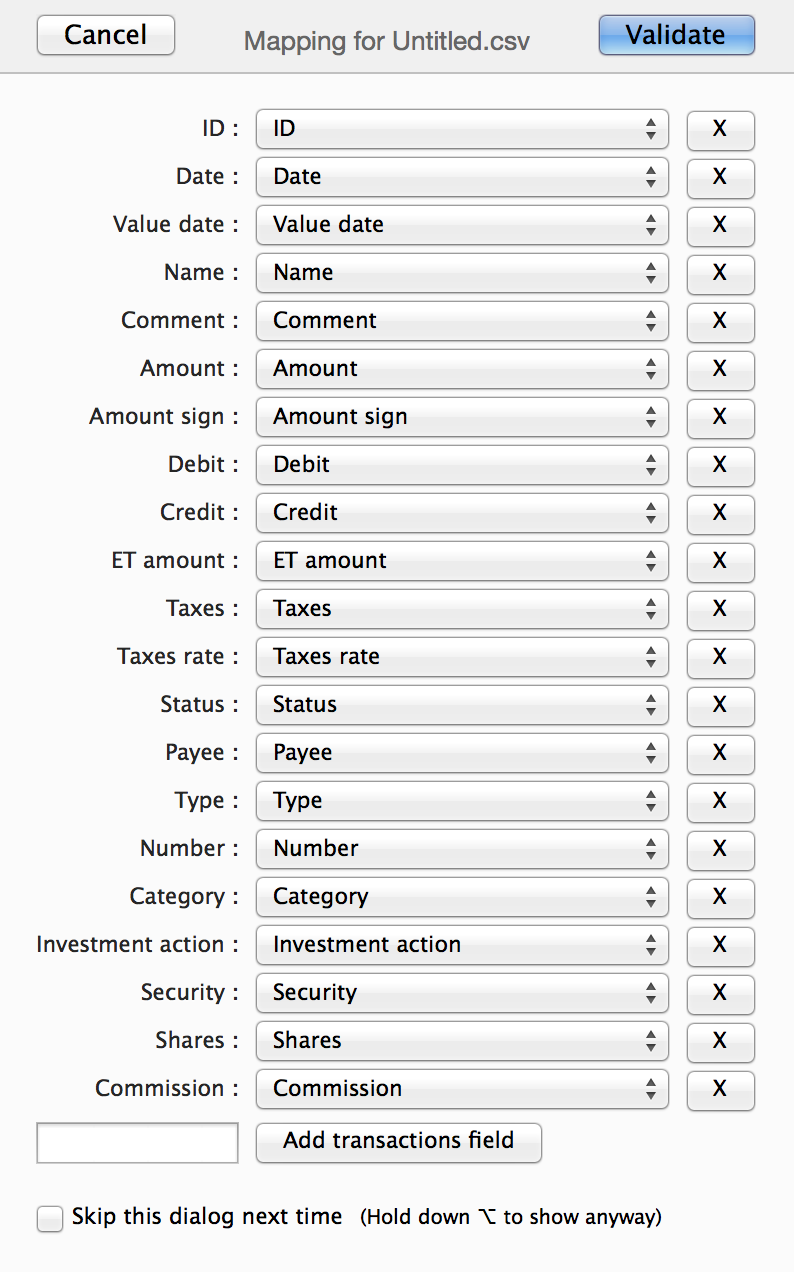
The mapping screen will appear next to let you tell which iCompta fields you want to export and how to name them. For QIF and OFX files the mapping is automatically set and won't appear unless you hold down ⌥ when validating the settings screen.
Unmapped values
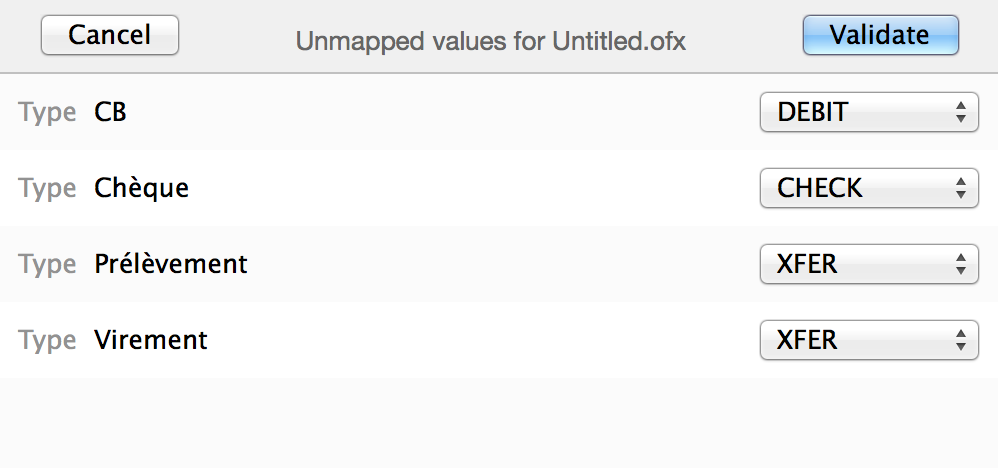
If the export format requires specific values for some fields, iCompta will ask you to give the value to use for each value in iCompta.
Results
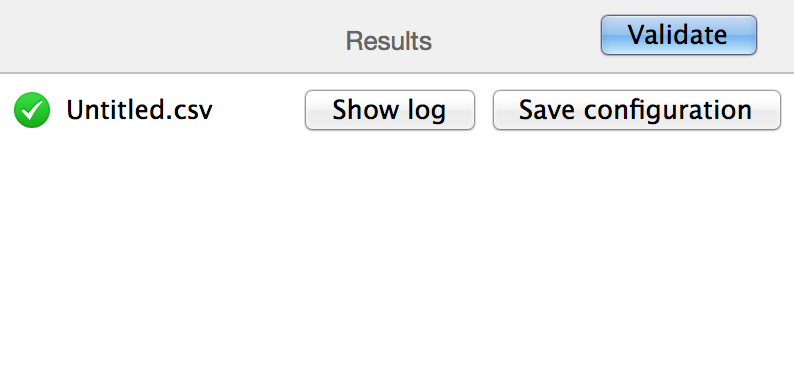
You can save your export configuration by clicking on the save configuration button in order to reuse it for other files. You can view and manage saved export configurations by clicking on the menu item.
Reconciliation
The different steps of a transaction's life
The workflow of a transaction is defined by its status :
- Planned : the transaction is planned but is not included in the balance of the account yet and it can be recomputed by iCompta.
- Created : the transaction is included in the balance but it doesn't appear on your financial institution's web site yet.
- Cleared : the transaction appears on your financial institution's web site.
- Locked : you have checked the transaction on your bank statement.
- Canceled : the transaction has been canceled.
There are different ways to reconcile depending on whether you enter your transactions manually in iCompta or download them.
Checking the cleared balance
If you enter the transactions yourself in iCompta you should open your financial institution's web site from time to time to see which transactions have been cleared. For these transactions change the status from created or planned to cleared by clicking on the status icon of the transaction line. At the end you should check that the cleared balance of the account displayed in iCompta is the same as the one displayed on the web site. If it's not it means you forgot to enter some transactions or that there are some mistakes in the amounts.
Reconciliation on import
If you enter the transactions yourself in iCompta you can also download transactions from your financial institution's as an alternative of the above method. In the import settings, set the status of imported transactions to cleared by default, enable reconciliation with existing transactions and choose to update the status of existing transactions. This is really the same thing as above but a little more automatic.
Using the bank statements panel
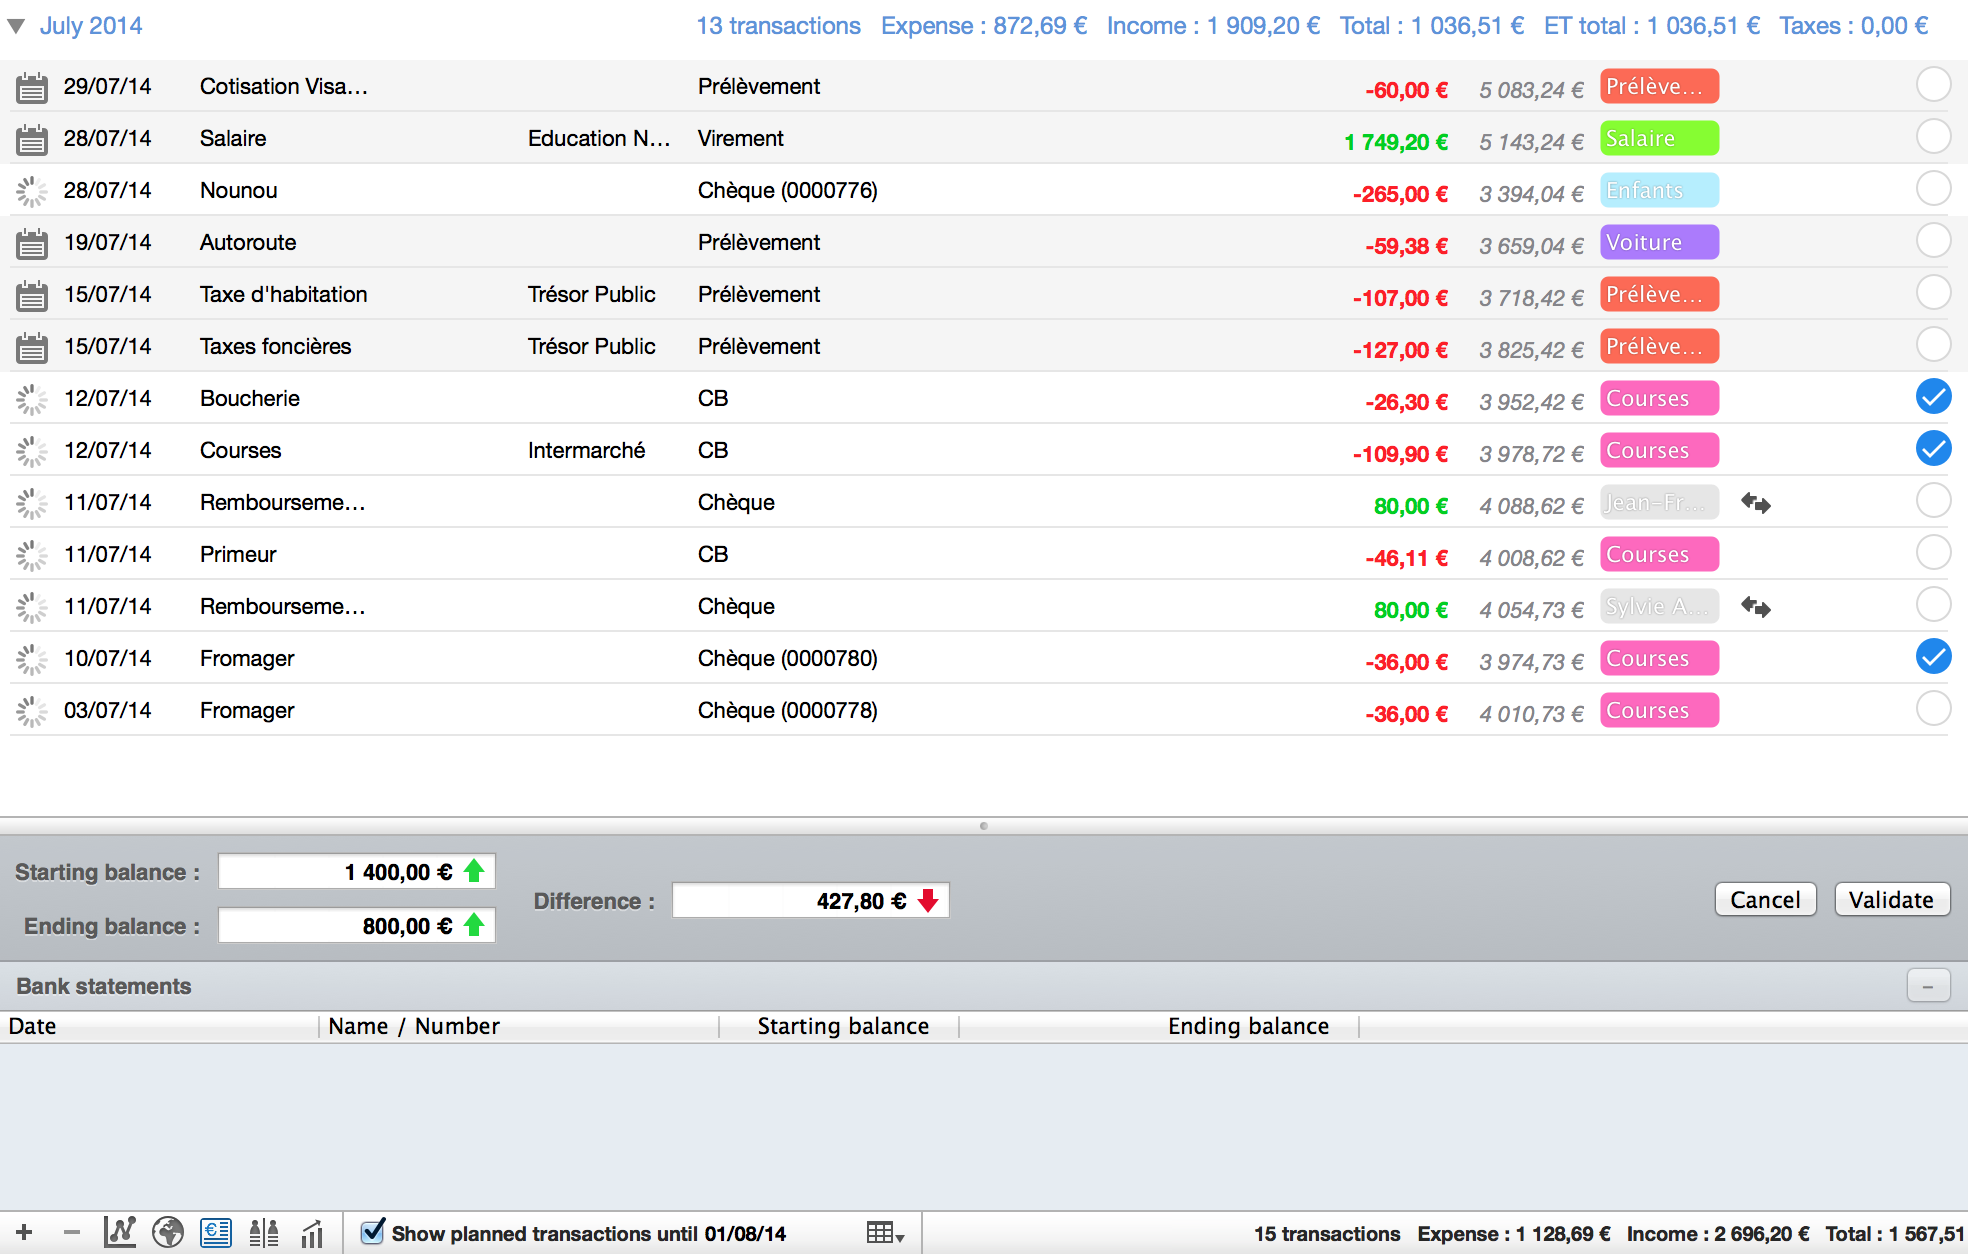
If you want to go further and compare your transactions in iCompta with your bank statements you can use the bank statements panel under the transactions list. Click on the reconcile button to start. If this is the first time you reconcile you have to enter the starting balance of your bank statement otherwise it will be filled with the previous ending balance. Enter the ending balance and you will see that the difference is updated. You will notice a new column has appeared in the transactions list to let you mark the transactions that are on your statement. When you mark transactions the difference field is updated so at the end it should be 0 if there are no mistakes. At that moment you can validate to set the status of the marked transactions to locked and a new line will appear in the bank statements list. You can double click on it later on to show all the transactions of that statement.
Making reports
Accounts summary
You can print the list of accounts with their balance by clicking on the menu item or using the keyboard shortcut ⌘P when no item is selected in the left list. If one account is selected in the list it will print its transactions instead.
Balance evolution
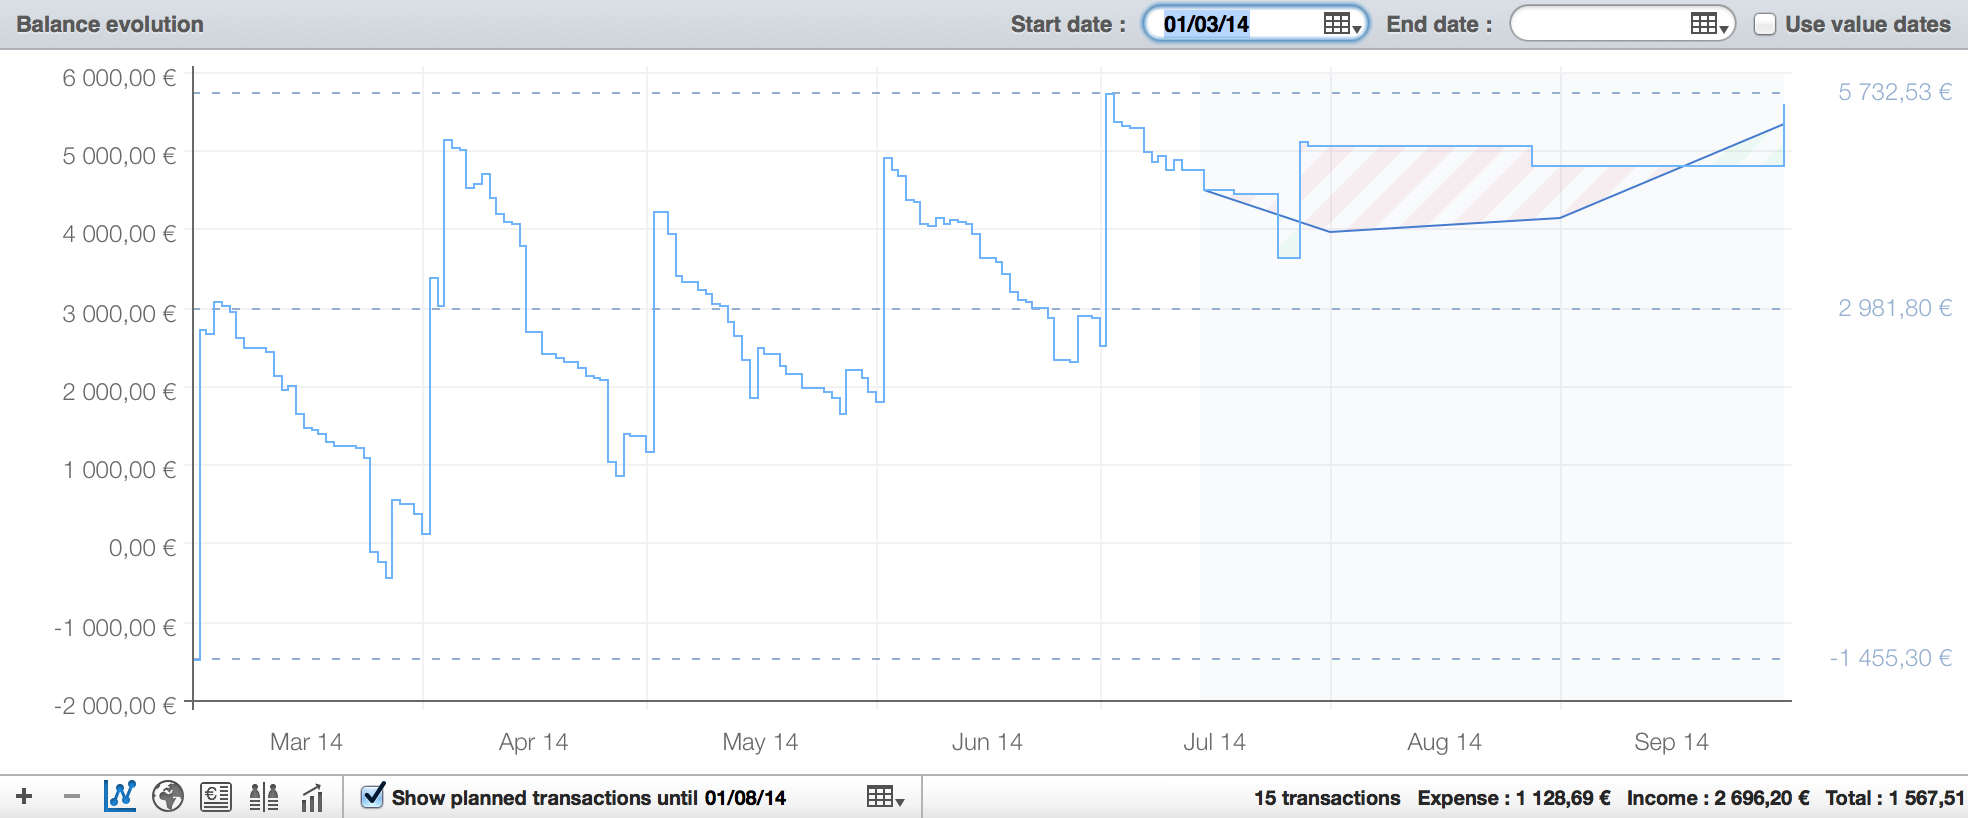
You can show the balance evolution graph by clicking on the button under the transactions list. The balance is displayed in blue along with three dotted lines for the minimum balance, the maximum balance and the average balance. If the end date of the graph is past today, the forecast of the account balance is displayed in dark blue. The forecast is based on the average income and expense of previous months. When you click on the graph, a black bubble shows the date and the balance corresponding to the mouse position.
You can double click on either axis to make the graph bigger. If you hold down ⌥ it will make the graph smaller instead.
You can print the balance evolution graph by right clicking on it and selecting print menu item.
Splits report
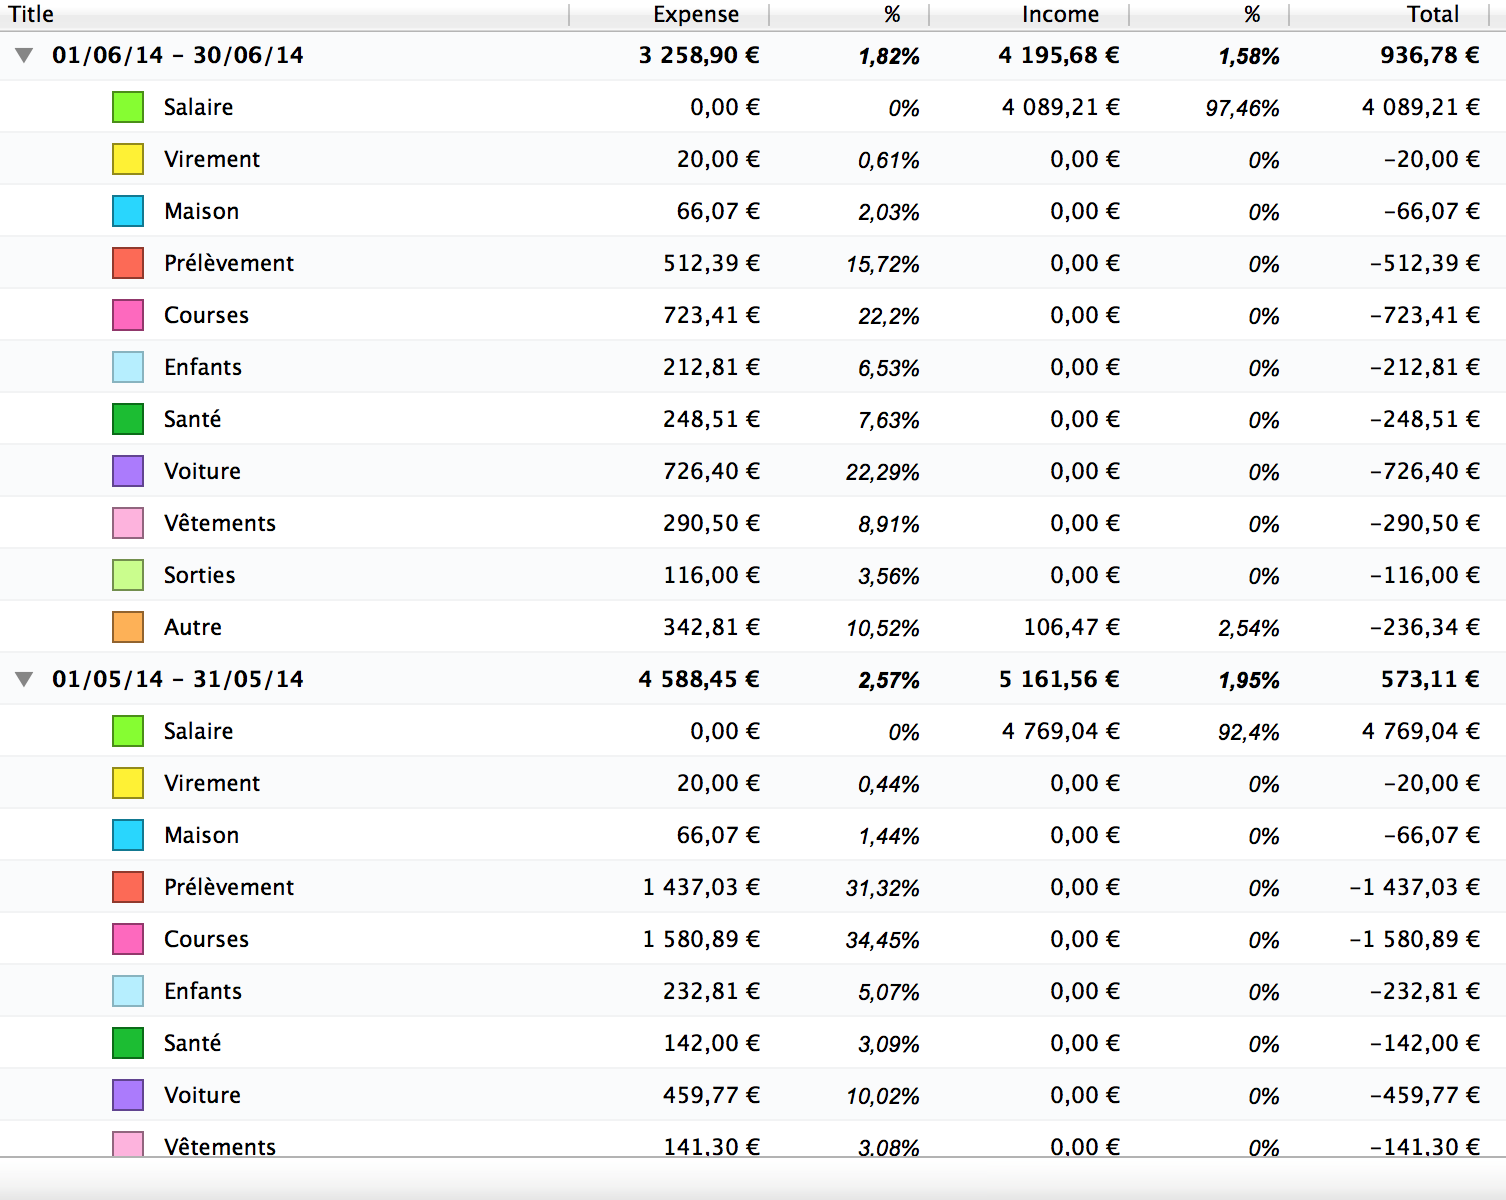
You can create a new report by clicking on the menu item. You can choose the currency of the report and customize which transactions and splits to analyze by settings the filters.
You can double click on a line to show the corresponding transactions.
You can export the selected lines to CSV with a copy/paste or by making a drag & drop on the desktop.
You can print the report by clicking on the menu item or using the keyboard shortcut ⌘P.
Comparative report
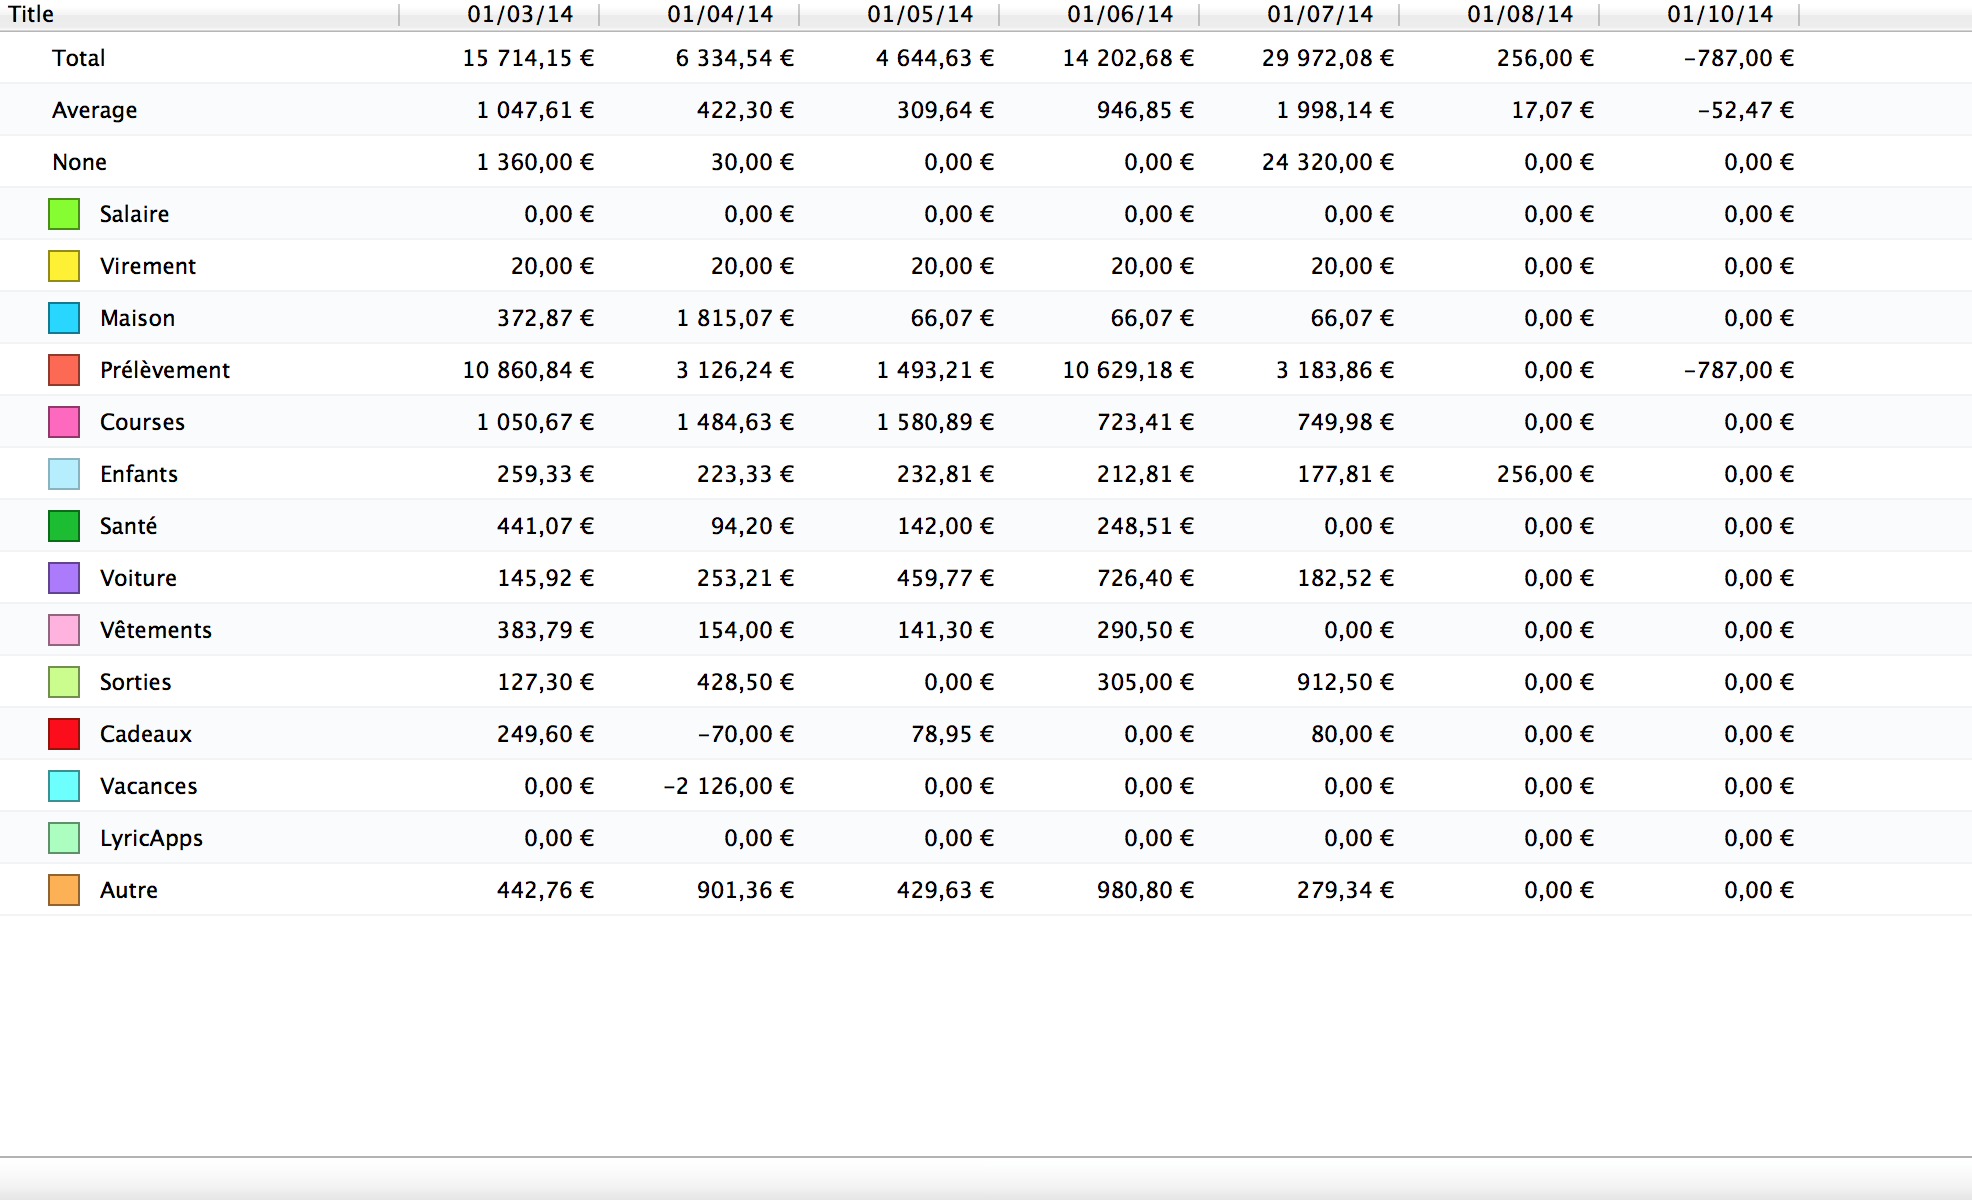
You can double click on a line to show the corresponding transactions.
You can export the selected lines to CSV with a copy/paste or by making a drag & drop on the desktop.
You can print the report by clicking on the menu item or using the keyboard shortcut ⌘P.
Pie chart
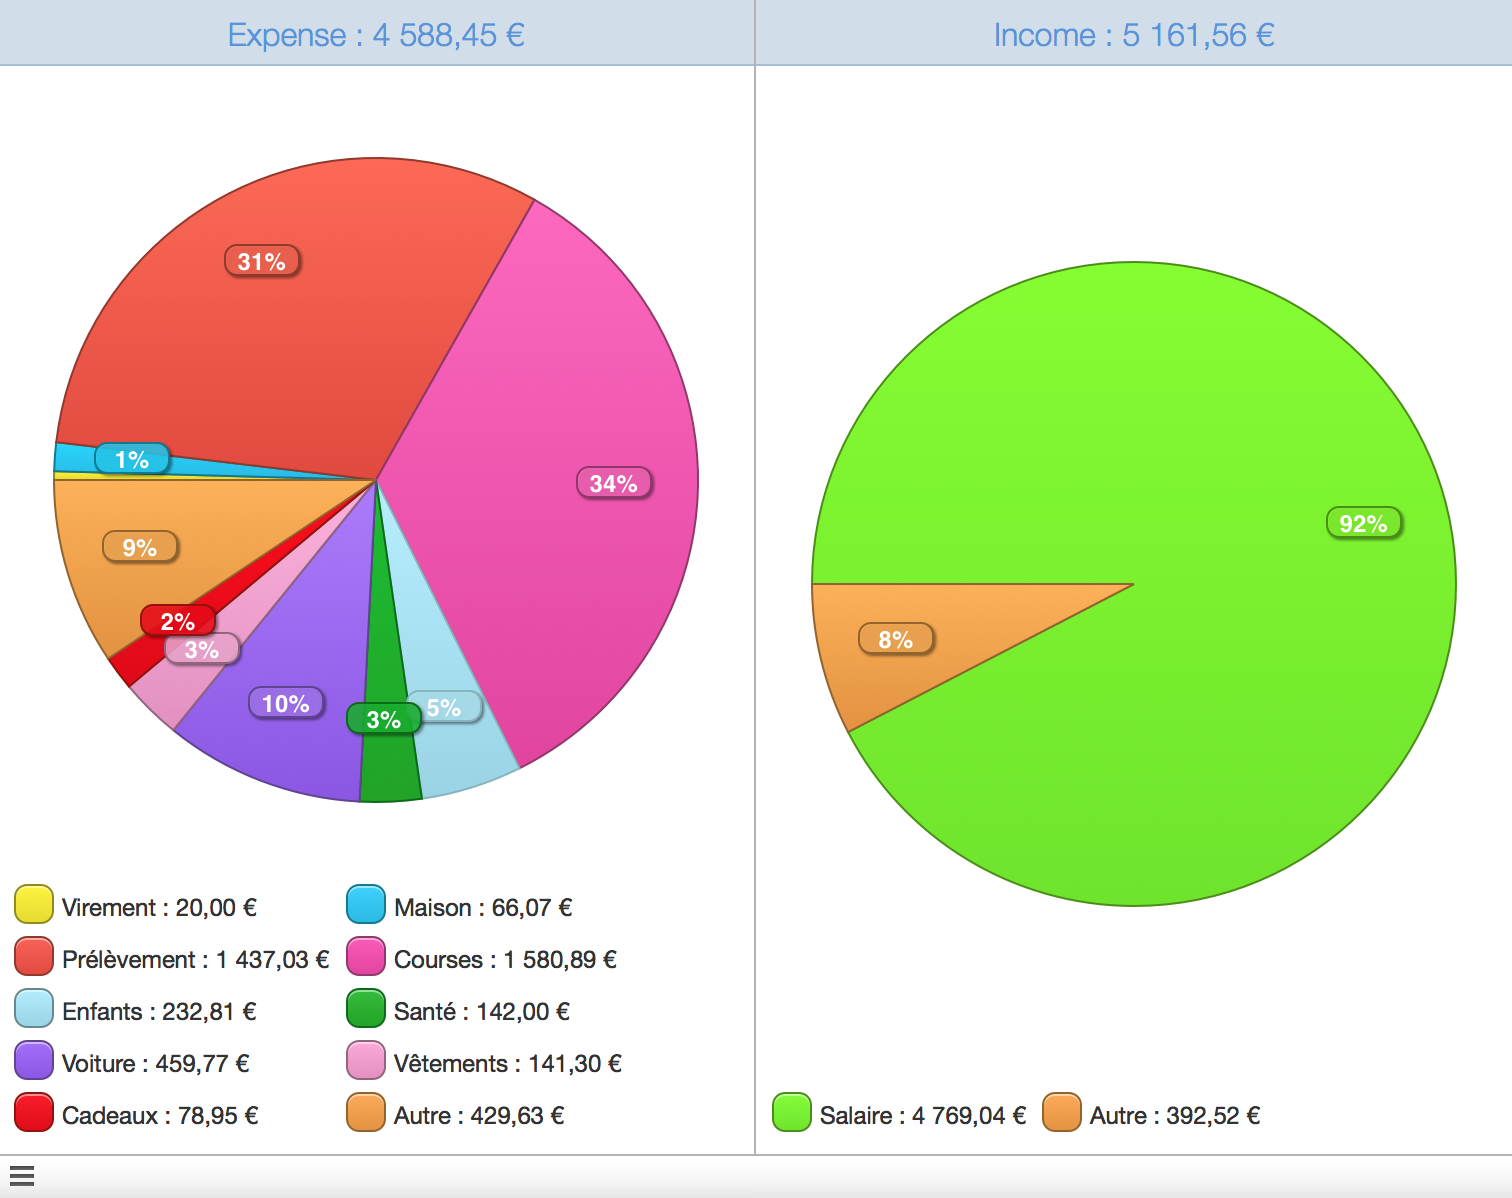
You can choose the period to display in the periods panel by clicking on the button under the pie charts.
You can double click on a slice to show the corresponding transactions.
You can print the report by clicking on the menu item or using the keyboard shortcut ⌘P.
Bar chart
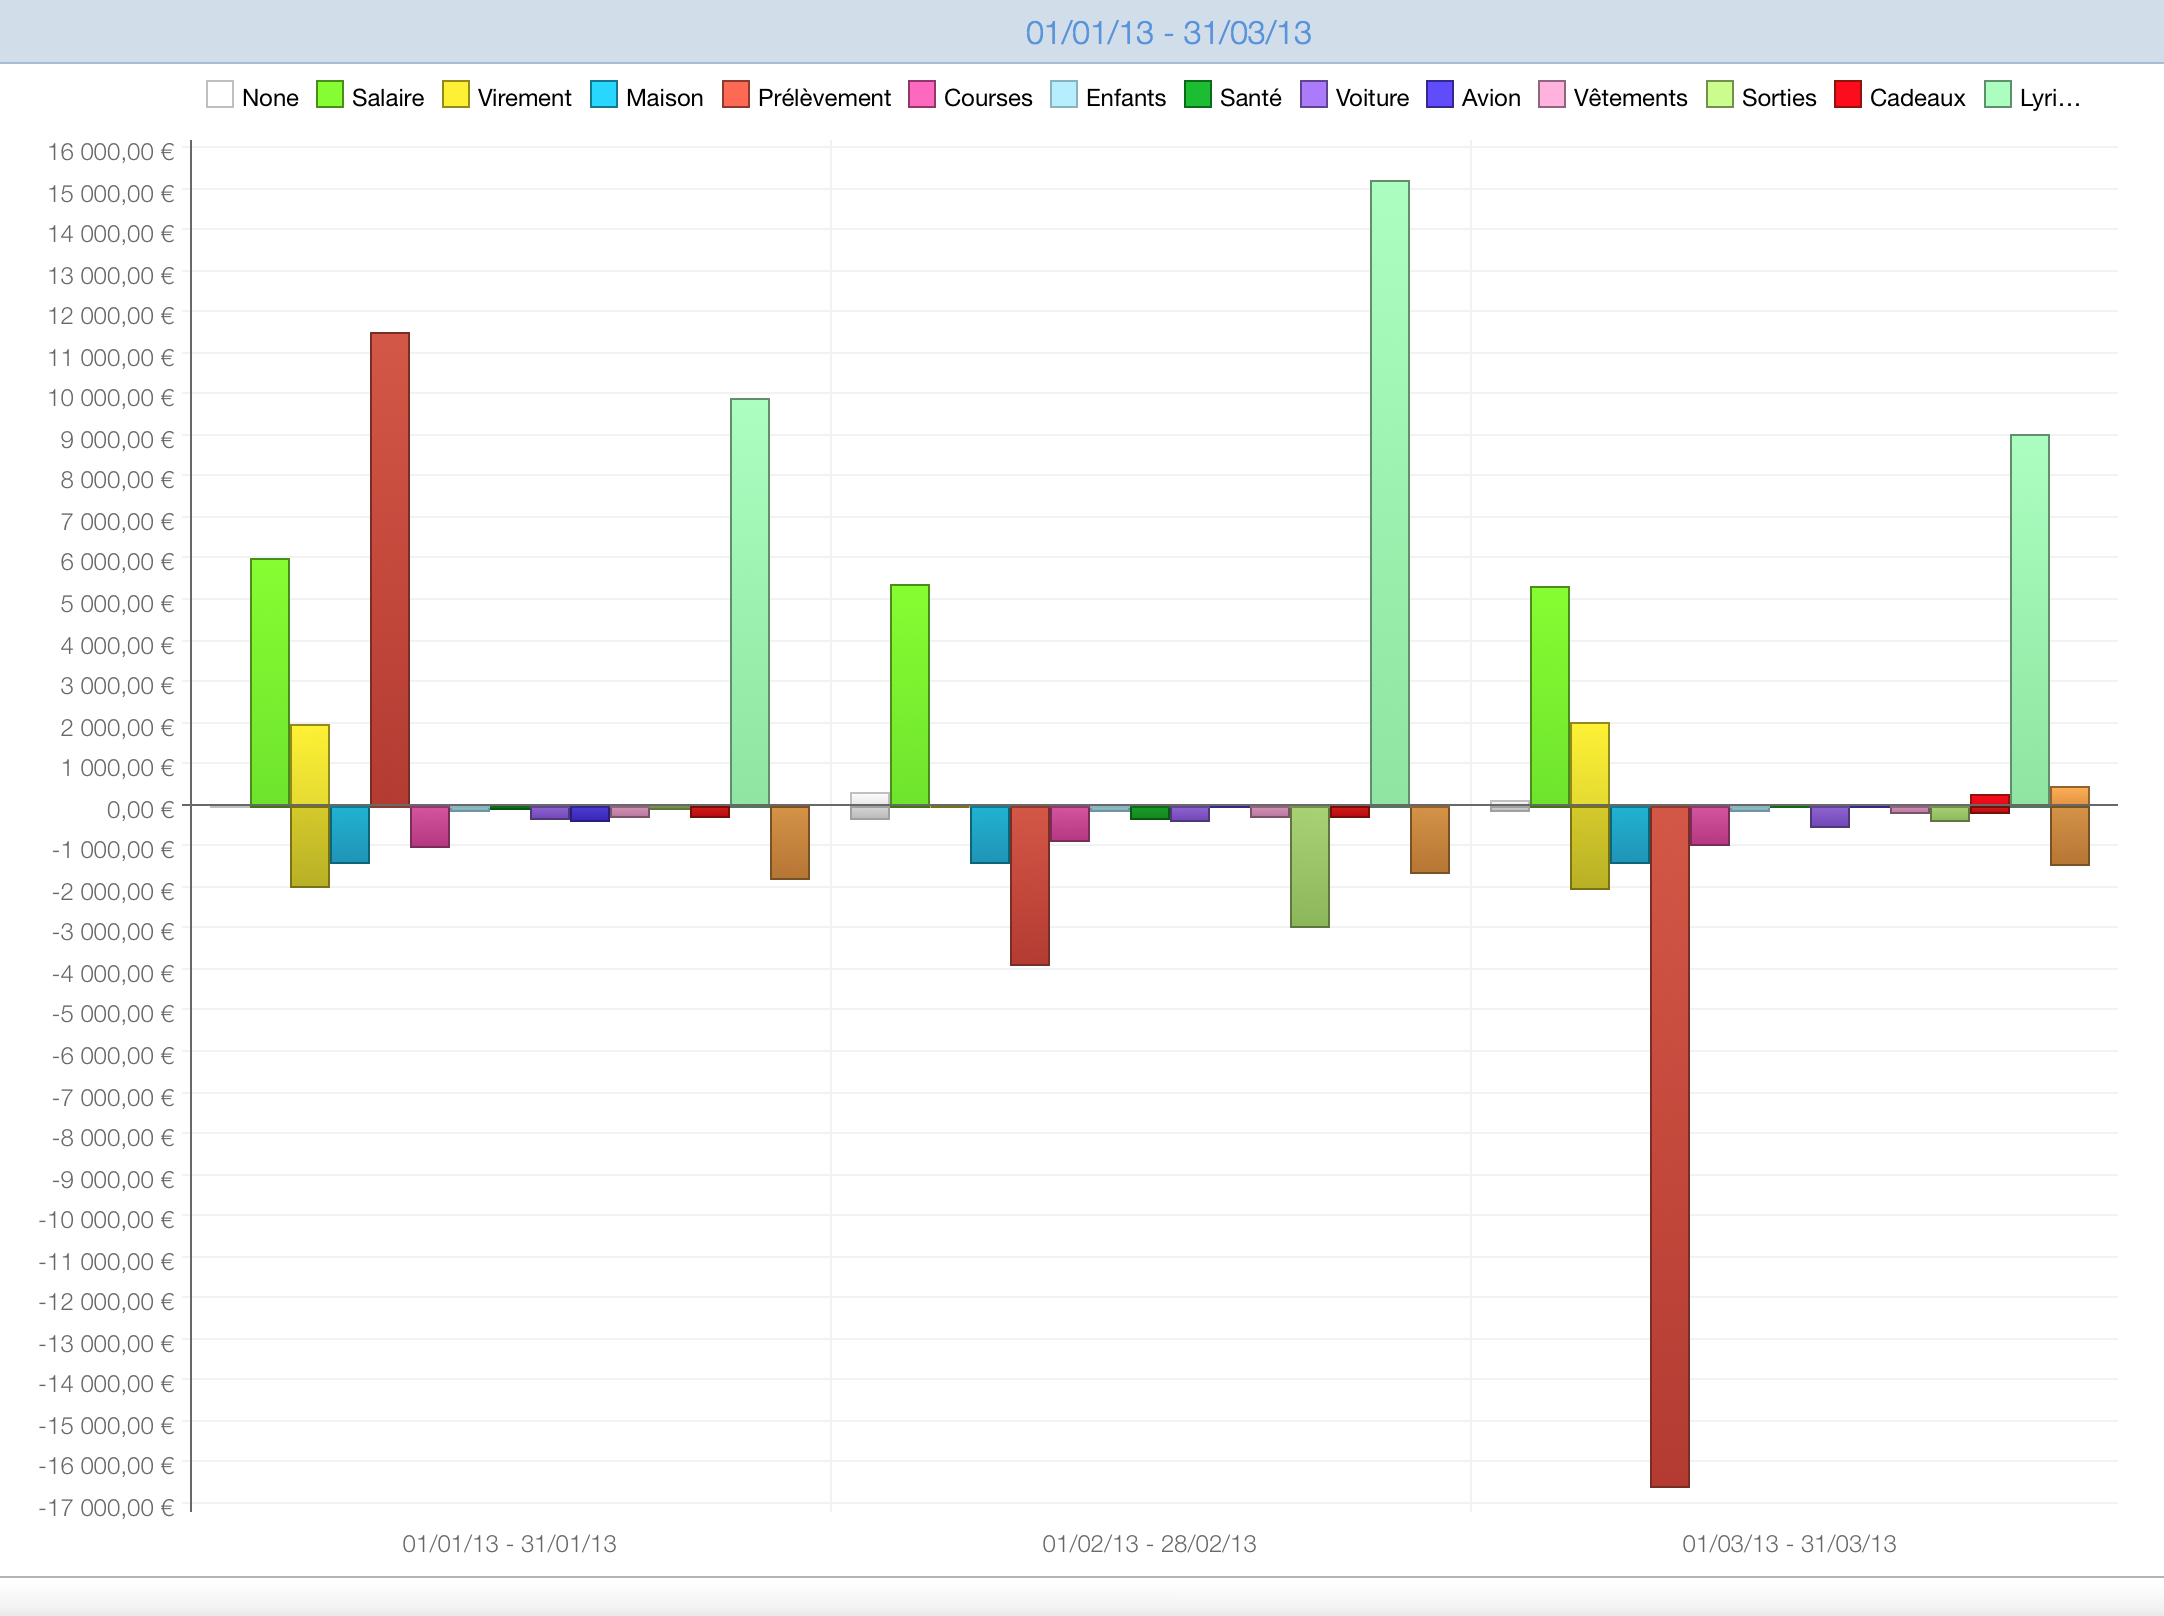
You can double click on either axis to make the graph bigger. If you hold down ⌥ it will make the graph smaller instead.
You can double click on a bar to show the corresponding transactions.
You can print the report by clicking on the menu item or using the keyboard shortcut ⌘P.
Monitoring your budget
A budget allows you to monitor your expense and income on a periodic basis. You have to define how much you expect to spend and how much you expect to earn in a month for example and you will be able to see if you stay in line with these expectations.
Creating or editing a budget
You can create a budget by clicking on the + button in the bottom left corner or by clicking on the menu item. When you create a new budget, a window appears to let you edit its properties. If you want to edit an existing budget just double click on it.
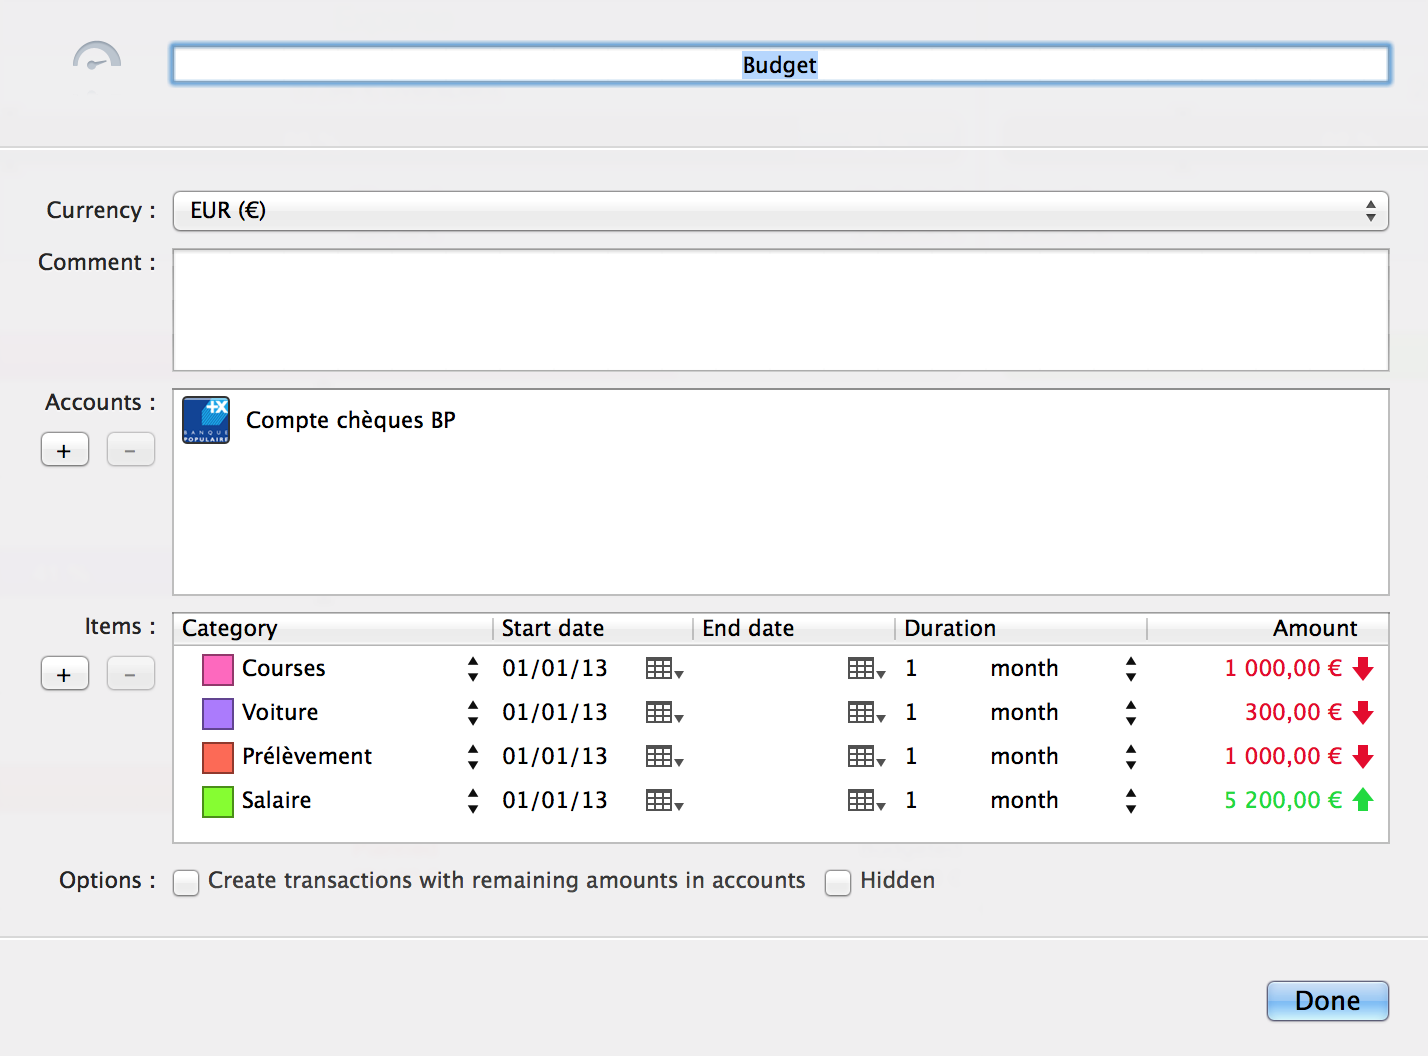
In the budget editing window you can change the following properties :
- Icon : you can drag & drop an image file over the existing icon or also copy/paste an image onto it to change it.
- Name
- Currency : go here to learn how to add a new currency.
- Accounts
- Items : you define the expected expense or income for a category on a given period.
- Create transactions with remaining amounts in accounts : if you enable this iCompta will compute how much is remaining to spend or earn for the budgeted categories and create transactions in the monitored accounts.
- Hidden : if you don't want it to be shown in the budgets list you can check this box. If you want to look at it later on you can activate menu item to make it reappear.
If you want to change the amounts you defined for a category you should create a new budget otherwise it will impact previous periods of the budget. You can copy/paste the current budget and change the amount on the new budget to go faster.
You can also create a budget whose items will be pre-filled by clicking on the menu item.
Removing a budget
You can remove selected budgets by clicking on the - button in the bottom left corner. If you just want to hide this budget from the budgets list but you still want to be able to look at it later set it to hidden in the budget editing window instead.
Monitoring a budget using progress bars
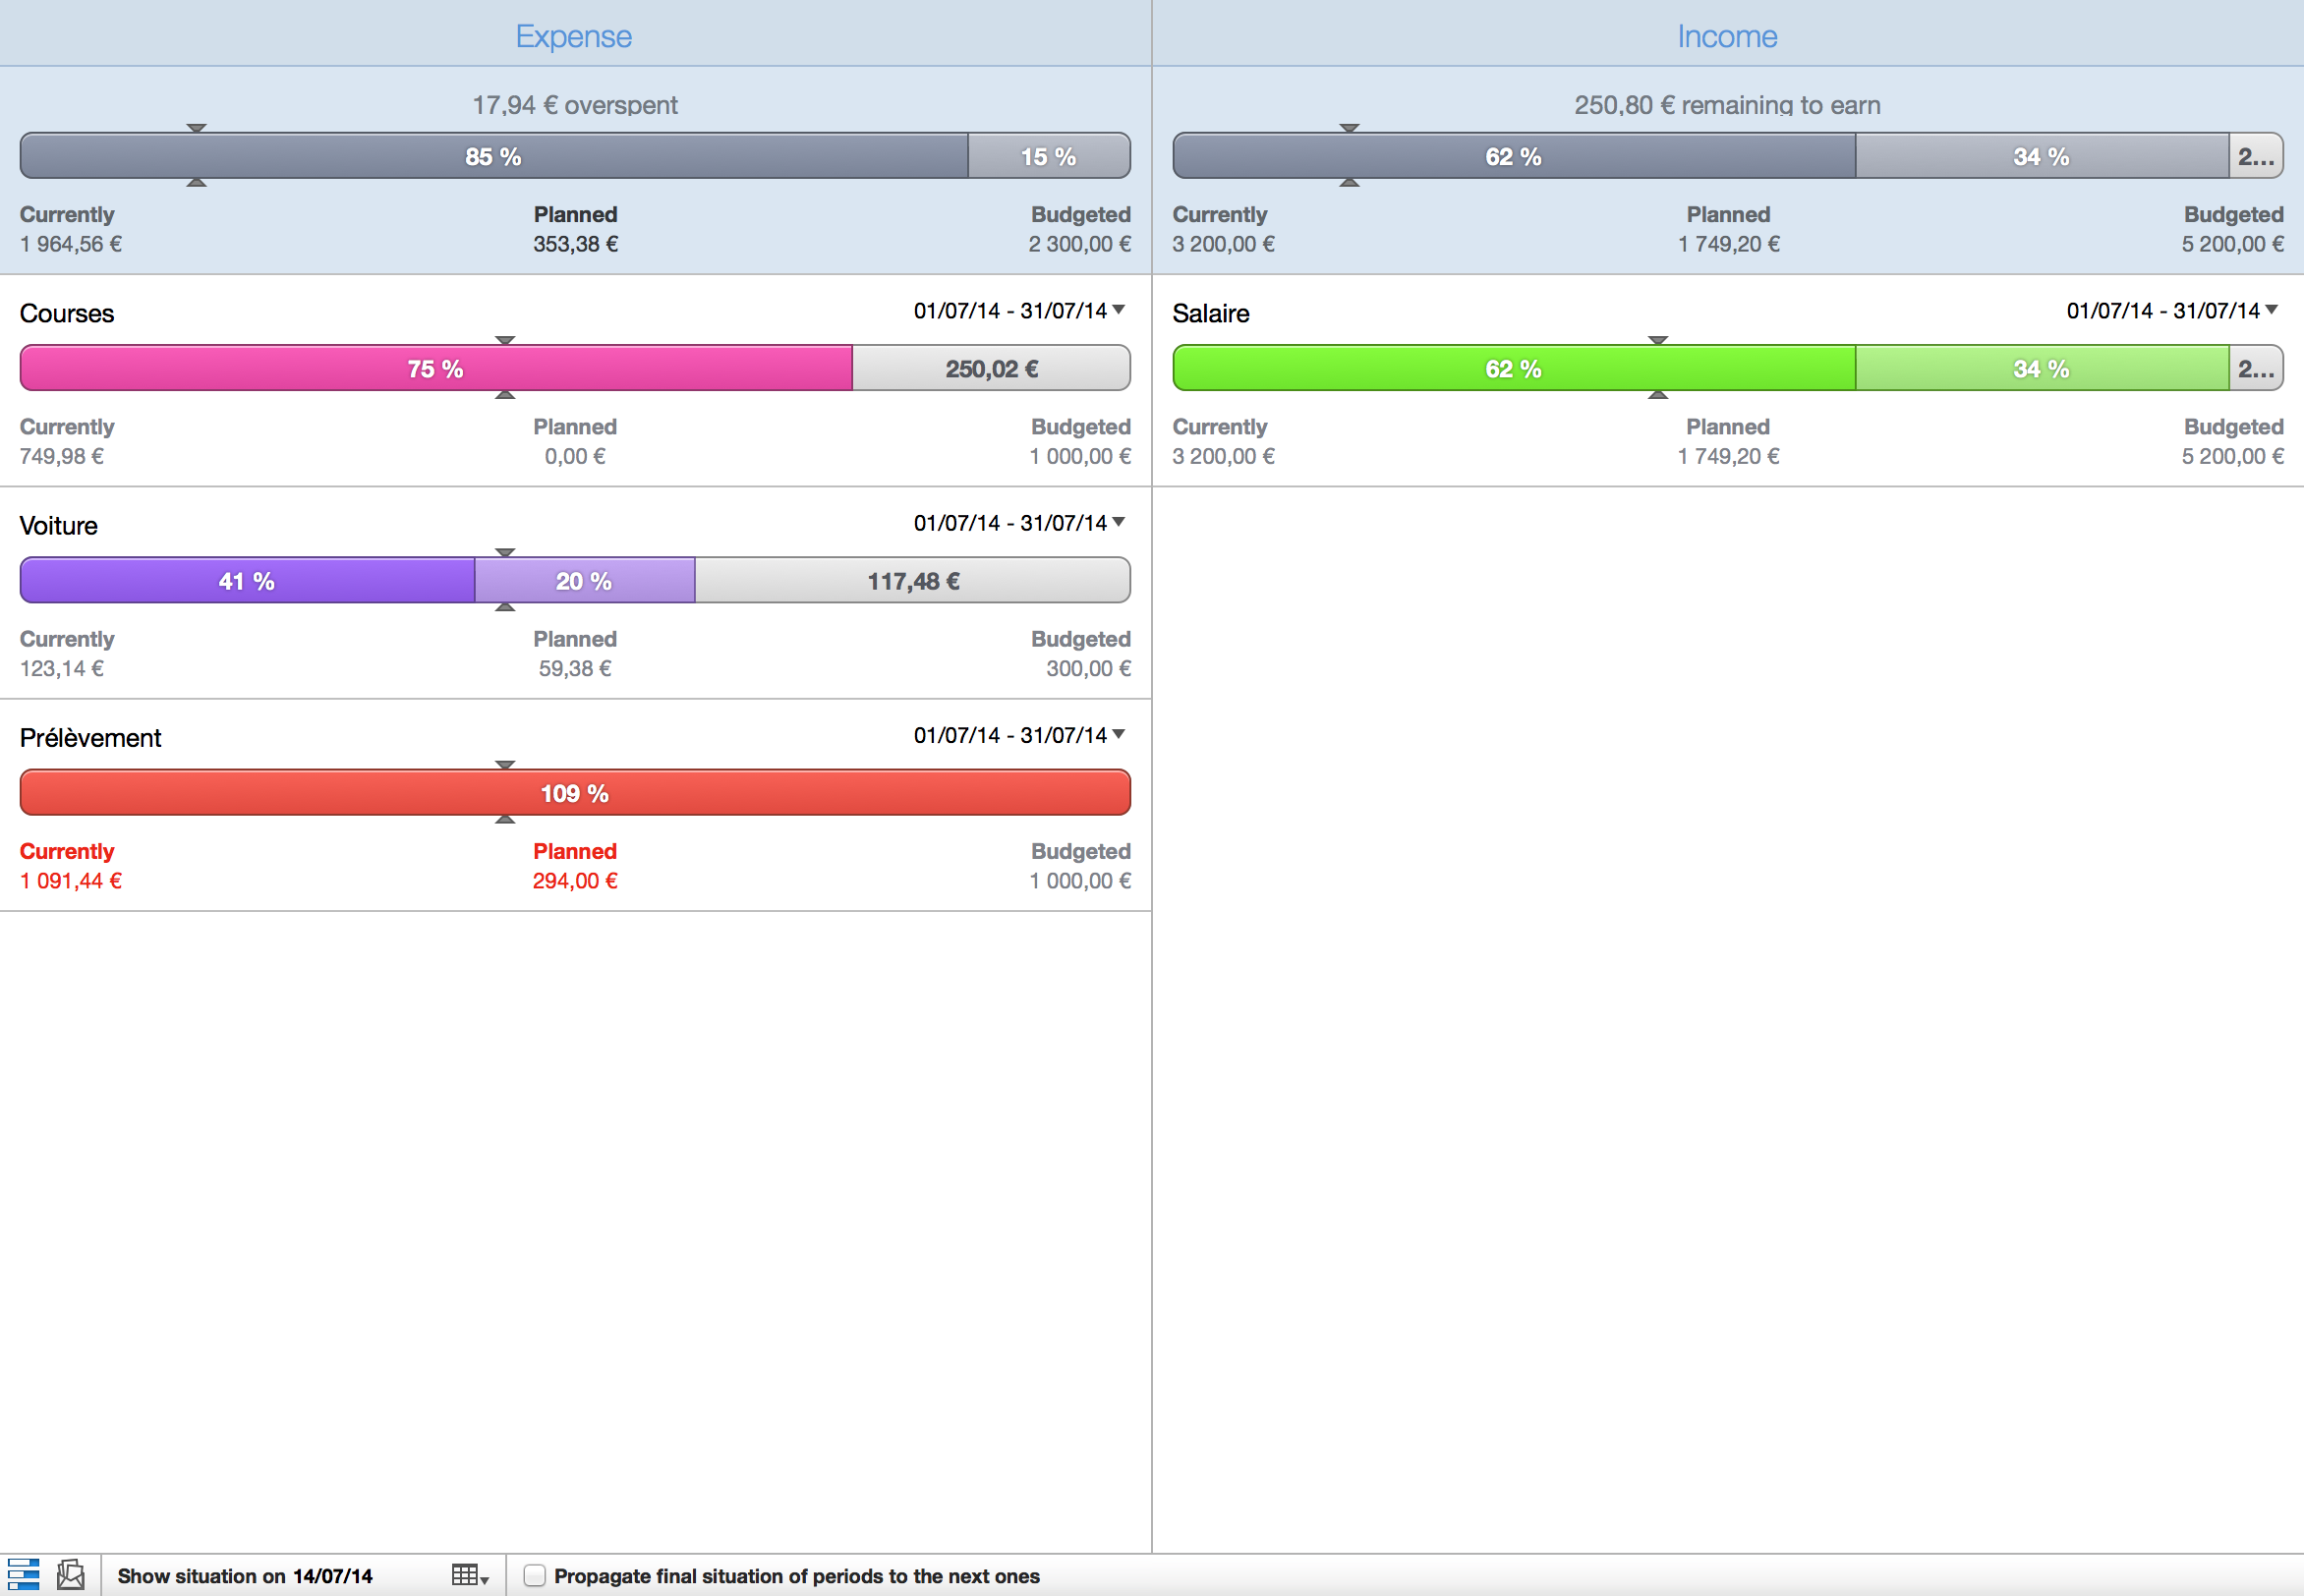
The first way to monitor your budget is by looking at the progress bars by clicking on the progress bars icon in the bottom bar when a budget is selected.
If you didn't spend all the budgeted money for a given month you can choose to add that unspent money to the budgeted money of next month by activating the propagation of final situation of periods to the next ones.
Monitoring a budget using envelopes
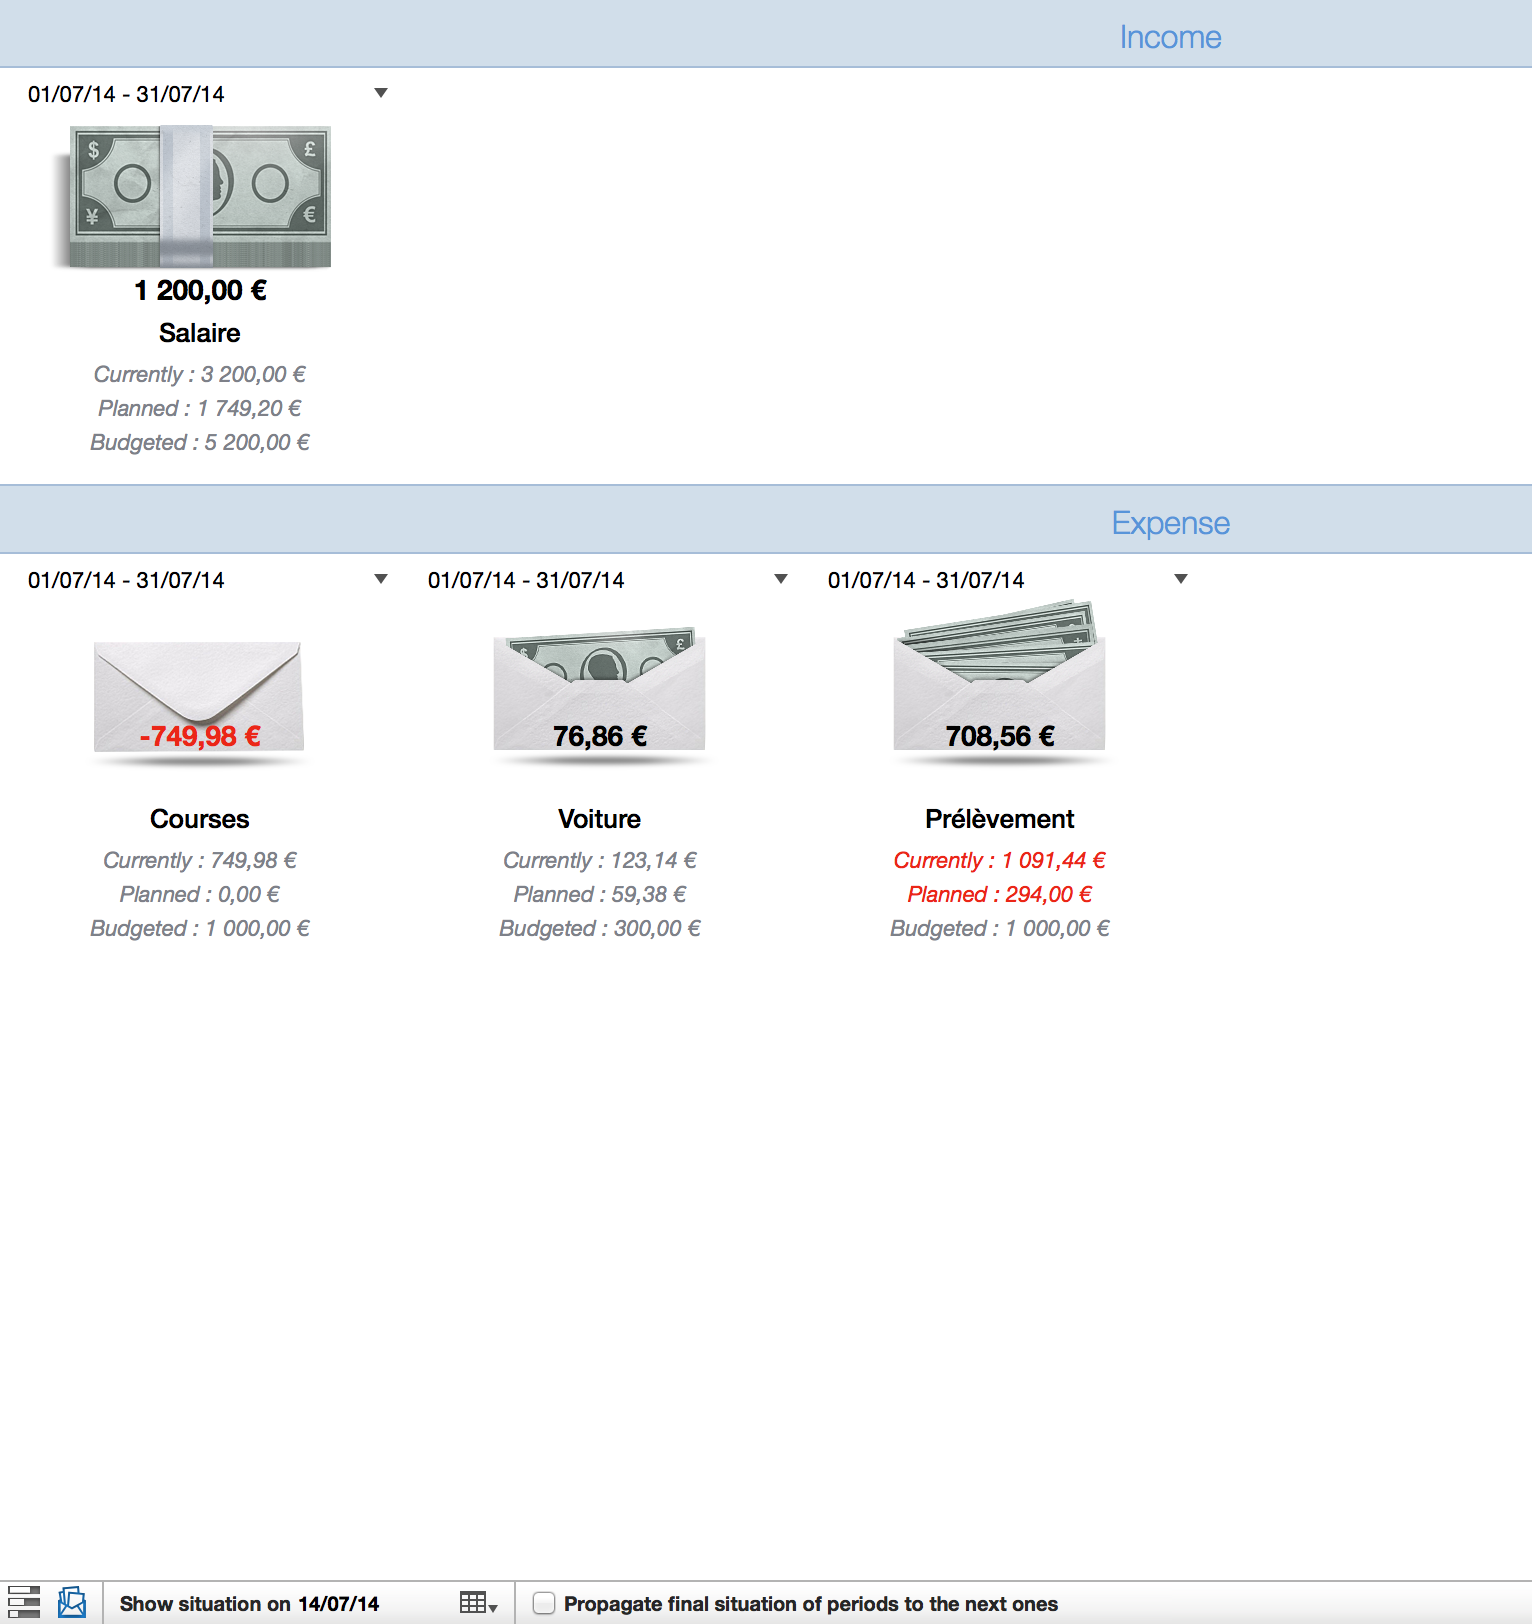
The second way to monitor your budget is by using envelopes by clicking on the envelope icon in the bottom bar when a budget is selected. In this mode, income categories are shown as a stack of cash and expense categories as envelopes. You have to drag & drop cash on envelopes to fill them.
Navigating between the different periods of a budget
There are several ways to choose which periods of a budget are displayed.

By activating the navigator you can see all the periods of a budget at a glance. If you select a line, it will also select the corresponding periods in the center part of the screen.
The navigator displays the periods for all the budget items or just the selected ones if you have selected items in the center part of the screen.
You can also set a date in the "Show situation on" field. It will the select the period running on that date for each category line.
- Example : you created a budget with the following categories :
- Food category, monthly and starting on 01/01/13.
- Other category, weekly and starting on 01/01/13.
- Holiday category, every 6 months and starting on 01/01/13.
- If you set the date to 01/10/13 in the "Show situation on" field for example, it will display the 01/01/13 - 01/31/13 period for the food category, the 01/08/13 - 01/14/13 period for the other category and the 01/01/13 - 06/30/13 period for the holiday category.
- If you set the date to 07/01/13 in the "Show situation on" field for example, it will display the 07/01/13 - 07/31/13 period for the food category, the 06/25/13 - 07/01/13 period for the other category and the 07/01/13 - 12/31/13 period for the holiday category.
Last, if you want to have more control, you can choose which periods to display for each category by clicking on the periods popup button in the category line.
Monitoring your investments
Managing securities
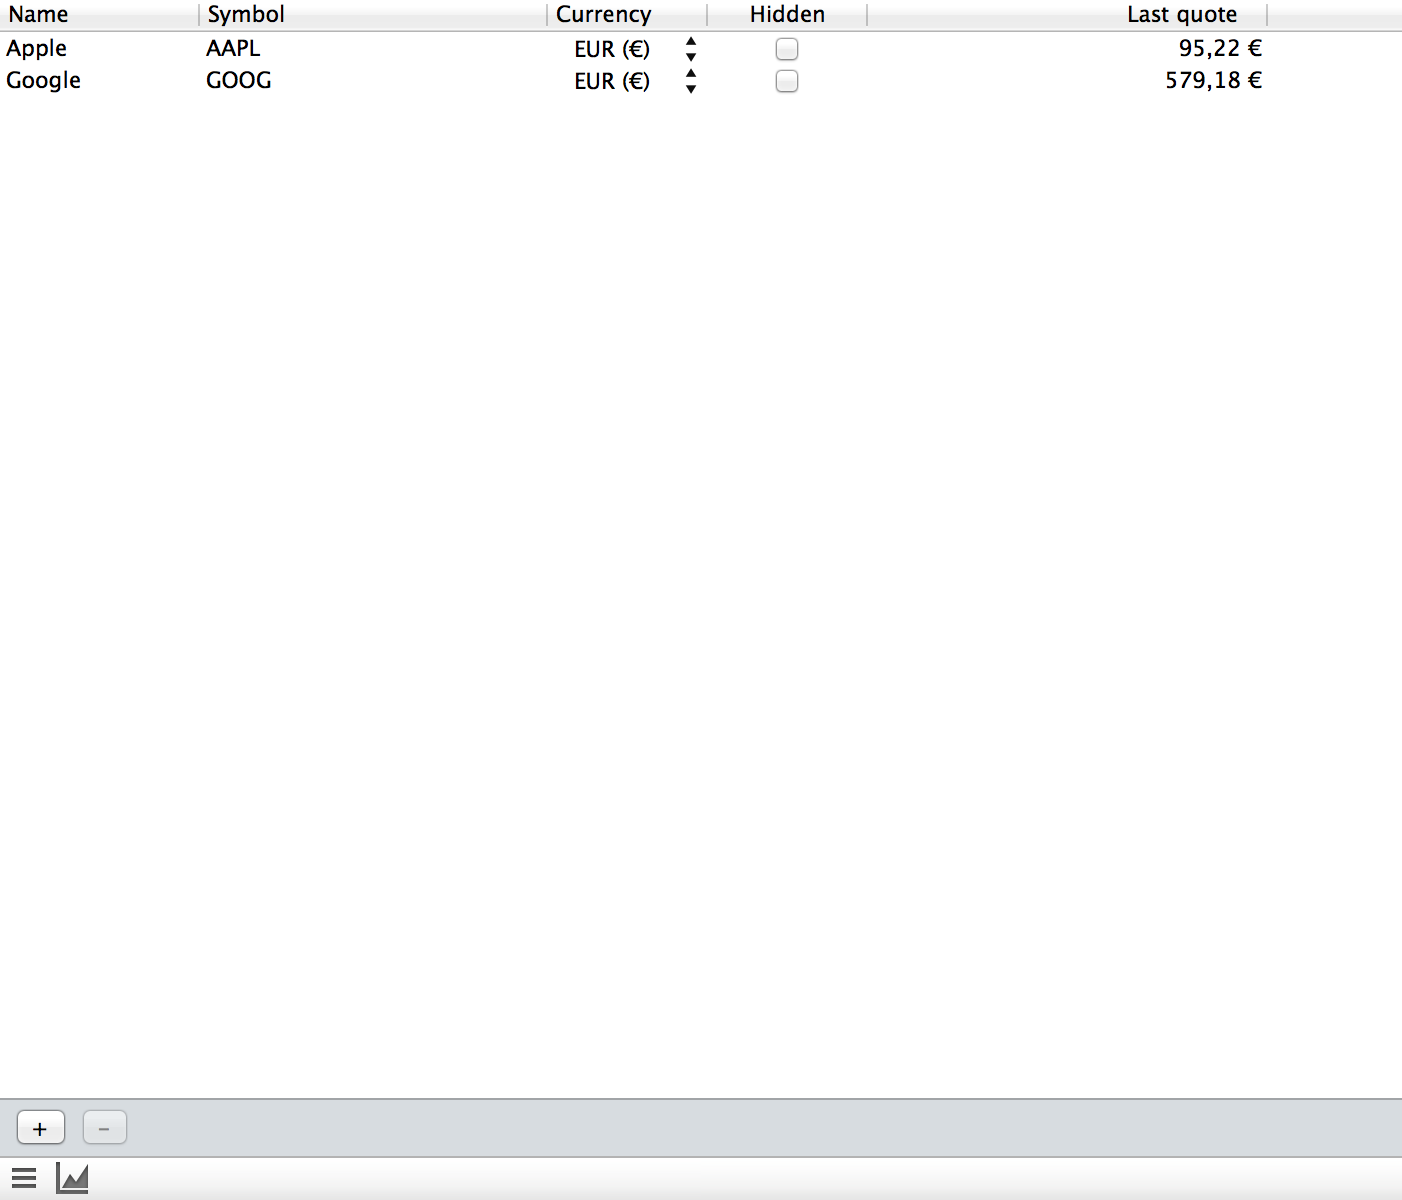
You can add or remove securities by selecting the securities line in the left list.
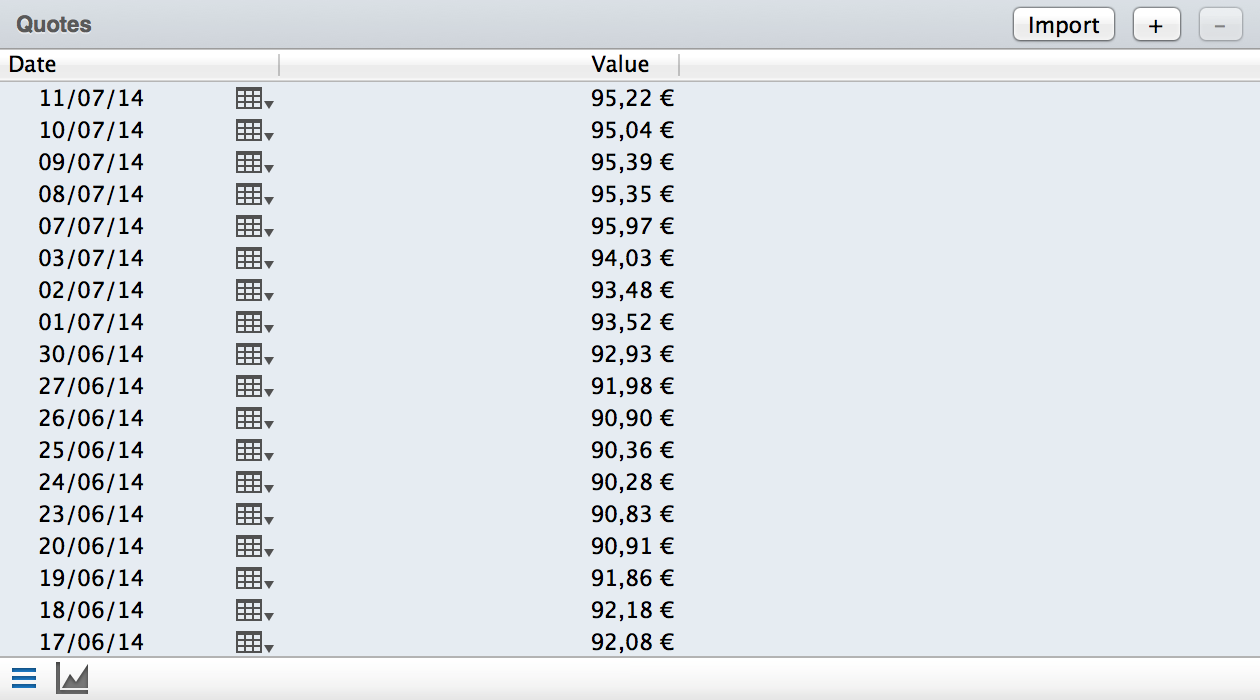
When you enter the symbol for a security, iCompta can download the latest quotes from Google or Yahoo if you enable it in the preferences window. You can also enter the quotes yourself or import them from a CSV file in the quotes panel by clicking on the second button in the bottom bar.
- To download quotes from Google :
- Go to http://www.google.com/finance
- Search for the company you want and click on the link to go to its page
- Besides the name of the company there is a symbol between parentheses. This is that symbol you need to enter in iCompta after the prefix "Google:"
- For example for Apple, you have to enter the symbol Google:NASDAQ:AAPL in iCompta
- To download quotes from Yahoo :
- Go to http://finance.yahoo.com
- Search for the company or the fund you want and click on the link to go to its page
- Besides the name of the company or the fund there is a symbol between parentheses. This is that symbol you need to enter in iCompta after the prefix "Yahoo:"
- For example for Apple, you have to enter the symbol Yahoo:AAPL in iCompta
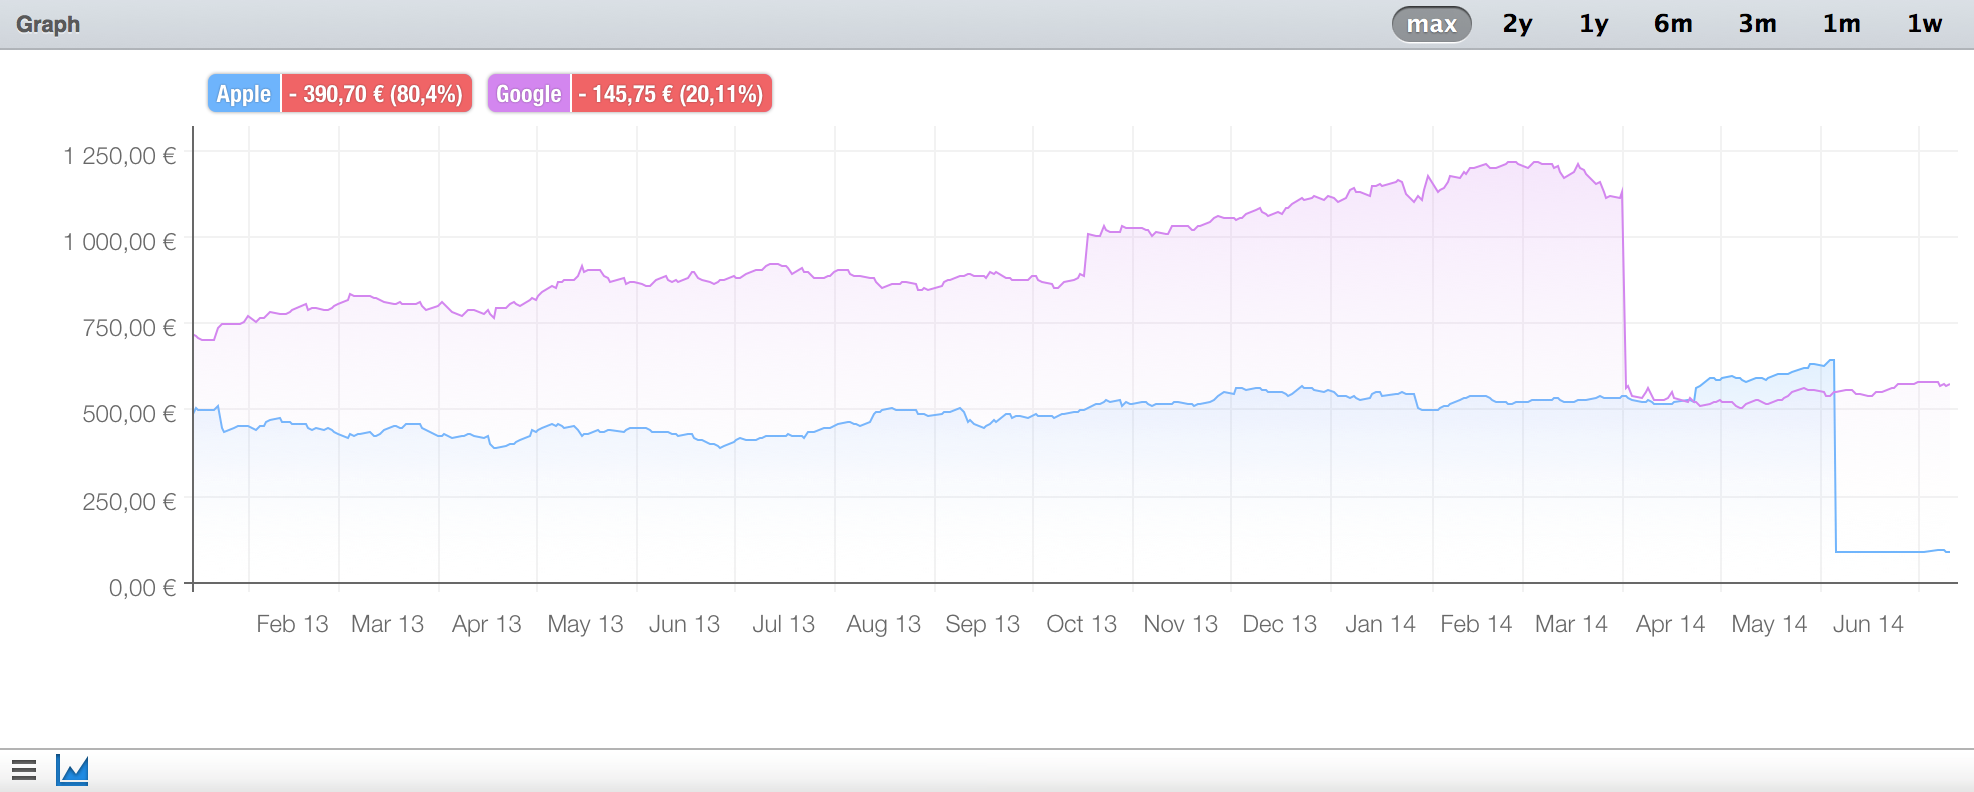
You can see the evolution of one or more securities by clicking on the third button in the bottom bar. You can double click on either axis to make the graph bigger. If you hold down ⌥ it will make the graph smaller instead.
Creating an investment account
Now that you have set securities you can create an account and set its type to investment. When you create a transaction in the investment account you can specify if it is related to a security and what kind of operation it was (buy, sell, etc.) as well as the number of shares.
Monitoring your portfolio

You can see the situation of your portfolio by showing the securities panel by clicking on the eighth button under the transactions list.
This panel shows all the securities you own in the selected accounts and for each security :
- The current number of shares
- The last quote
- The market value
- The average share cost (commission included)
- The profit :(last quote - average cost) × number of shares + dividends
- The realized profit :∑ amount of sale (commission included) - (average cost at the date of the sale × number of shares sold)
- The return on investment :(market value at the end of the period + dividends during the period + sales during the period) / (market value at the beginning of the period + purchases during the period)
- The sum of commissions
Making rules to automate things
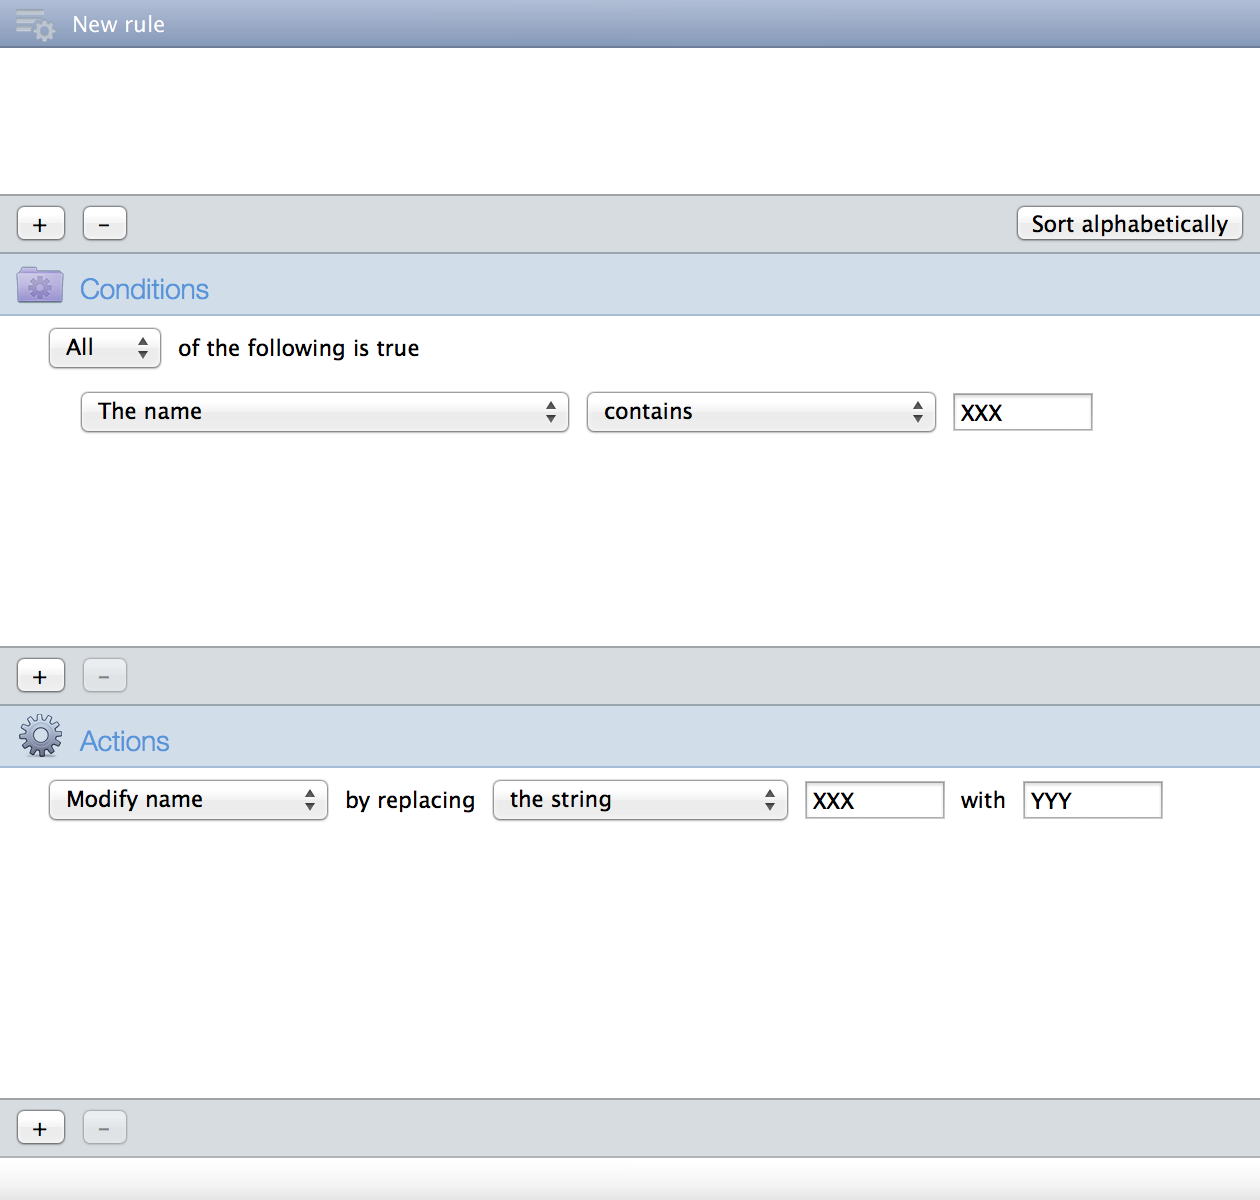
You can add or remove rules by selecting the rules line in the left list. A rule is used to perform actions on transactions when a set of conditions is fulfilled.
You can apply rules to selected transactions by clicking on the menu item or by using the keyboard shortcut ⌘R.
The rules are assessed sequentially in the order they appear in the list.
- Example : setting a default type for new transactions.
- Create a new rule and name it "Credit card".
- Add a new condition and change it to "The account is CC" (assuming you have an account named "CC").
- Add a new action and change it to "Set type to Credit card".
- Now when you create a new transaction in the "CC" account, you can apply rules to automatically set the type of the new transaction to "Credit card".
Adding a password on open
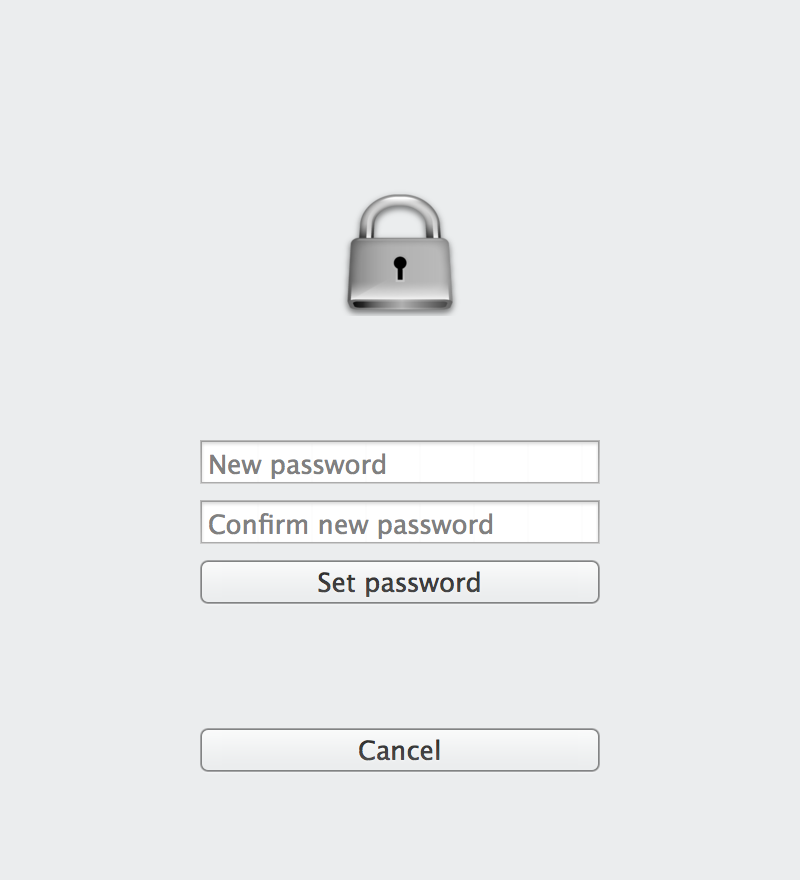
You can add a password on open by clicking on the lock button in the lower left part of the window. Next time you open your document you will have to enter the password to see the data.
Please be aware that unlike previous versions of iCompta, this is just a software protection and the data file on your disk is not encrypted.
Synchronizing your data
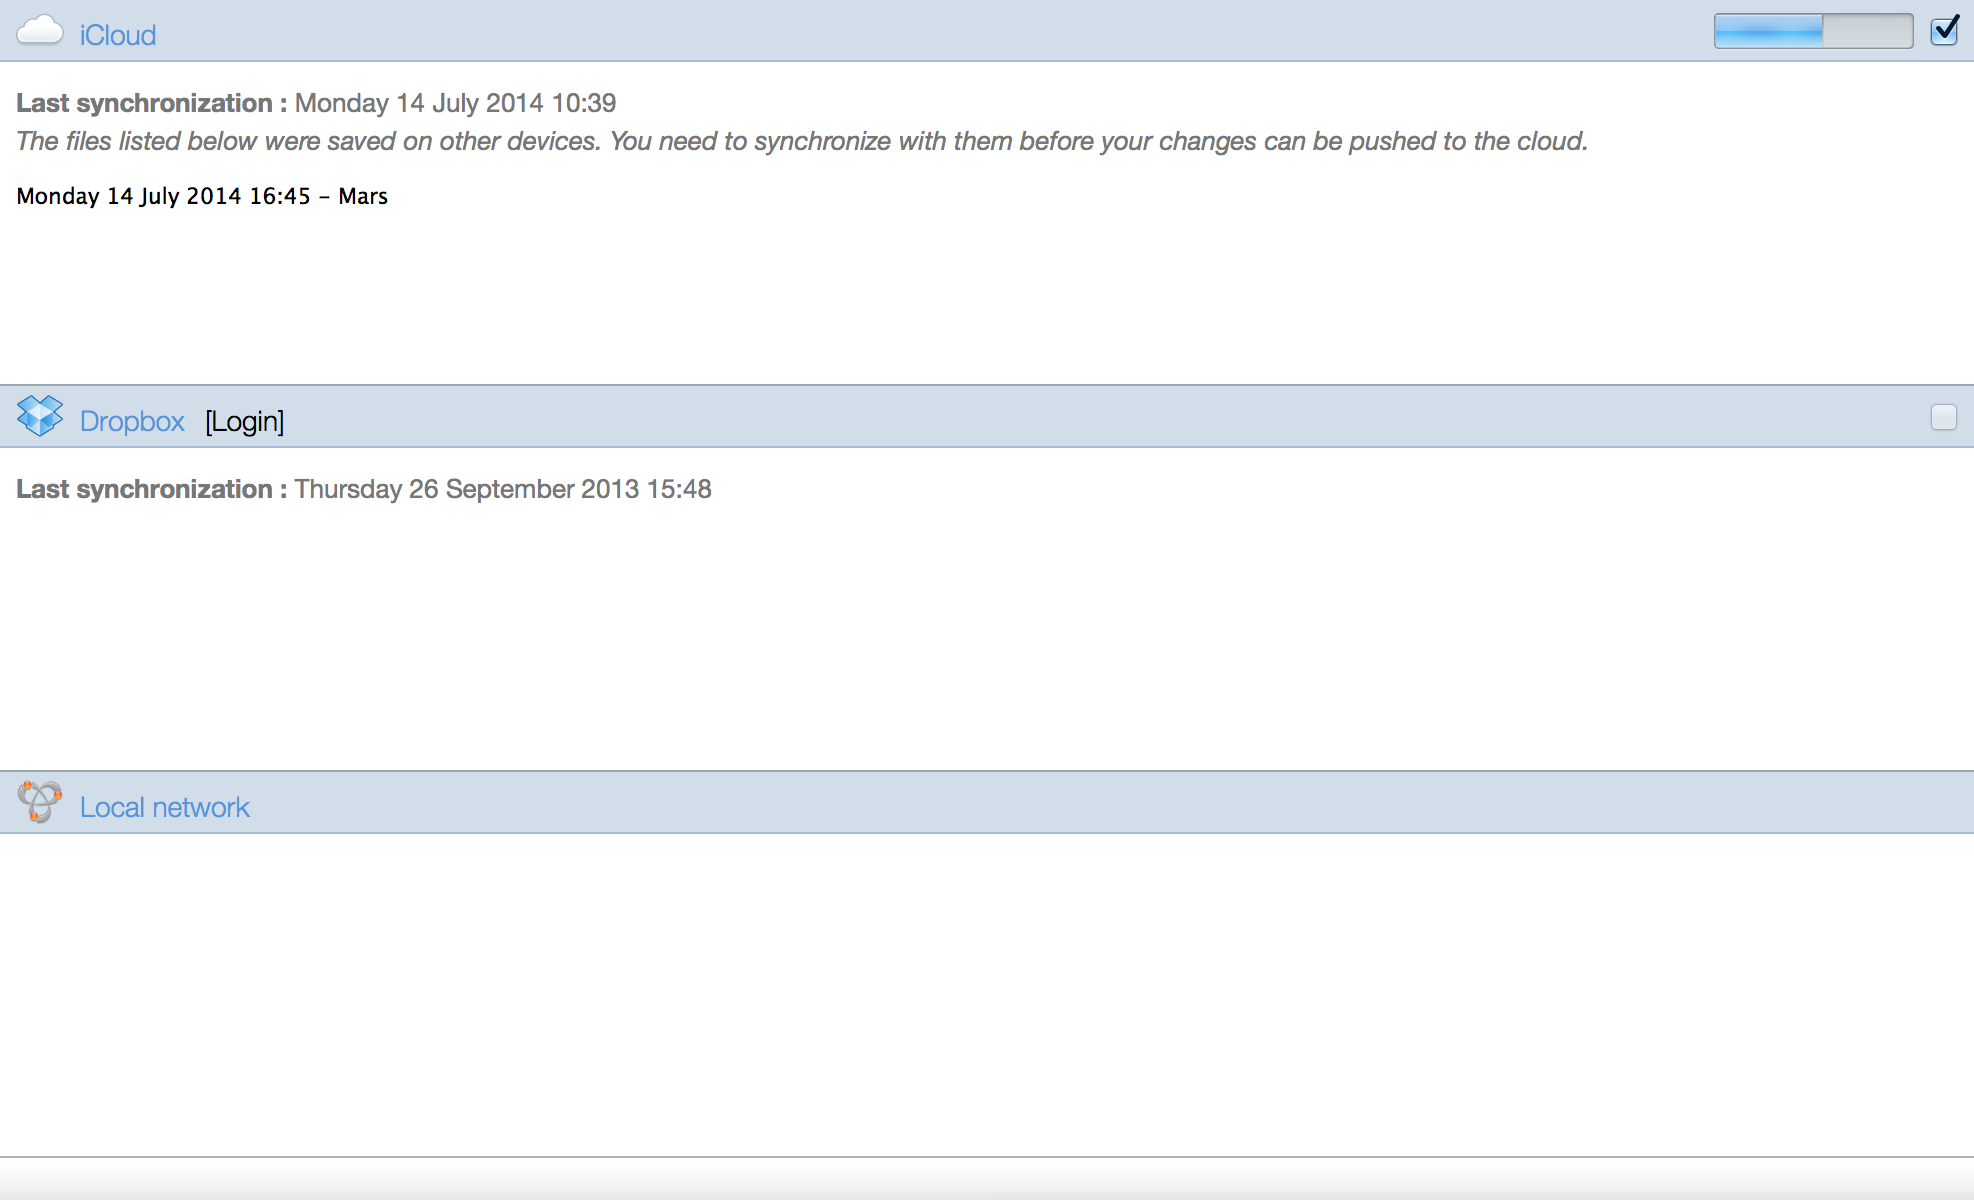
You can synchronize your document with other computers or mobile devices using iCloud, Dropbox or via the local network.
By default, iCloud or Dropbox synchronization is automatically performed in background but you can choose to do it manually in the preferences window.
iCloud
To allow iCloud synchronization you must be logged in iCloud in System Preferences and have activated "Documents & Data" if you have OS X 10.9 or "iCloud Drive" if you have OS X 10.10.
You can activate iCloud synchronization in the synchronization line in the left list. When activated, iCompta will send your document to iCloud when you save it. Now you can open this document on another device and make some changes. When you save on the other device, iCompta will be notified and will show a new line in the iCloud section. If the automatic synchronization is activated, the changes will be merged after a few moments otherwise you can double click on that line to start a synchronization with the modified data. The document won't be sent to iCloud even if you save it until all the other versions available have been processed.
Dropbox
To allow Dropbox synchronization you must have a Dropbox account and login to your account with the login button in the Dropbox line.
You can activate Dropbox synchronization in the synchronization line in the left list. When activated, iCompta will send your document to Dropbox when you save it. Now you can open this document on another device and make some changes. When you save on the other device, iCompta will be notified and will show a new line in the Dropbox section. If the automatic synchronization is activated, the changes will be merged after a few moments otherwise you can double click on that line to start a synchronization with the modified data. The document won't be sent to Dropbox even if you save it until all the other versions available have been processed.
If you use Dropbox synchronization the folder Applications/iCompta will be created in your Dropbox folder.
Step by step to activate Dropbox or iCloud synchronization
With either Dropbox or iCloud, you don't need to put your accounts file directly in iCloud or in the Dropbox folder. On the opposite keep it in your Documents folder for example because iCompta will handle sending the database in the cloud.
- Open your file and select the synchronization line in the left list.
- Activate iCloud or Dropbox synchronization (you can activate both but that would be useless and a waste of network bandwith).
- From now on iCompta will send your file to the cloud every time you click on the menu item (⌘S keyboard shortcut) on Mac or when you push the save button on iPhone / iPad. There is just an exception to this rule : if there are pending synchronizations (see the above paragraphs).
- When you save, iCompta will zip the database in the iCloud folder or in the Dropbox/Applications/iCompta folder so that it gets pushed in the cloud.
- So now you probably want to open that file in the cloud on other devices to make some changes.
- On Mac click on menu item and choose the one you just added.
- On iPhone or iPad go in the files browser and click on the iCloud or Dropbox button in the bottom toolbar and choose the one you just added.
- You can now make some changes on any device.
- When you save you should see a progress indicator on the right of the synchronization line.
- When it's over, it means that the file has been uploaded to the cloud.
- You should now see a progress indicator on the other device meaning that the synchronization data is being downloaded.
- When completed, the synchronization can finally begin and you should see your changes after a short amount of time.
In case of synchronization failure
Because of sandboxing, iCompta may not be able to open a file from the cloud to start synchronizing and in that case you see the following message :
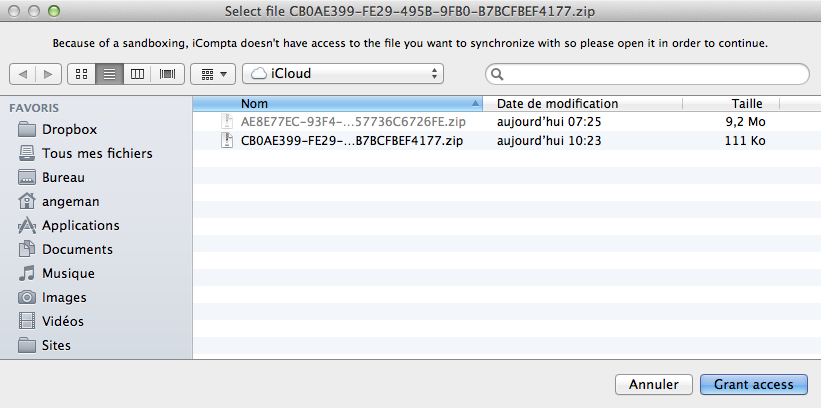
You just need to select the file and click on "Grant access".
The file chooser may also not be opened at the right location, thus preventing you to select the file. In that case, click on "Cancel", select the Synchronization line in the left list and finally select the version with an error. Hit the backspace key or click on menu item in order to cancel the synchronization with this version. Go back to the device from which this version came and save again. A new version should appear and synchronize without trouble this time.
Local network
To synchronize with other devices on your local network, iCompta must be launched and the synchronization line selected on each device. The available devices will be displayed in the local network section and you can double click one to start the synchronization process. An authorization dialog will appear on the other device if this is the first time. Unlike cloud synchronization, there are 3 different synchronization modes :
- Synchronize : changes on both sides will be merged.
- Send : the document on the other side will be overwritten.
- Get : the current document will be overwritten.
When iCompta is launched with the synchronization line selected on every device and all devices are connected to the same local network but yet you see no devices in the local network section, you should try to reboot your DSL box or WiFi router.
The synchronization changes window

When synchronizing with latest data on the cloud or another device through the local network, iCompta always does the same thing. First it will get the data and compare with the current data to see what is different. Then it will present you a list of changes between the 2 documents with the current value on the left and the value in the other document on the right. The most recent value is automatically selected and the other one is dimmed. You can click on the other value to choose it instead.
Professional features
You can enable professional features in the preferences window.
Managing taxes
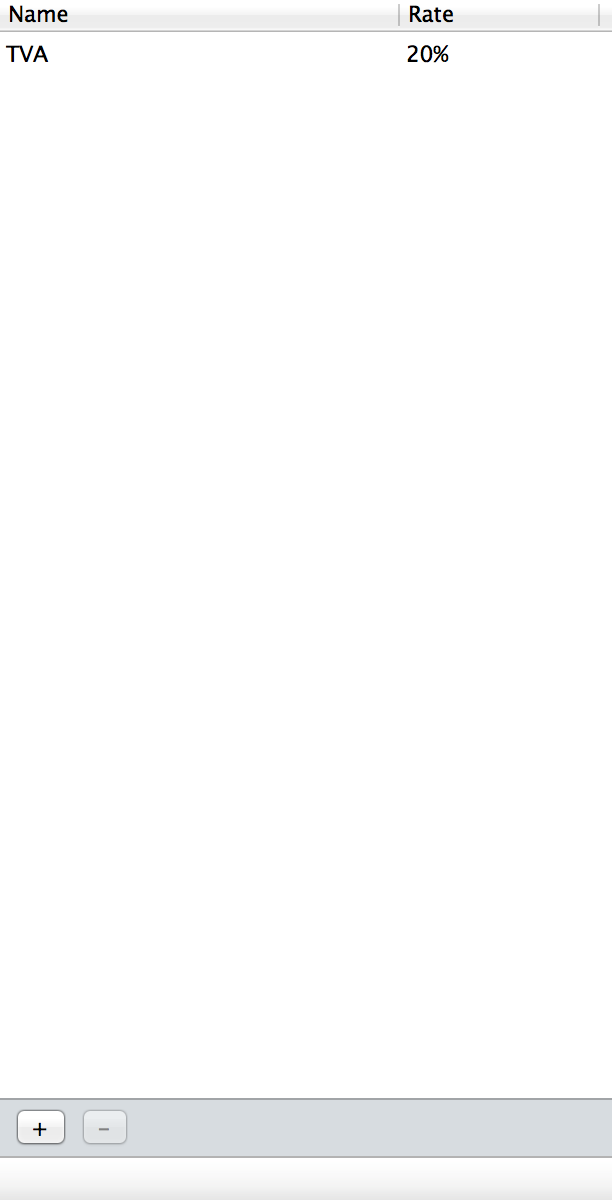
You can add or remove taxes by selecting the taxes line in the left list.
Managing clients
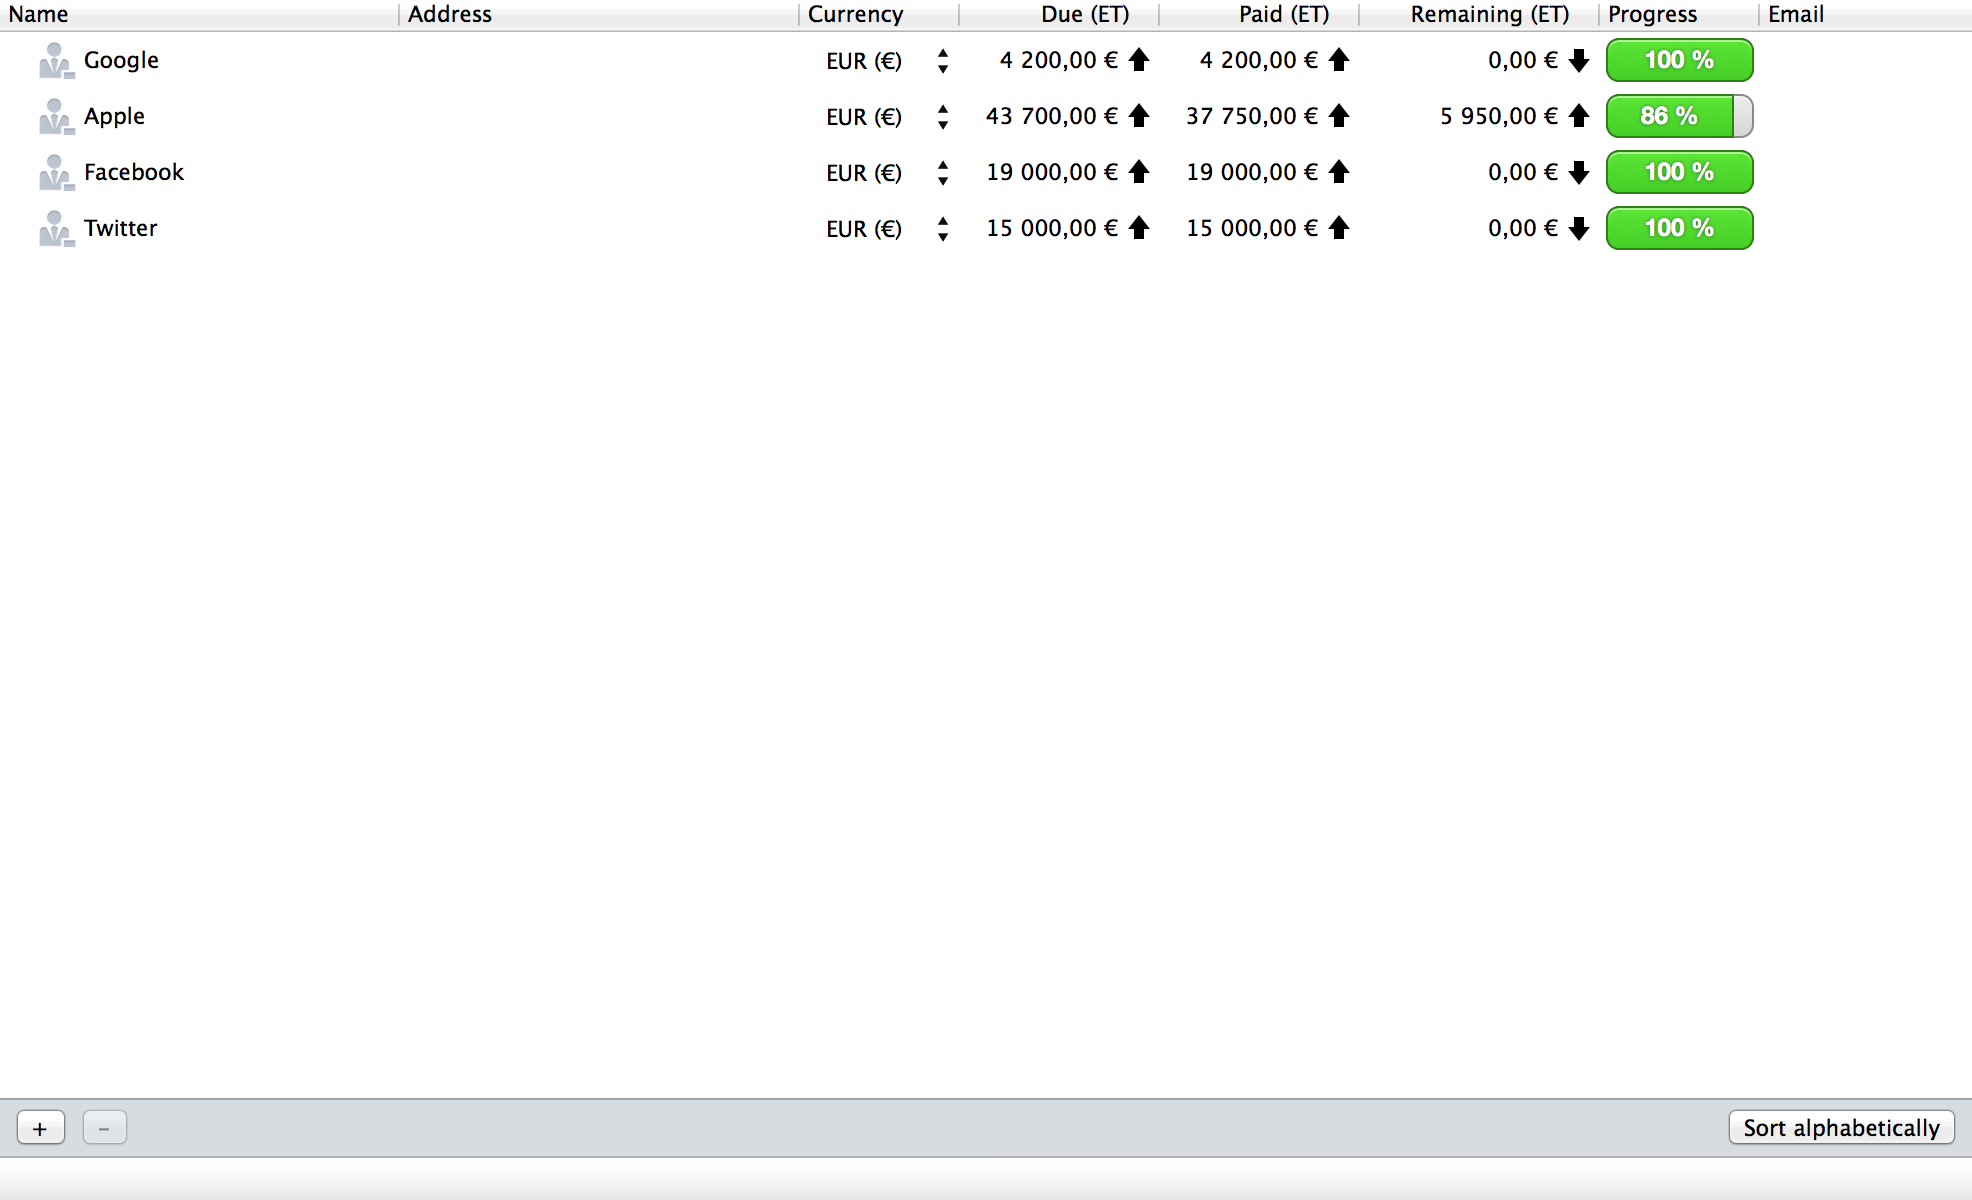
You can add or remove clients by selecting the clients line in the left list.
The amount a client has still to pay is displayed on his or her line along with a progress bar.
Making invoices
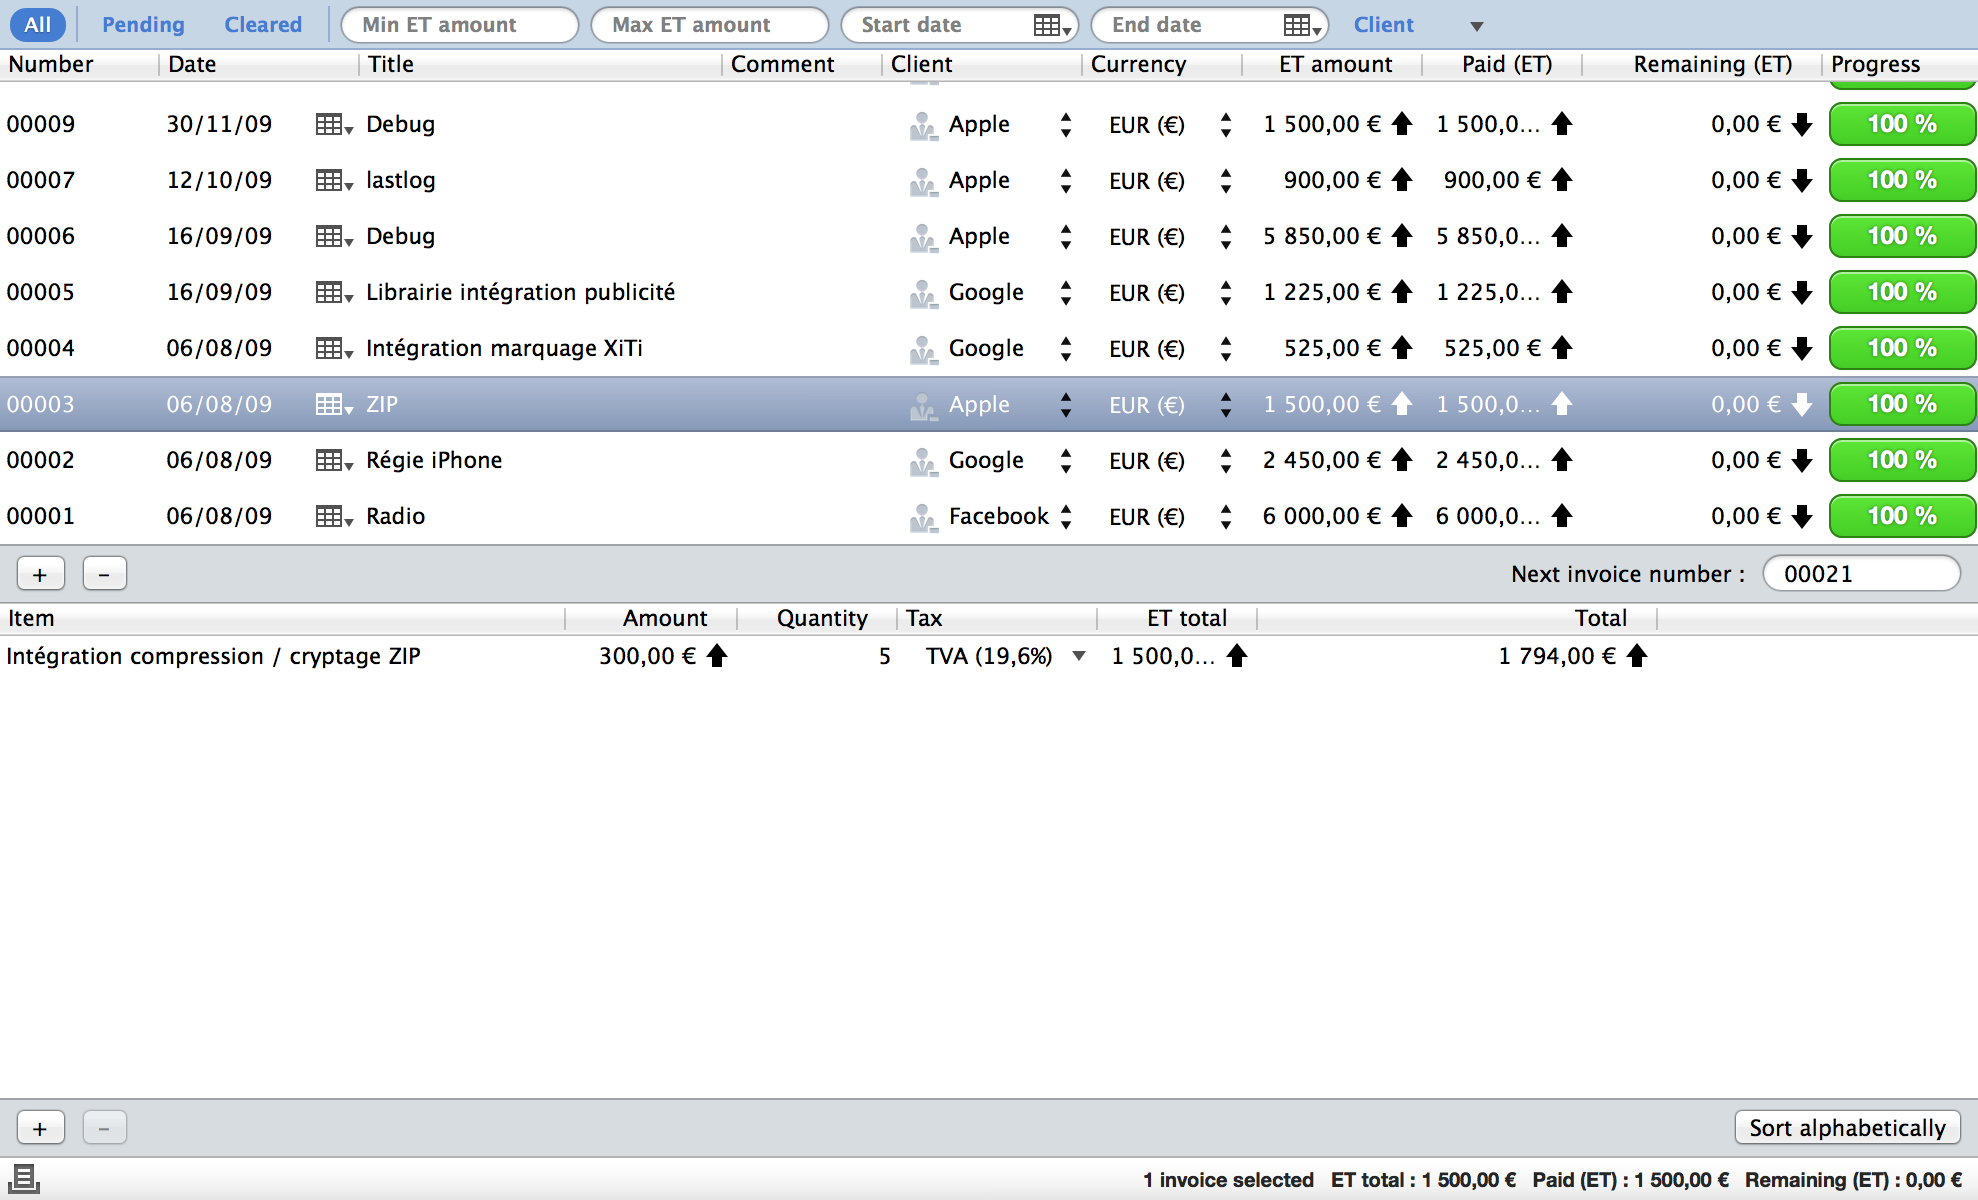
You can add or remove invoices by selecting the invoices line in the left list.
You can print or email an invoice by right clicking on it. To do so you have to create an invoice template first by clicking on the templates button under the invoices list. Invoice templates should be written in HTML and are processed with MGTemplateEngine (Credits to Matt Gemmell). You can find more information on the syntax of the template engine here.
Making a taxes report
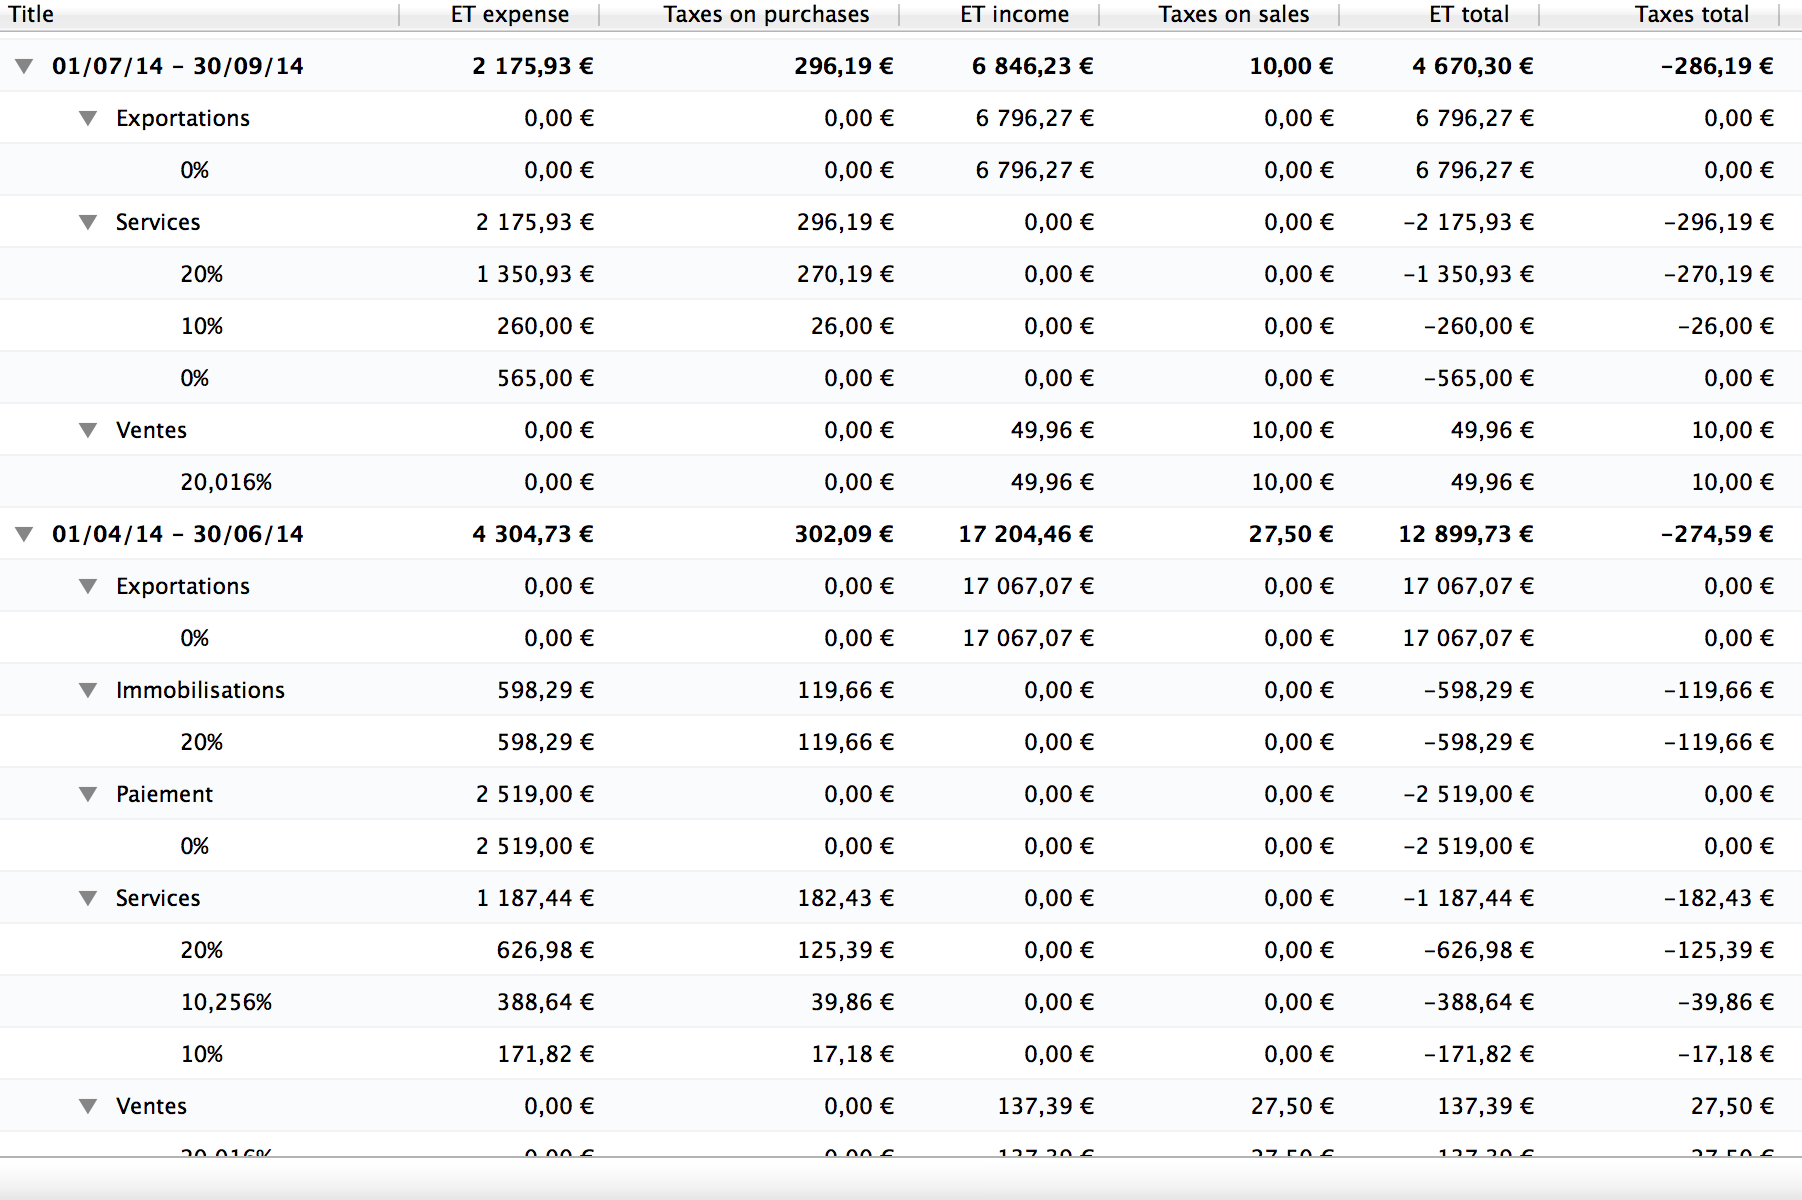
You can create a new report by clicking on the menu item. A taxes report is like a splits report but grouped by taxes category.
